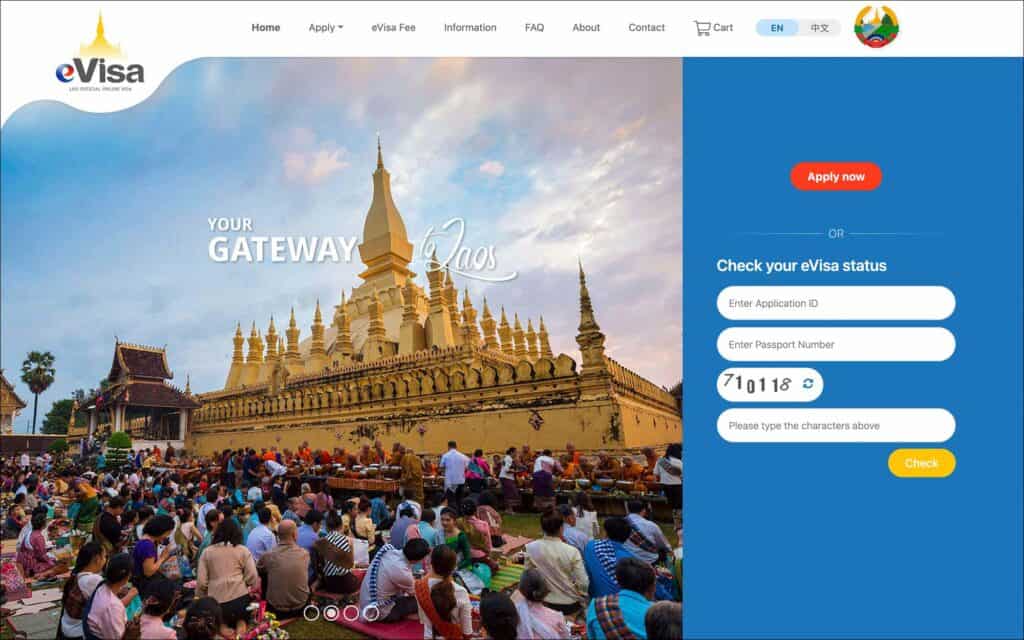
To apply for Laos eVisa, all you need is a digital photo, a passport scan and a credit card for visa fee payment.
It takes about 15 minutes to fill out and submit the online application. It takes about 3 working days to receive your approved eVisa.
If you haven’t already, read the Laos eVisa article for details on visa validity, processing time, and photo requirements. Then follow along with this step-by-step guide to fill out your Laos eVisa application, track your status and download your approved eVisa.
Table of Contents
***
Documents needed to apply for Laos eVisa
Before starting your Laos eVisa online application, have these documents ready.
- Original passport with at least 6 months validity from the intended date of arrival in Laos
- Digital passport-size photo with the following specification
- Photo must be in JPG, JPEG or PNG format only
- Photo must be less than 10MB in size
- Scan of your passport ID/biodata page
- Scan must be in JPG, JPEG or PNG format only
- Scan must be less than 10MB in size
- Credit/debit card for visa fee payment
***
Steps for filling out Laos eVisa application
01. Start
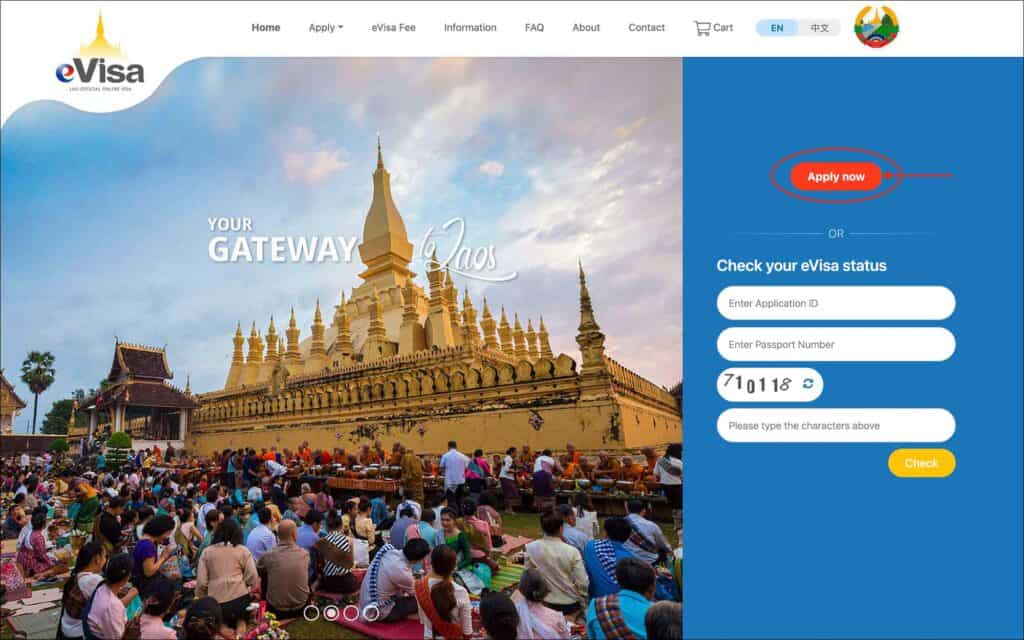
- Go to the Laos eVisa Portal
- If an “Important Notice!” popup is shown, read the instructions and click the blue “I Agree” button to close the popup
- Click on the red “Apply now” button
You will be taken to the “Security Verification” page.
02. Security Verification
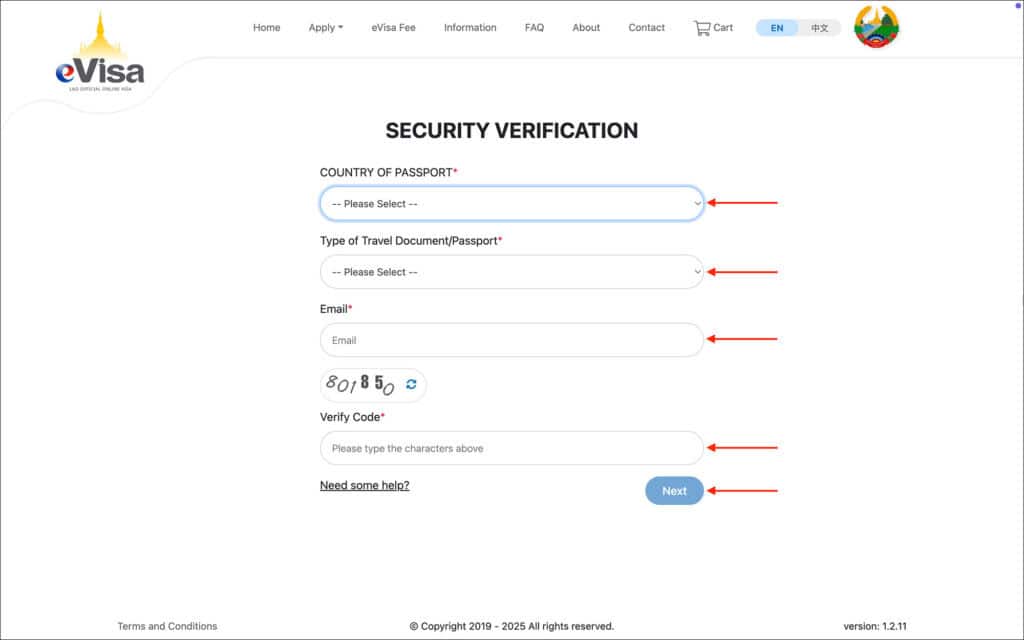
Enter the following information in the “Security Verification” page.
- Email [Comment: Enter the email where you would like to receive your approved Laos eVisa]
- Captcha [Comment: Enter the numbers shown in the captcha]
Click on the blue “Next” button.
You will be taken to the “Verification” page
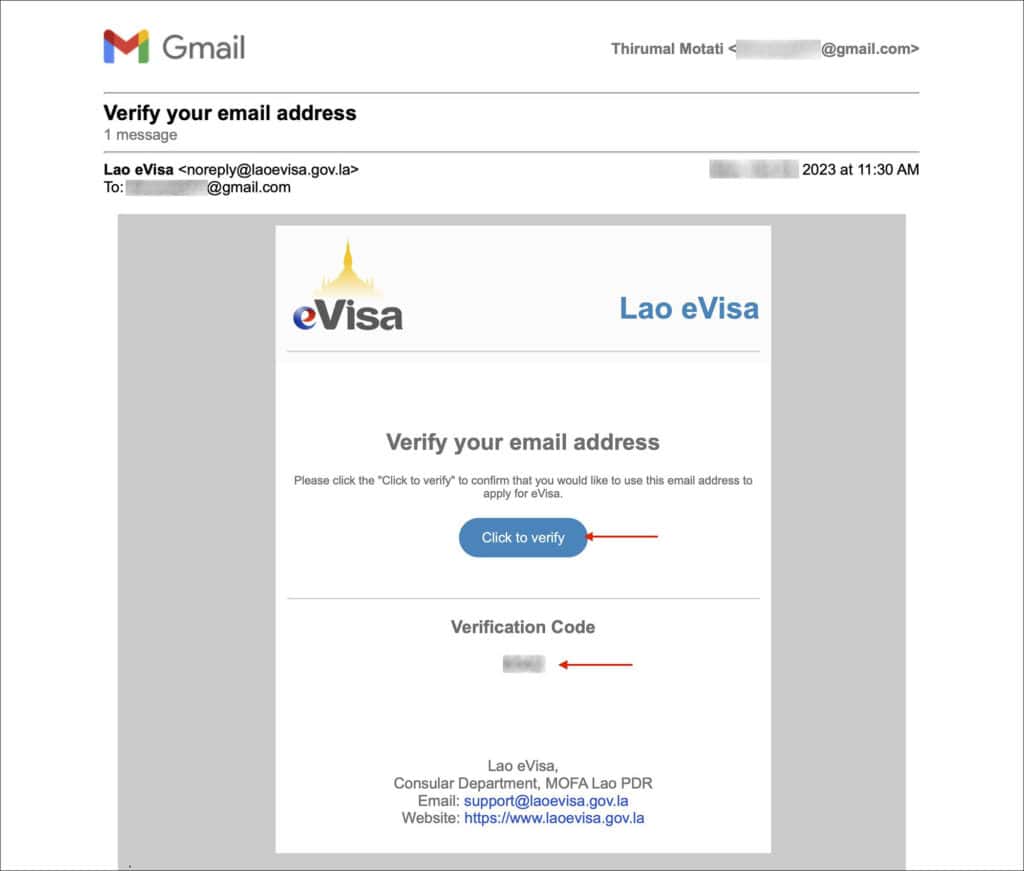
Now, check your email inbox. You will receive a 4-digit code in your email.
03. Verification
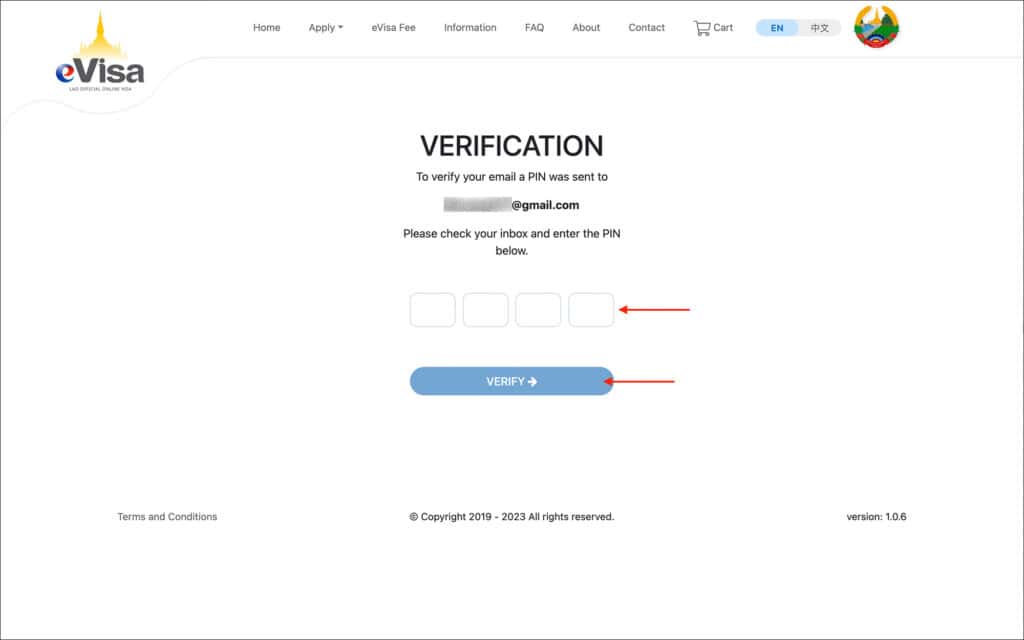
On the “Verification” page, enter the 4-digit code from your email in the boxes provided.
Click on the blue “VERIFY ->” button
You will be taken to the “Personal Information” page.
04. Personal Information
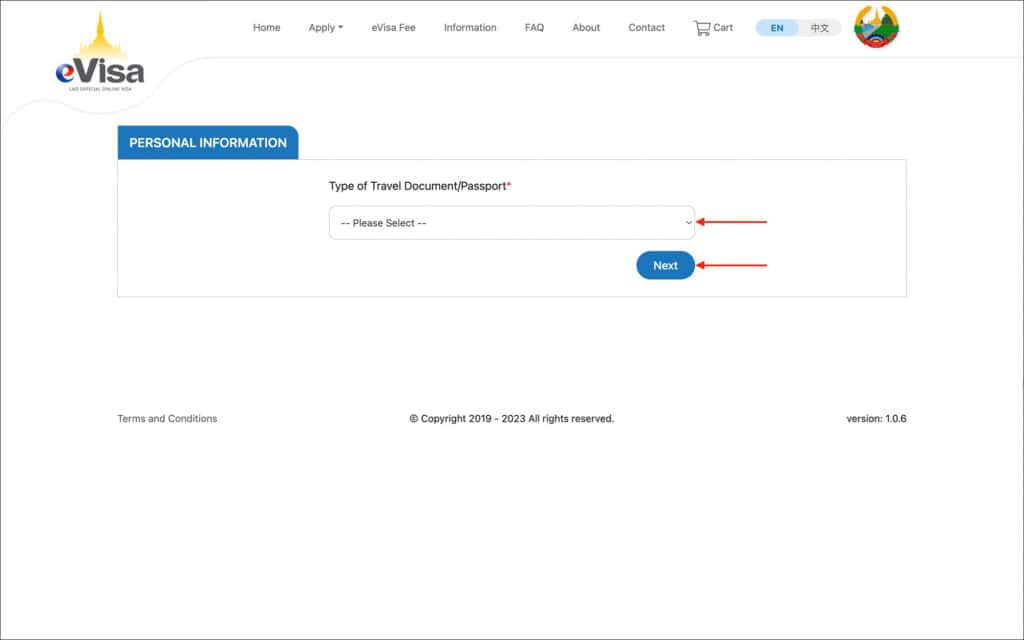
Enter the following information on the “Personal Information” page.
- Type of Travel Document/Passport [Comment: Select “Ordinary” from the options]
- [OPTIONS]
- Ordinary
- Diplomatic
- Service/Special/Official
- Travel Document of Stateless Person
Once you select “Ordinary” passport from the options, you will be taken to the next page to upload your documents and enter your personal details.
Section: PERSONAL INFORMATION
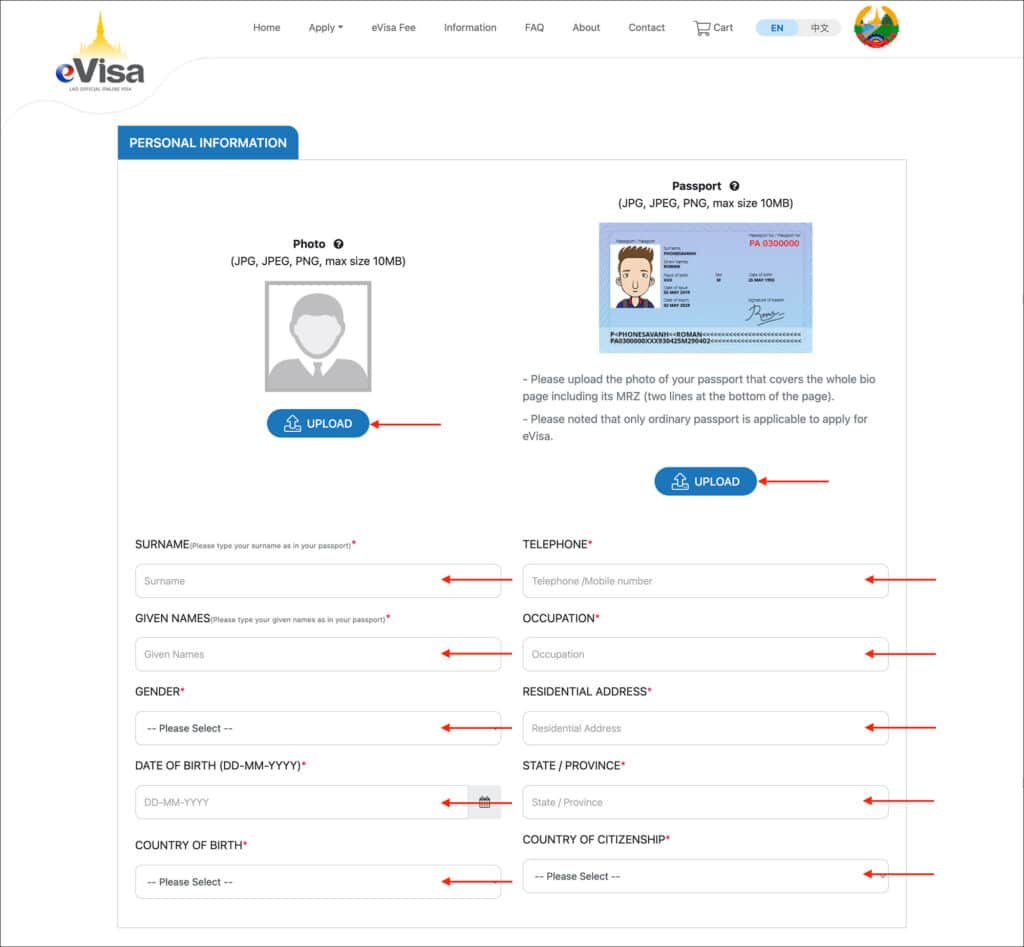
Upload your photo, and passport scan and enter your personal details in this section.
Photo
Follow the below instructions to upload your photo.
- Click on the blue “UPLOAD” button.
- A popup with instructions will appear.
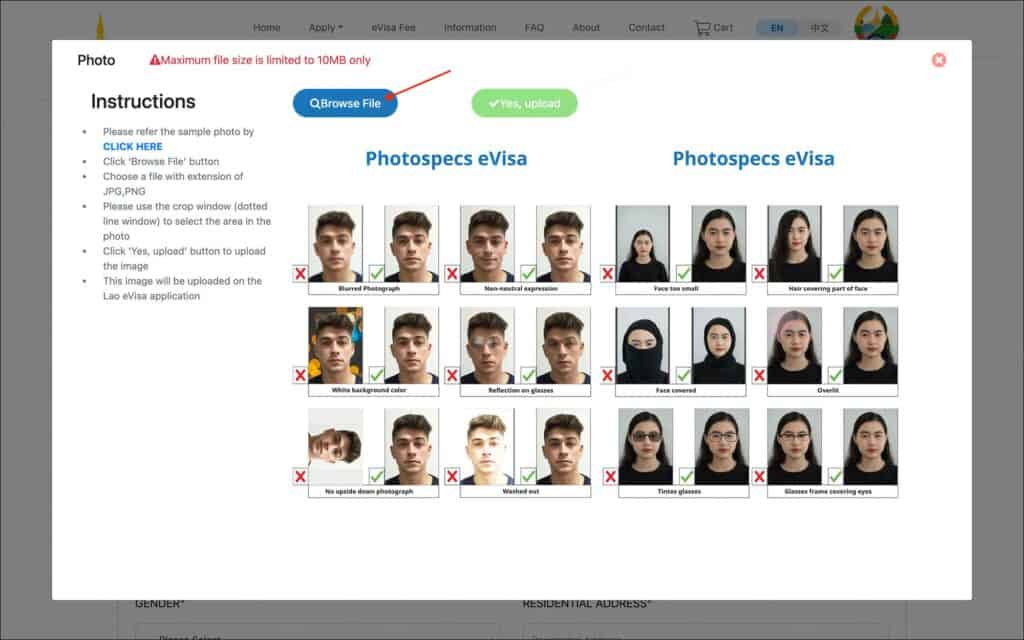
- Click on the blue “Browse File” button to upload a digital photo
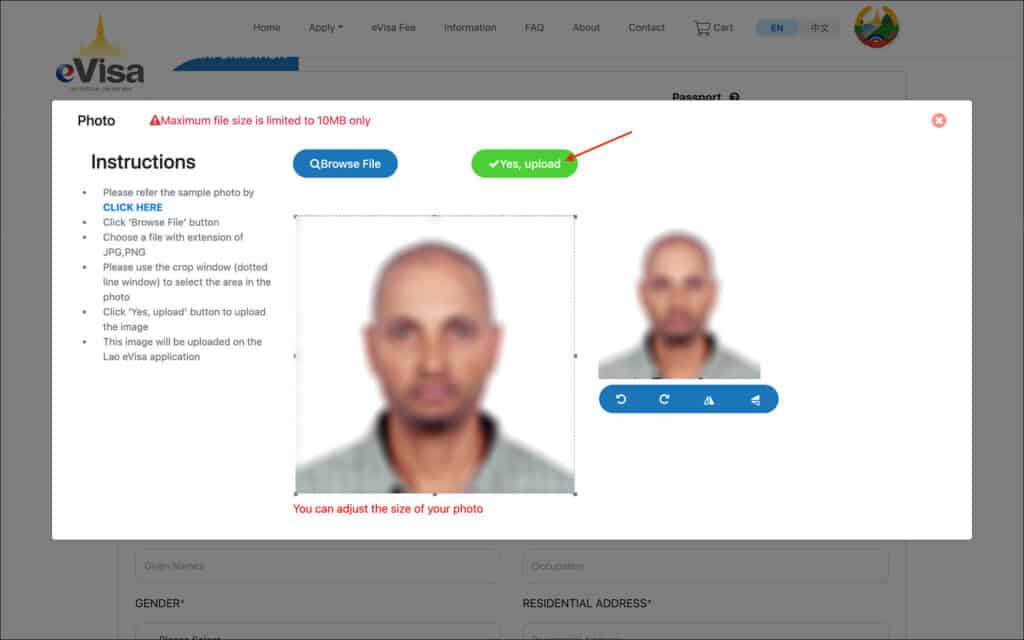
- If needed, adjust the photo using the dotted lines
- Then, click on the green “Yes, upload” button.
Passport
Follow the below instructions to upload your passport scan.
- Click on the blue “UPLOAD” button.
- A popup with instructions will appear.
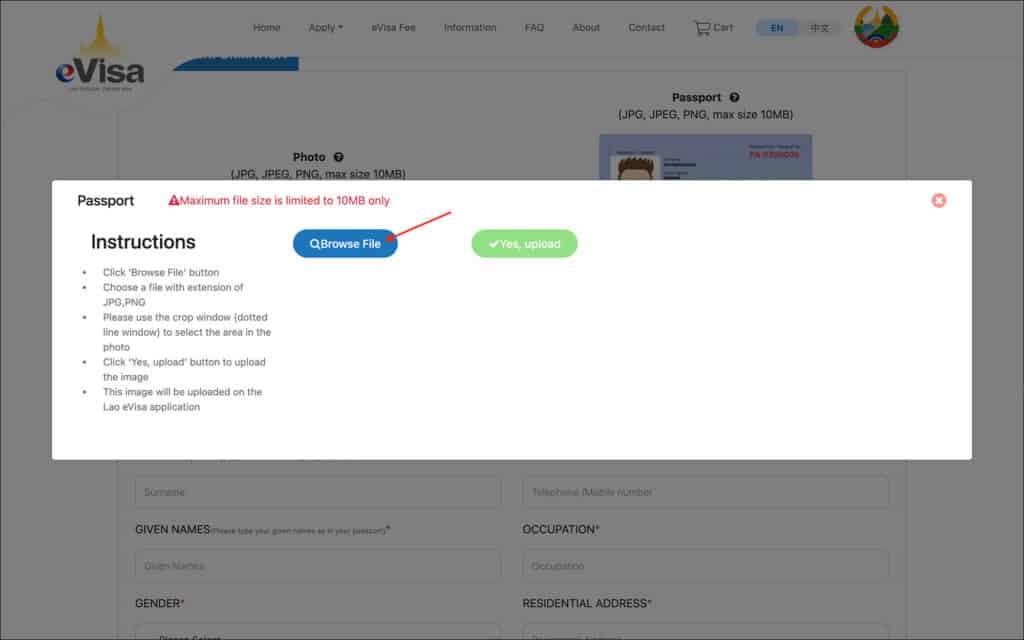
- Click on the blue “Browse File” button to upload a scan of your passport bio page
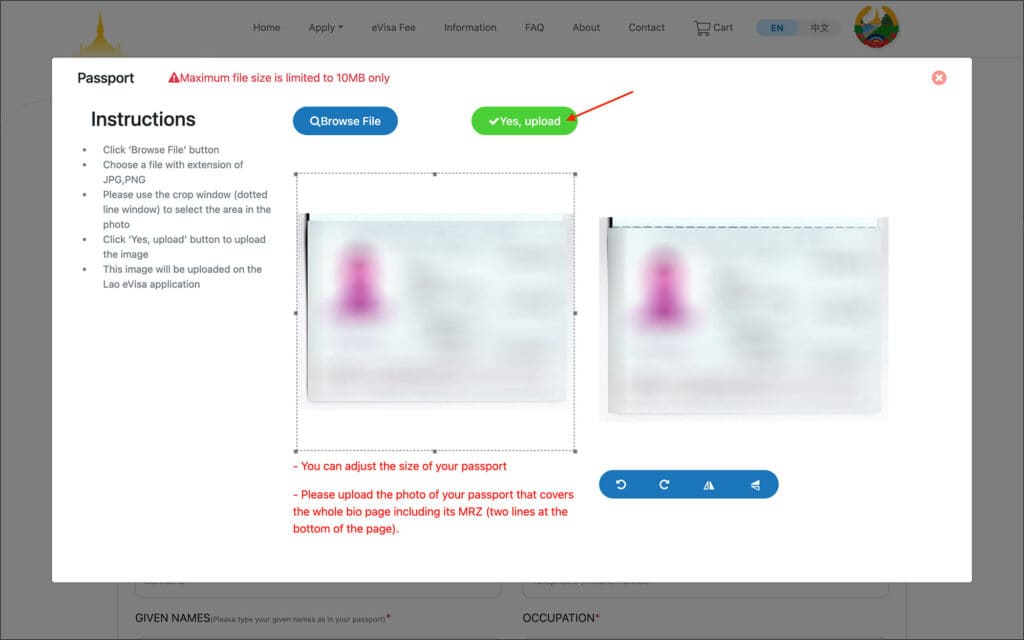
- If needed, adjust the scan using the dotted lines
- Then, click on the green “Yes, upload” button.
After uploading your photo and passport scan, enter the following personal details.
- Surname [Comment: Enter your surname as it appears in your passport]
- Given Names [Comment: Enter your given names as they appear in your passport. If you have a middle name, combine your first and middle together and enter here.]
- Gender [Comment: Select your gender either Male or Female]
- Date of Birth [Comment: Enter your date of birth as it appears in your passport in DD-MM-YYYY format]
- Country of Birth [Comment: Enter your country of birth as it appears in your passport]
- Telephone [Comment: Enter your cell phone number where you can receive calls]
- Occupation [Comment: Enter your current occupation such as doctor, engineer, freelancer, etc.]
- Residential Address [Comment: Enter your current residential address]
- State/Province [Comment: Enter the state or province of your residential address]
- Country of Citizenship [Comment: Enter your country of citizenship as per your passport]
Section: PASSPORT DETAILS
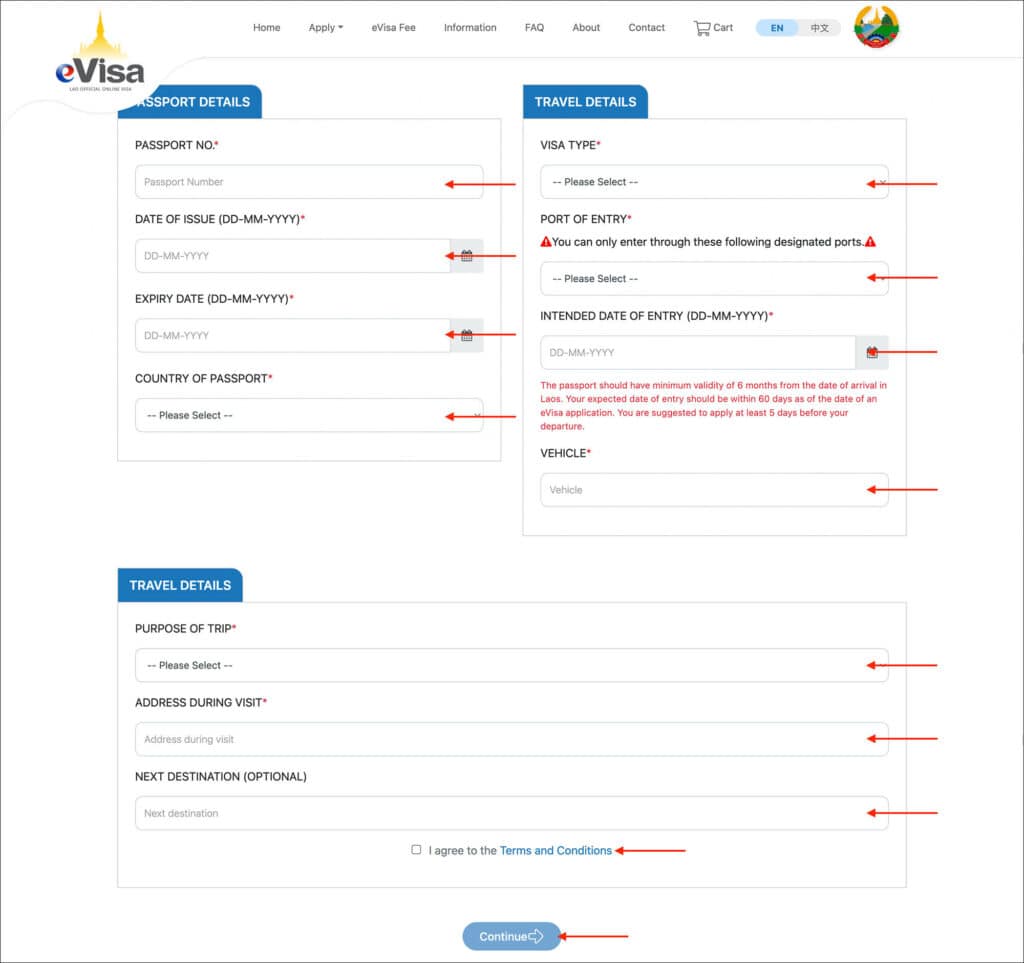
Enter your passport details in this section.
- Passport No. [Comment: Enter your passport number]
- Date of Issue [Comment: Enter your passport date of issue]
- Expiry Date [Comment: Enter your passport expiration date]
- Country of Passport [Comment: Enter the country of your passport]
Section: TRAVEL DETAILS
Enter your visa details in this section.
- Visa Type [Comment: Select “Tourist” from the options]
- Port of Entry [Comment: Select your intended port of entry from the options]
- [OPTIONS]
- Wattay International Airport (Vientiane Capital)
- Luang Prabang International Airport (Luang Prabang Province)
- Pakse International Airport
- Lao-Thai Friendship Bridge I (Vientiane Capital)
- Lao-Thai Friendship Bridge II (Savannakhet Province)
- Boten International Checkpoint
- Lao-Thai Friendship Bridge IV
- Boten Railway Station
- Intended Date of Entry [Comment: Enter your intended date of entry into Laos in DD-MM-YYYY format]
- Vehicle [Comment: If you will be flying into Laos, enter “Flight”. If you will be entering by train, enter “Train” and if by bus/taxi enter “Public Transport”. If you will be driving into Laos, enter the vehicle number of the car or motorbike.]
Section: TRAVEL DETAILS
Enter your trip details in this section.
- Purpose of Trip [Comment: Enter “Travel” from the options]
- [OPTIONS]
- Travel
- Visit
- Other
- Address During Visit [Comment: Enter the first hotel address where you will stay during your trip]
- Next Destination (optional) [Comment: Since this is an optional field, you can leave it blank. Or, if you will be traveling to multiple countries, enter the next country after Laos]
NOTE: Address During Visit
Do not book a non-refundable hotel. Just book a refundable or pay-at-check-in hotel to use their address in the visa application.
Check the box to agree to the Terms and Conditions and click on the blue “Continue ->” button.
05. Review
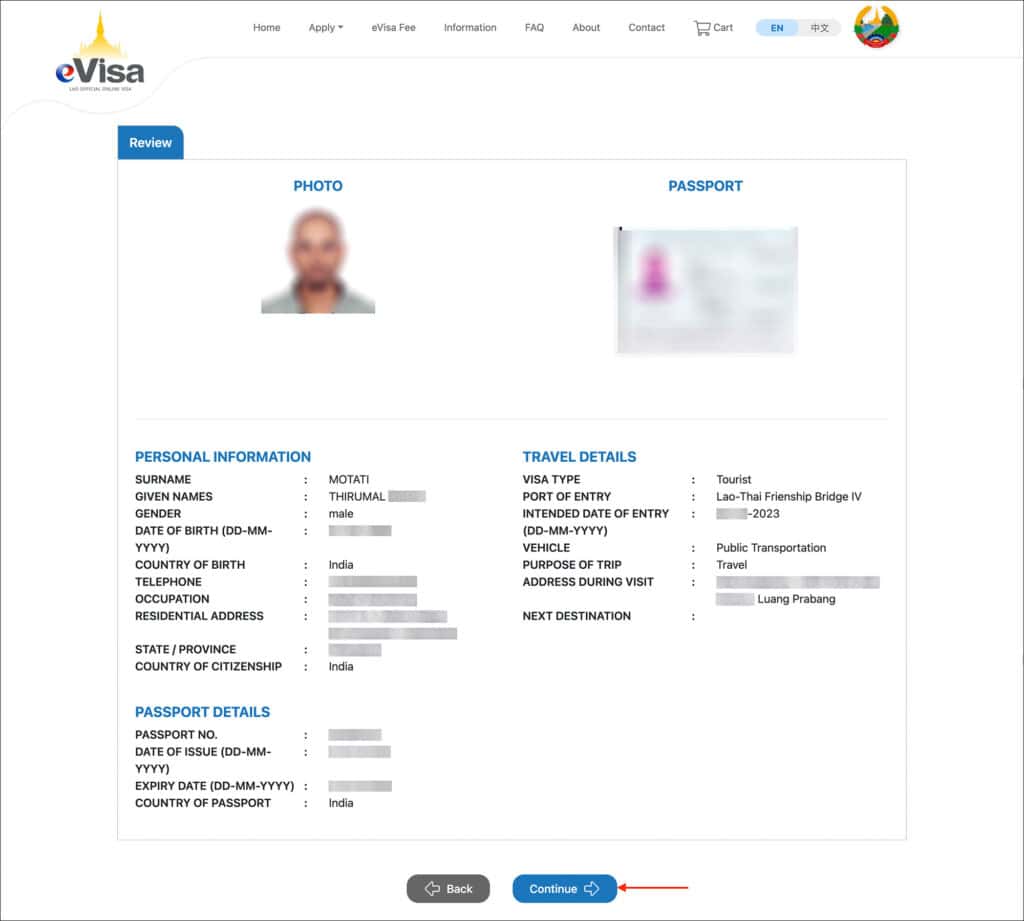
Review the information you have entered so far and make sure it’s correct and accurate.
If all the information is correct, click on the blue “Continue ->” button.
06. Cart
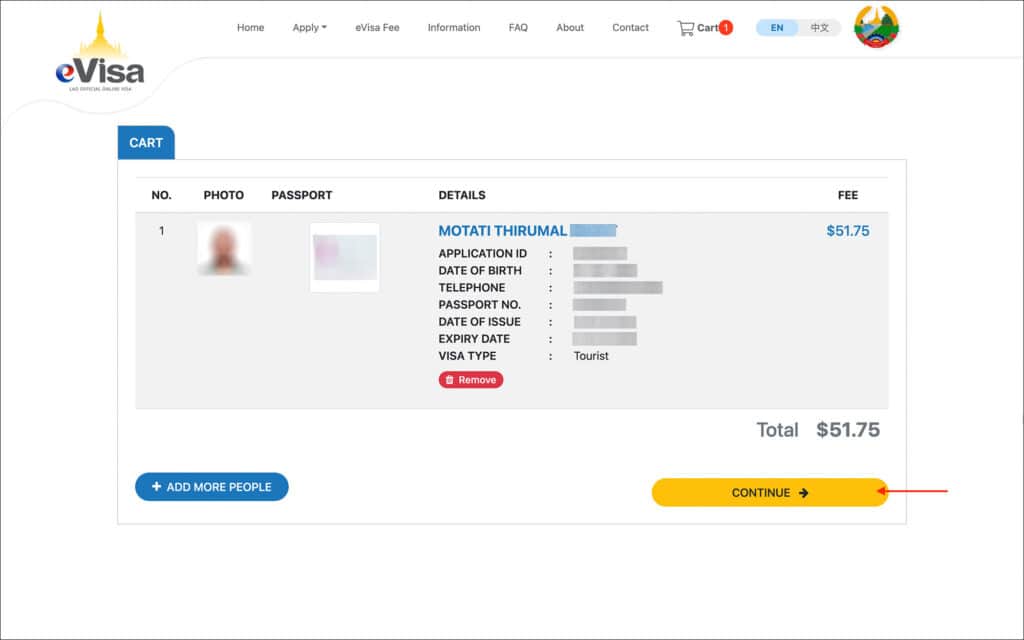
On this page, you will see your visa application and the total fee.
If you have any family members traveling with you, you can create applications for them using the blue “+ ADD MORE PEOPLE” button.
After adding your family members, click on the yellow “CONTINUE ->” button.
07. Payment Review
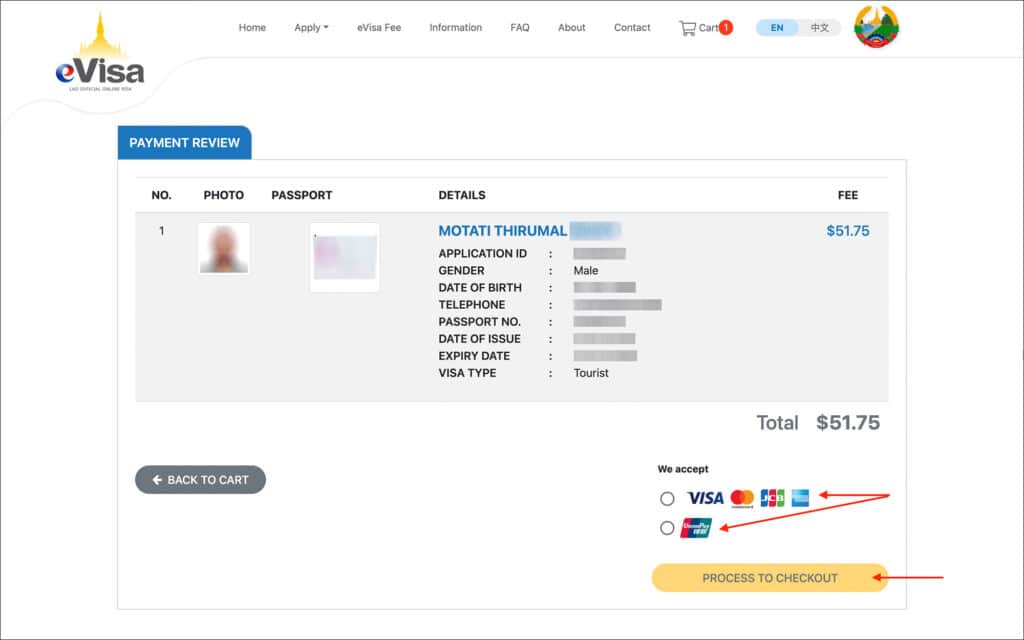
On this page, select the payment option that works for you.
Click on the yellow “PROCESS TO CHECKOUT” button.
A “Payment Confirmation” popup will appear. Click on the red “Pay” button.
08. Payment Form
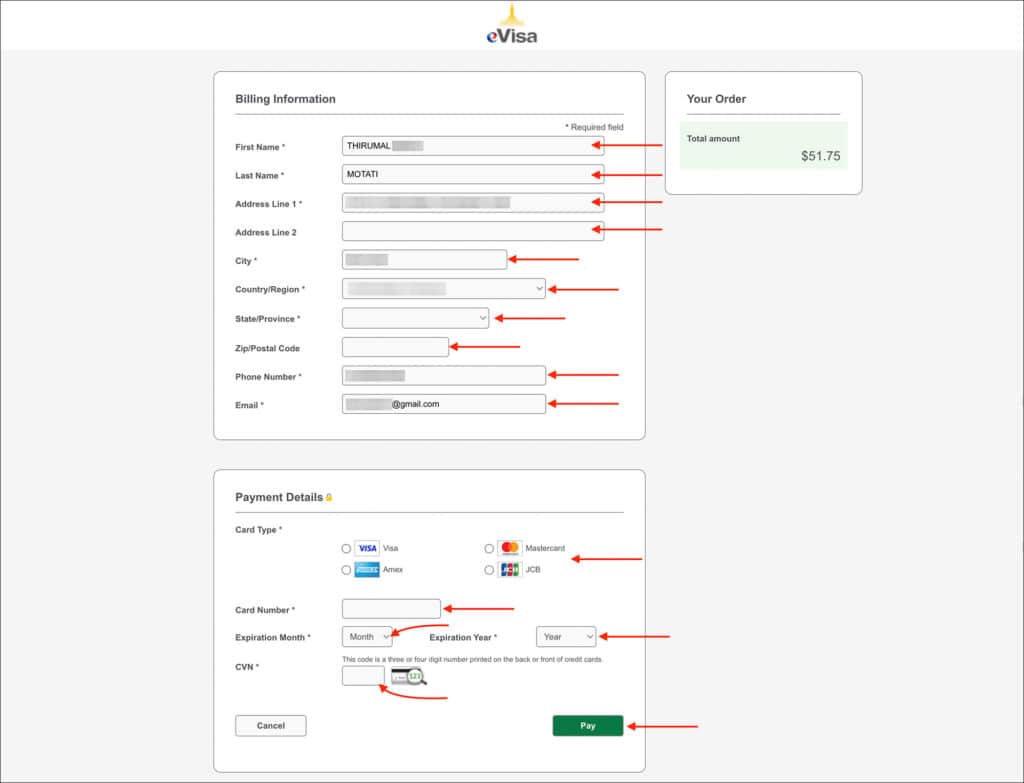
On this page, enter your billing address and credit card information.
Click on the green “Pay” button.
09. Payment Successful
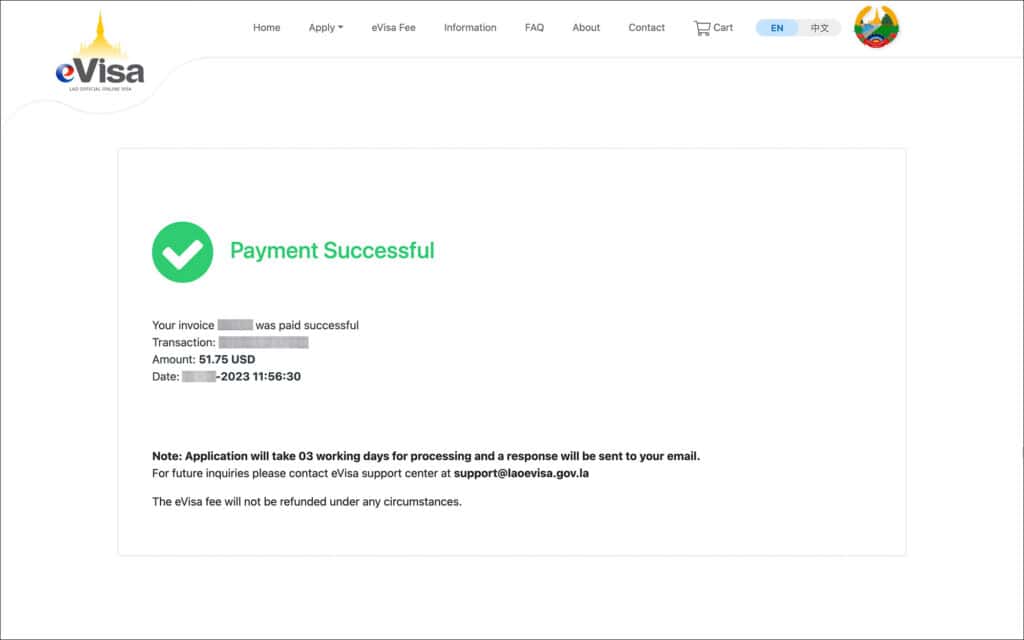
A “Payment Successful” page will appear.
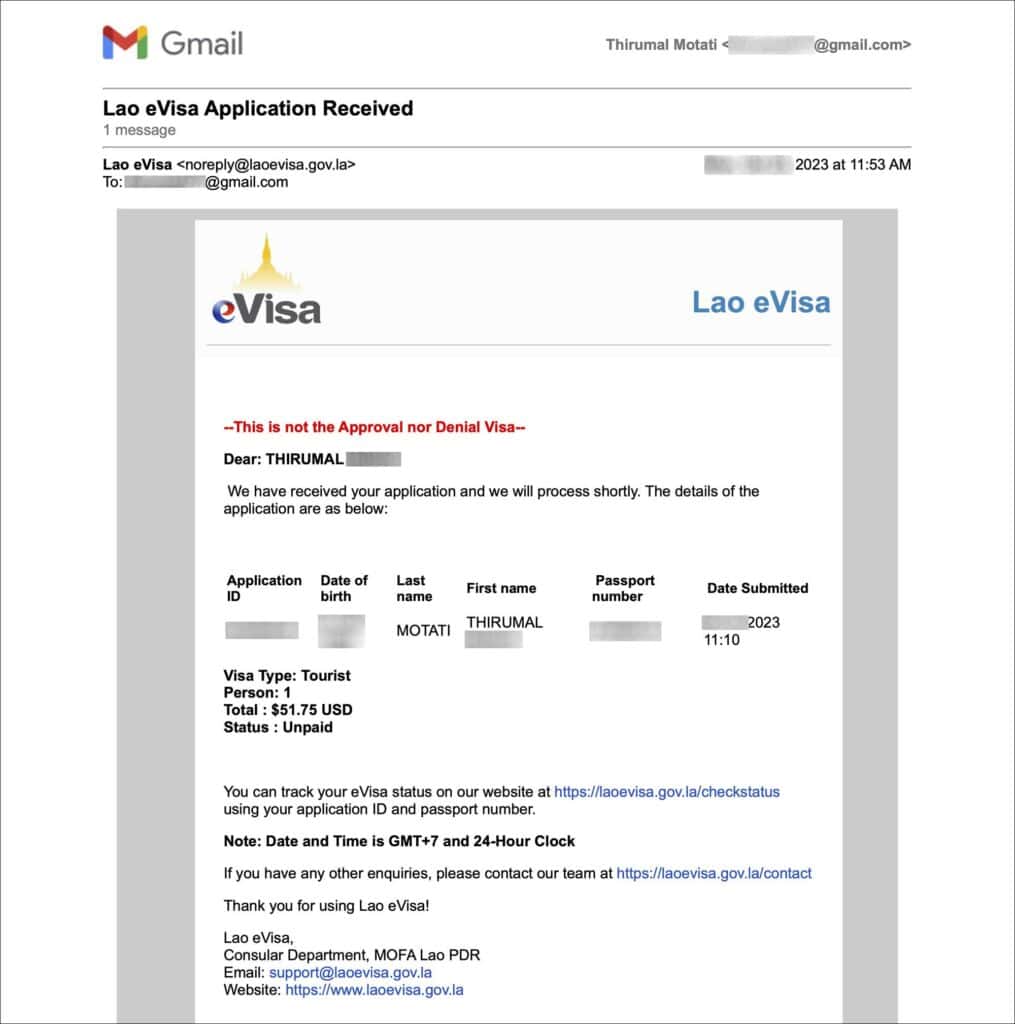
You will receive an email confirming your successful application submission.
***
Track your Laos eVisa application status
Follow the below steps to check the status of your Laos eVisa application.
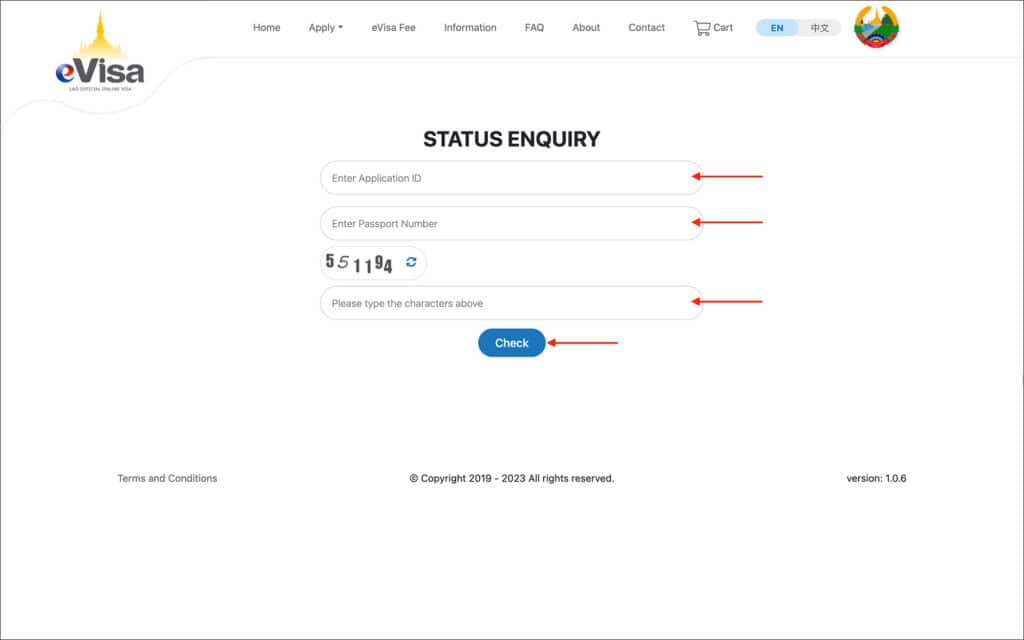
- Go to the Laos eVisa Status Enquiry page
- Enter your Application ID, Passport Number and Captcha
- Click on the blue “Check” button
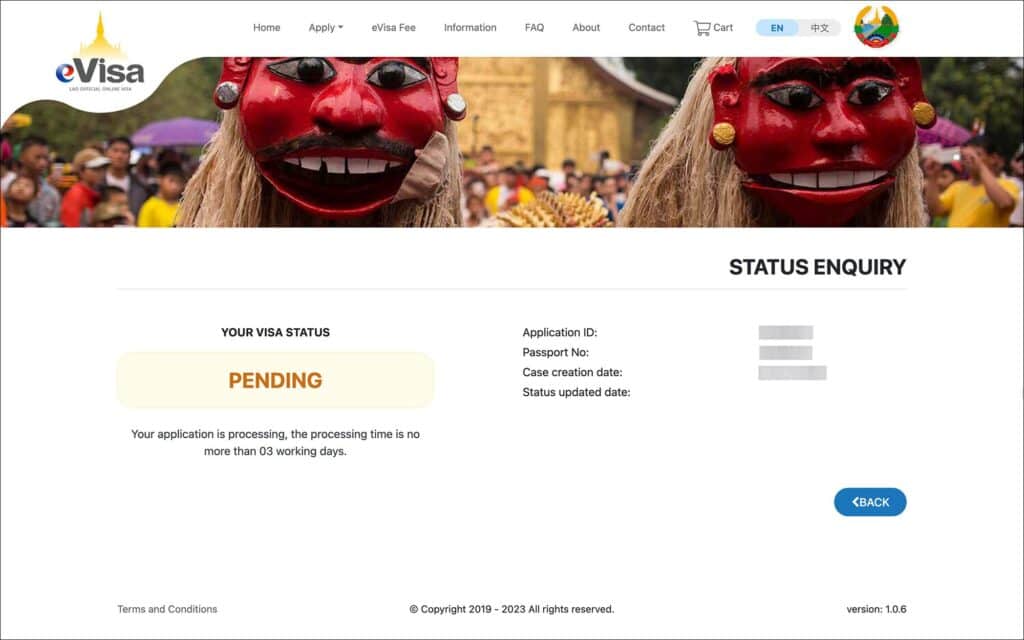
If the application status is “PENDING” then your application is still under process.
If the application status is “APPROVED” then your application is approved.
***
Download your approved Laos eVisa
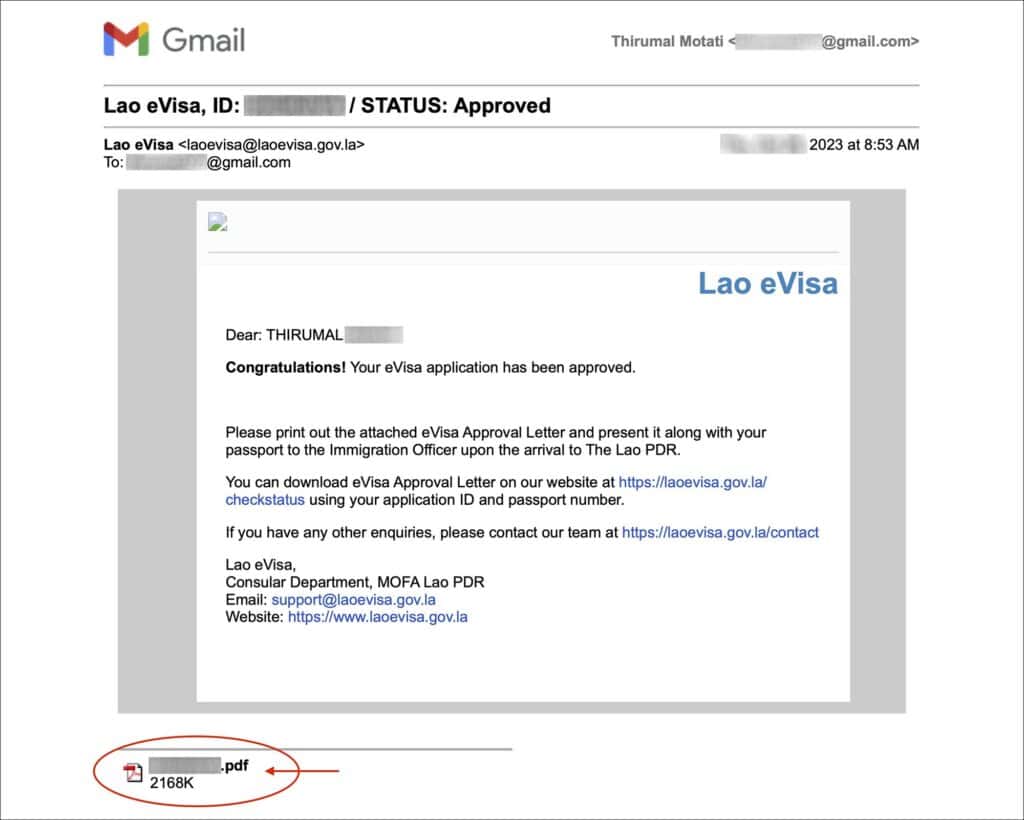
When your Laos eVisa is approved, you will receive an email confirmation with your approved eVisa attached to the email.
You can download the attachment and print it.
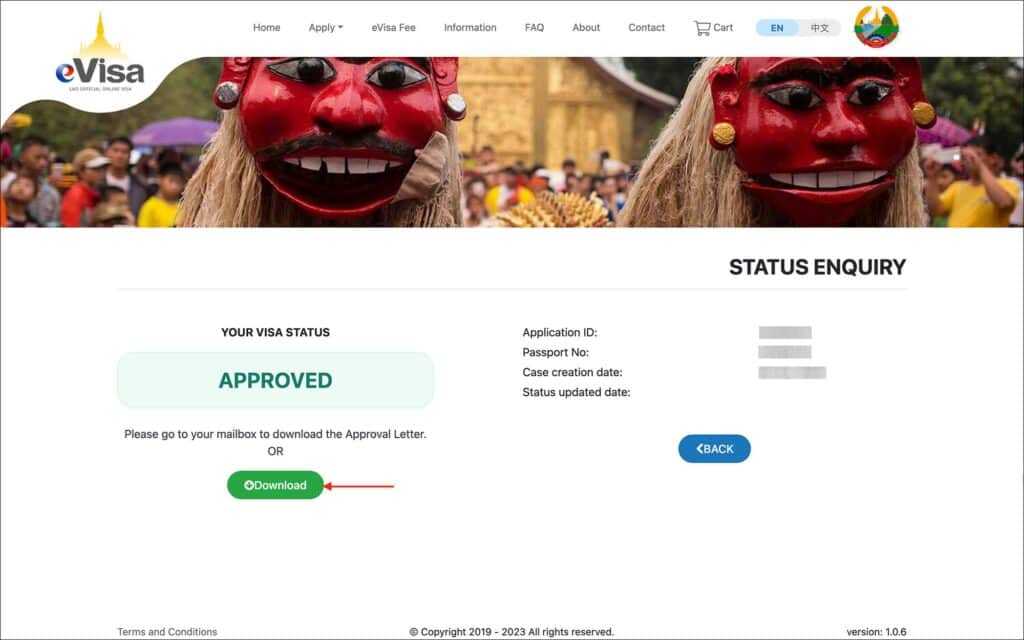
You can also download your approved Laos eVisa from the “Status Enquiry” page.
Follow the below instructions to download your Laos eVisa from the “Status Enquiry” page.
- Go to the Laos eVisa Status Enquiry page
- Enter your Application ID, Passport Number and Captcha
- Click on the blue “Check” button
If the application status is “APPROVED”, you will see a green “Download” button. Click on this “Download” button to download your approved Laos eVisa.
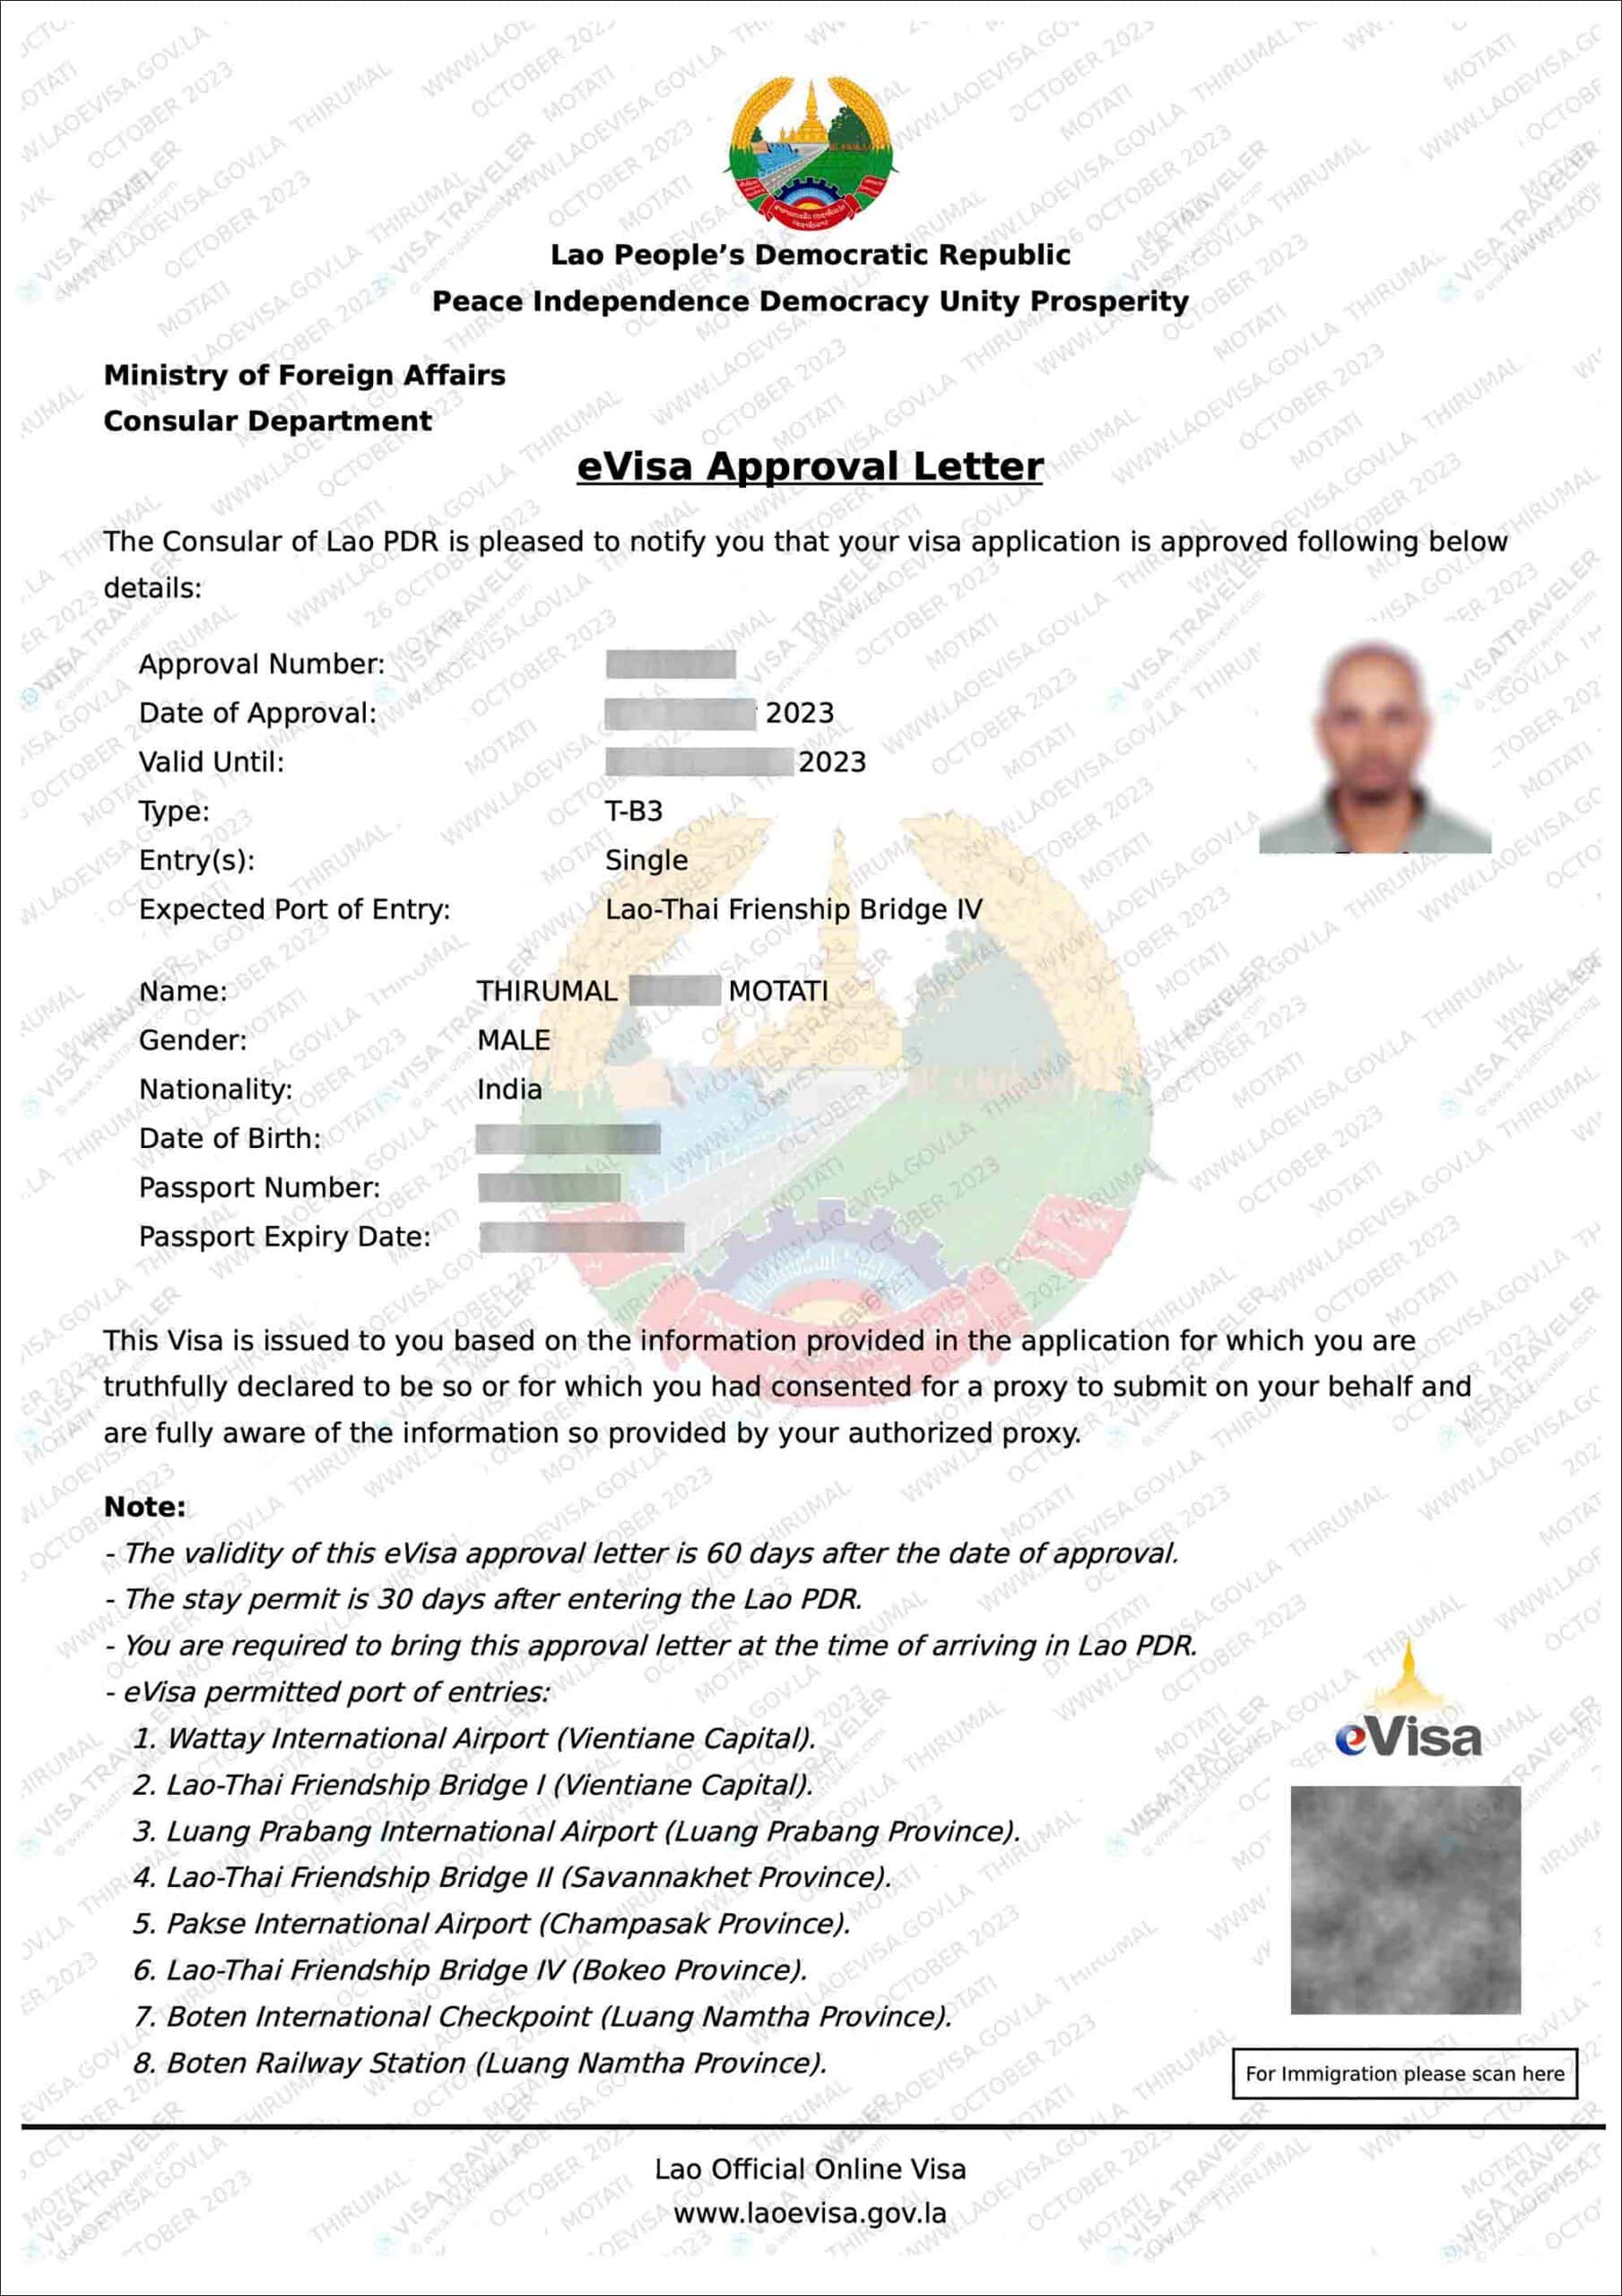
Print your Laos eVisa on an A4 or letter-size paper. The immigration in Laos insists on seeing an eVisa print rather than a copy on your phone. So make sure to carry a print of your approved Laos eVisa.
***
If for some reason, your eVisa is not approved in time, you can also obtain Visa on Arrival at the airport or land border. Read the Laos visa guide for details on different visa types and their application procedures.
That’s it guys! This is the step-by-step guide on how to apply for Laos eVisa. If you’re having trouble filling out the application, leave a comment below.

 9 Reasons for Australia Visa Denial (And How to Avoid Them)
 Australian Bridging Visas: An Essential Guide
 14 VISA-FREE Countries You Can Visit With Japan Visa or PR [2024 Edition]
Leave a Reply