The Japan eVisa system is a simplified way to obtain a short-term visa to visit Japan as a tourist. It has very narrow eligibility provisions but if you fit the requirements, it will save you a trip to a Japanese embassy.
Your Japan online visa application is sent to the Japanese overseas establishment with jurisdiction over your country of residence, so the required documents and fees vary.
Quick summary:
- Eligibility: Residents and nationals of certain countries, unless already exempt from a tourist visa for Japan. Check the full list in the Eligibility Section below.
- Validity: 3 months from the date of issue
- Allowed stay: 15, 30, or 90 days
- Extensions: Not allowed
- Processing time: 5 business days
- Fee: 3000 JPY. Less for some nationalities.
Read the Japan Visa Guide for more general information on available visas for tourists, eligibility and requirements.
Table of Contents
***
Understanding Japan eVisa
Japan eVisa validity
The validity of the Japan eVisa is 3 months starting from the day after the date of issue.
The validity is not extendable and the visa is not transferable to a new passport.
Duration of stay
The allowed duration of stay can be either 15, 30, or 90 days depending on your travel itinerary and other factors of your application. The most commonly granted duration is 90 days.
Allowed number of entries
The Japan eVisa is single-entry only. You cannot apply for a multiple-entry visa online. You must apply for a regular tourist visa at a Japanese overseas establishment for multiple-entry visas.
Allowed ports of entry
With an eVisa, you are allowed to enter Japan only by air. You can enter from any international airport.
When to apply
The Japanese eVisa website is efficient and most online visa applications are processed within 5 business days. This period is calculated after your application is considered complete by the Japanese overseas establishment in charge.
There are often cases where travelers are asked to submit additional documents, so in reality, it may take longer than 5 business days to get the eVisa.
Periods with increased demand (for example the period leading up to the Cherry Blossom season) also result in longer waiting times.
- Earliest: 3 months before flying to Japan
- Latest: 2 weeks
eVisa extension
Japan eVisa is non-extendable. So, extensions are not possible.
***
Japan eVisa Requirements
eVisa eligibility
1. Eligibility for independent travelers:
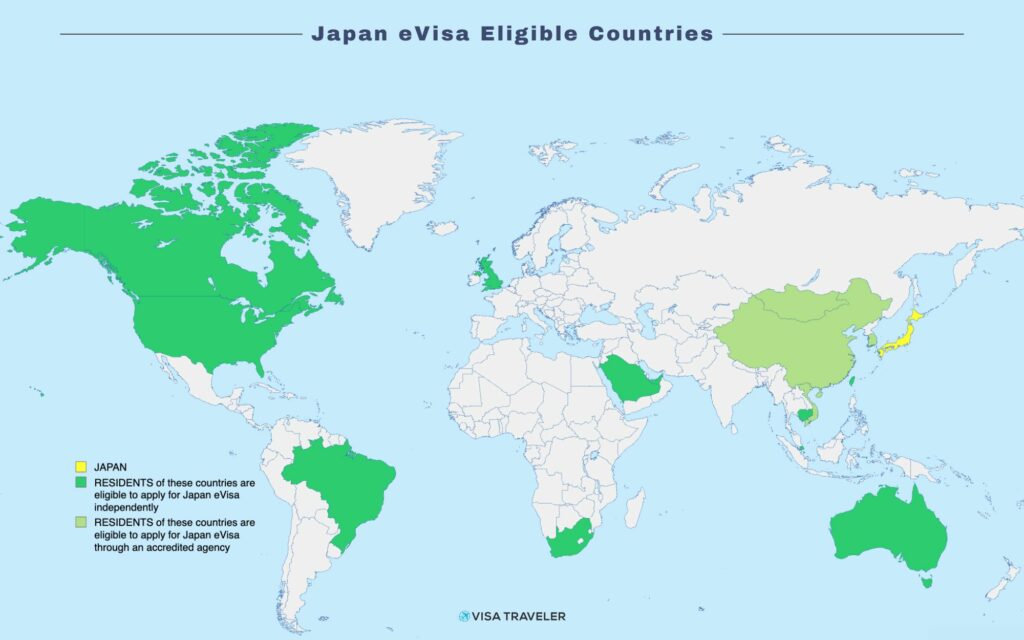
- All residents of Australia, Brazil, Cambodia, Canada, Saudi Arabia, Singapore, South Africa, Taiwan, United Arab Emirates, United Kingdom, and the USA, regardless of nationality, unless already exempt from a tourist visa for Japan.
Note that there is a distinction between a national and a resident. As a national, you will have a passport issued by the said country, whereas as a resident you will have a different passport plus a residence permit or long-term visa to reside in the said country.
Most of the nationals of the countries above are exempt. Exceptions are Cambodia, Saudi Arabia, and South Africa – if you’re either their national or resident, you’re eligible for the Japan eVisa.
2. Eligibility requiring the use of an accredited agency:
The following are required to use an accredited agency to apply for Japan eVisa.
- Nationals of China residing in China
- Nationals of Vietnam residing in Vietnam and traveling to Japan on a packaged tour
- Residents of Hong Kong, Macau, Mongolia, and South Korea regardless of nationality, unless already visa-exempt.
You are NOT eligible for an eVisa if:
- You have a criminal record
- You are a dual national of Japan and another country.
- You intend to enter Japan by ship
- You seek a multiple-entry visa
Documents required
The required documents may vary between countries. It’s best to check on the Japan eVisa website for the exact list of documents for your nationality and citizenship combination.
Mandatory documents:
- Passport
- One passport-size photo
- Proof of legal residency and/or immigration status
- Flight itinerary
- Schedule of stay
- Proof of ability to pay for the trip
Passport: The passport must be valid for the duration of stay in Japan
Proof of legal residency/immigration status: This can be a long-term visa or residence permit that allows you to reside in that country legally. Examples include student visas, work visas, PR cards, or permanent visas.
Flight itinerary: You are not required to purchase flight tickets, instead, you can provide a flight itinerary for your visa.
NOTE
The flight itinerary must provide all flights that will bring you to Japan, not just the flight arriving in Japan if you’re connecting somewhere.
For example, you live in Australia and your itinerary involves visiting Thailand first and then Japan. In that case, providing flight tickets from Thailand to Japan will not be sufficient. You will have to provide your flight tickets from Australia to Thailand as well.
The same applies to the return ticket and if you are stopping over somewhere on your way back home and that country requires a visa, you will have to provide that too.
Schedule of stay: This is a detailed day-by-day plan of places you’ll visit and things you’ll do in Japan. You must use the Travel Itinerary Planner template provided by the Ministry of Foreign Affairs of Japan. If haven’t planned every day of your trip, it’s fine to leave a few days as “To be determined”.
Proof of ability to pay for the trip: This can be your bank statements, salary slips, income tax returns, etc.
Additional mandatory documents requested only in some countries:
- Proof of accommodation booking
- Proof of current residential address
Proof of accommodation booking: This can be your hotel booking, Airbnb confirmation, etc. I recommend booking a refundable hotel or Airbnb to avoid any losses in case of visa refusal.
Proof of current residential address: This can be a driver’s license, national ID, state ID, utility bill or rental agreement that shows your current address. This document is usually asked when there are multiple Japanese consulates in a country.
Other optional documents include:
- Visa for the country you will visit after Japan (if you require one)
- Certificate of enrollment in a University or a Certificate of employment
- If someone will sponsor your trip, submit:
- Sponsorship letter
- Passport of sponsor
- Documents to prove the relationship with the guarantor (marriage certificate, birth certificate, resident book, family book, etc.)
- Parental consent form if under 18
- Letter of authorization
You may be asked to submit additional documents after you submit the application.
Photo requirements
The photo for the eVisa must meet the following requirements:
- Must have been taken in the last 6 months
- Must be on a plain, untextured background
- Enter face must be clearly visible and must be centered horizontally
eVisa fee
The eVisa fee is generally 3,000 Japanese Yen.
Some countries have signed bilateral agreements with Japan, so the fee is lower or zero. Check with the Japanese overseas establishment with jurisdiction over your place of residence to see if you’re eligible for a lower fee or no fee.
The exact fee will be shown after your application is successfully processed and eVisa issued. Unlike most other countries, payment for the Japan eVisa is made after the visa is issued.
Processing time
The processing time is 5 business days.
This period starts when the Japanese overseas establishment receives your online application and confirms that it’s complete.
You may be asked for additional documents in which case the normal 5-day processing period will start after you submit them too.
That said, many Japanese overseas establishments are experiencing delays and processing is taking up to 2 weeks in some countries.
***
Japan eVisa Application Process
How to apply for Japan eVisa
Before you begin the application process, make sure you’re eligible for the Japan eVisa. If you are, then follow the below steps.
Step 1: Navigate to the Japan eVisa website, enter your nationality and residency, and check the required documents.
Step 2: Create an account. Use a real email address as you receive a multi-factor authentication code via email every time you log in.
Step 3: Start a new application and enter your personal information
Step 4: Gather all supporting documents, create PDF copies, and upload them to your application
Step 5: Submit your application
Step 6: Regularly check your email in case you’re requested to submit additional documents
Step 7: After your visa is ready and you receive a Visa Issuance Notice, log back in and follow the instructions to complete the online payment.
Step 8: Download the Visa Issuance Notice as a PDF from the eVisa Portal and keep it for when you travel to Japan.
IMPORTANT:
Although it’s rare, you may be asked to visit the Japanese embassy for an interview or to submit additional documents in person. You can also choose to pay the visa fee in cash at the embassy.
How to track eVisa status
You can track the status of your application in the Application Information section of the eVisa portal. You will receive an email every time the status changes.
How to download the approved eVisa
After you pay for the eVisa, click on the checkbox next to the Visa Issuance Notice and then click on Download PDF.
How to contact customer service
For specific inquiries about your eVisa application, contact the Japanese overseas establishment that is in charge of it.
For general questions about the eVisa or the Japan eVisa website, use the below contact options.
Email: japan-visa@bricks-corp.com
Phone: Contact phone number depending on your country.
***
Entry Procedure at the Border
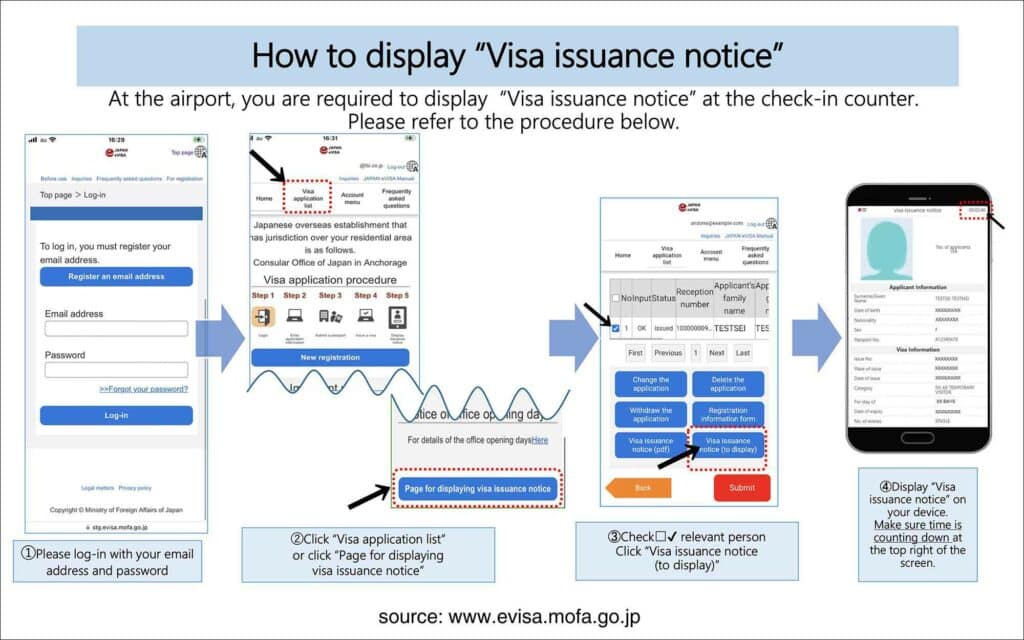
With the eVisa, you are allowed to enter Japan only by air, through any international airport.
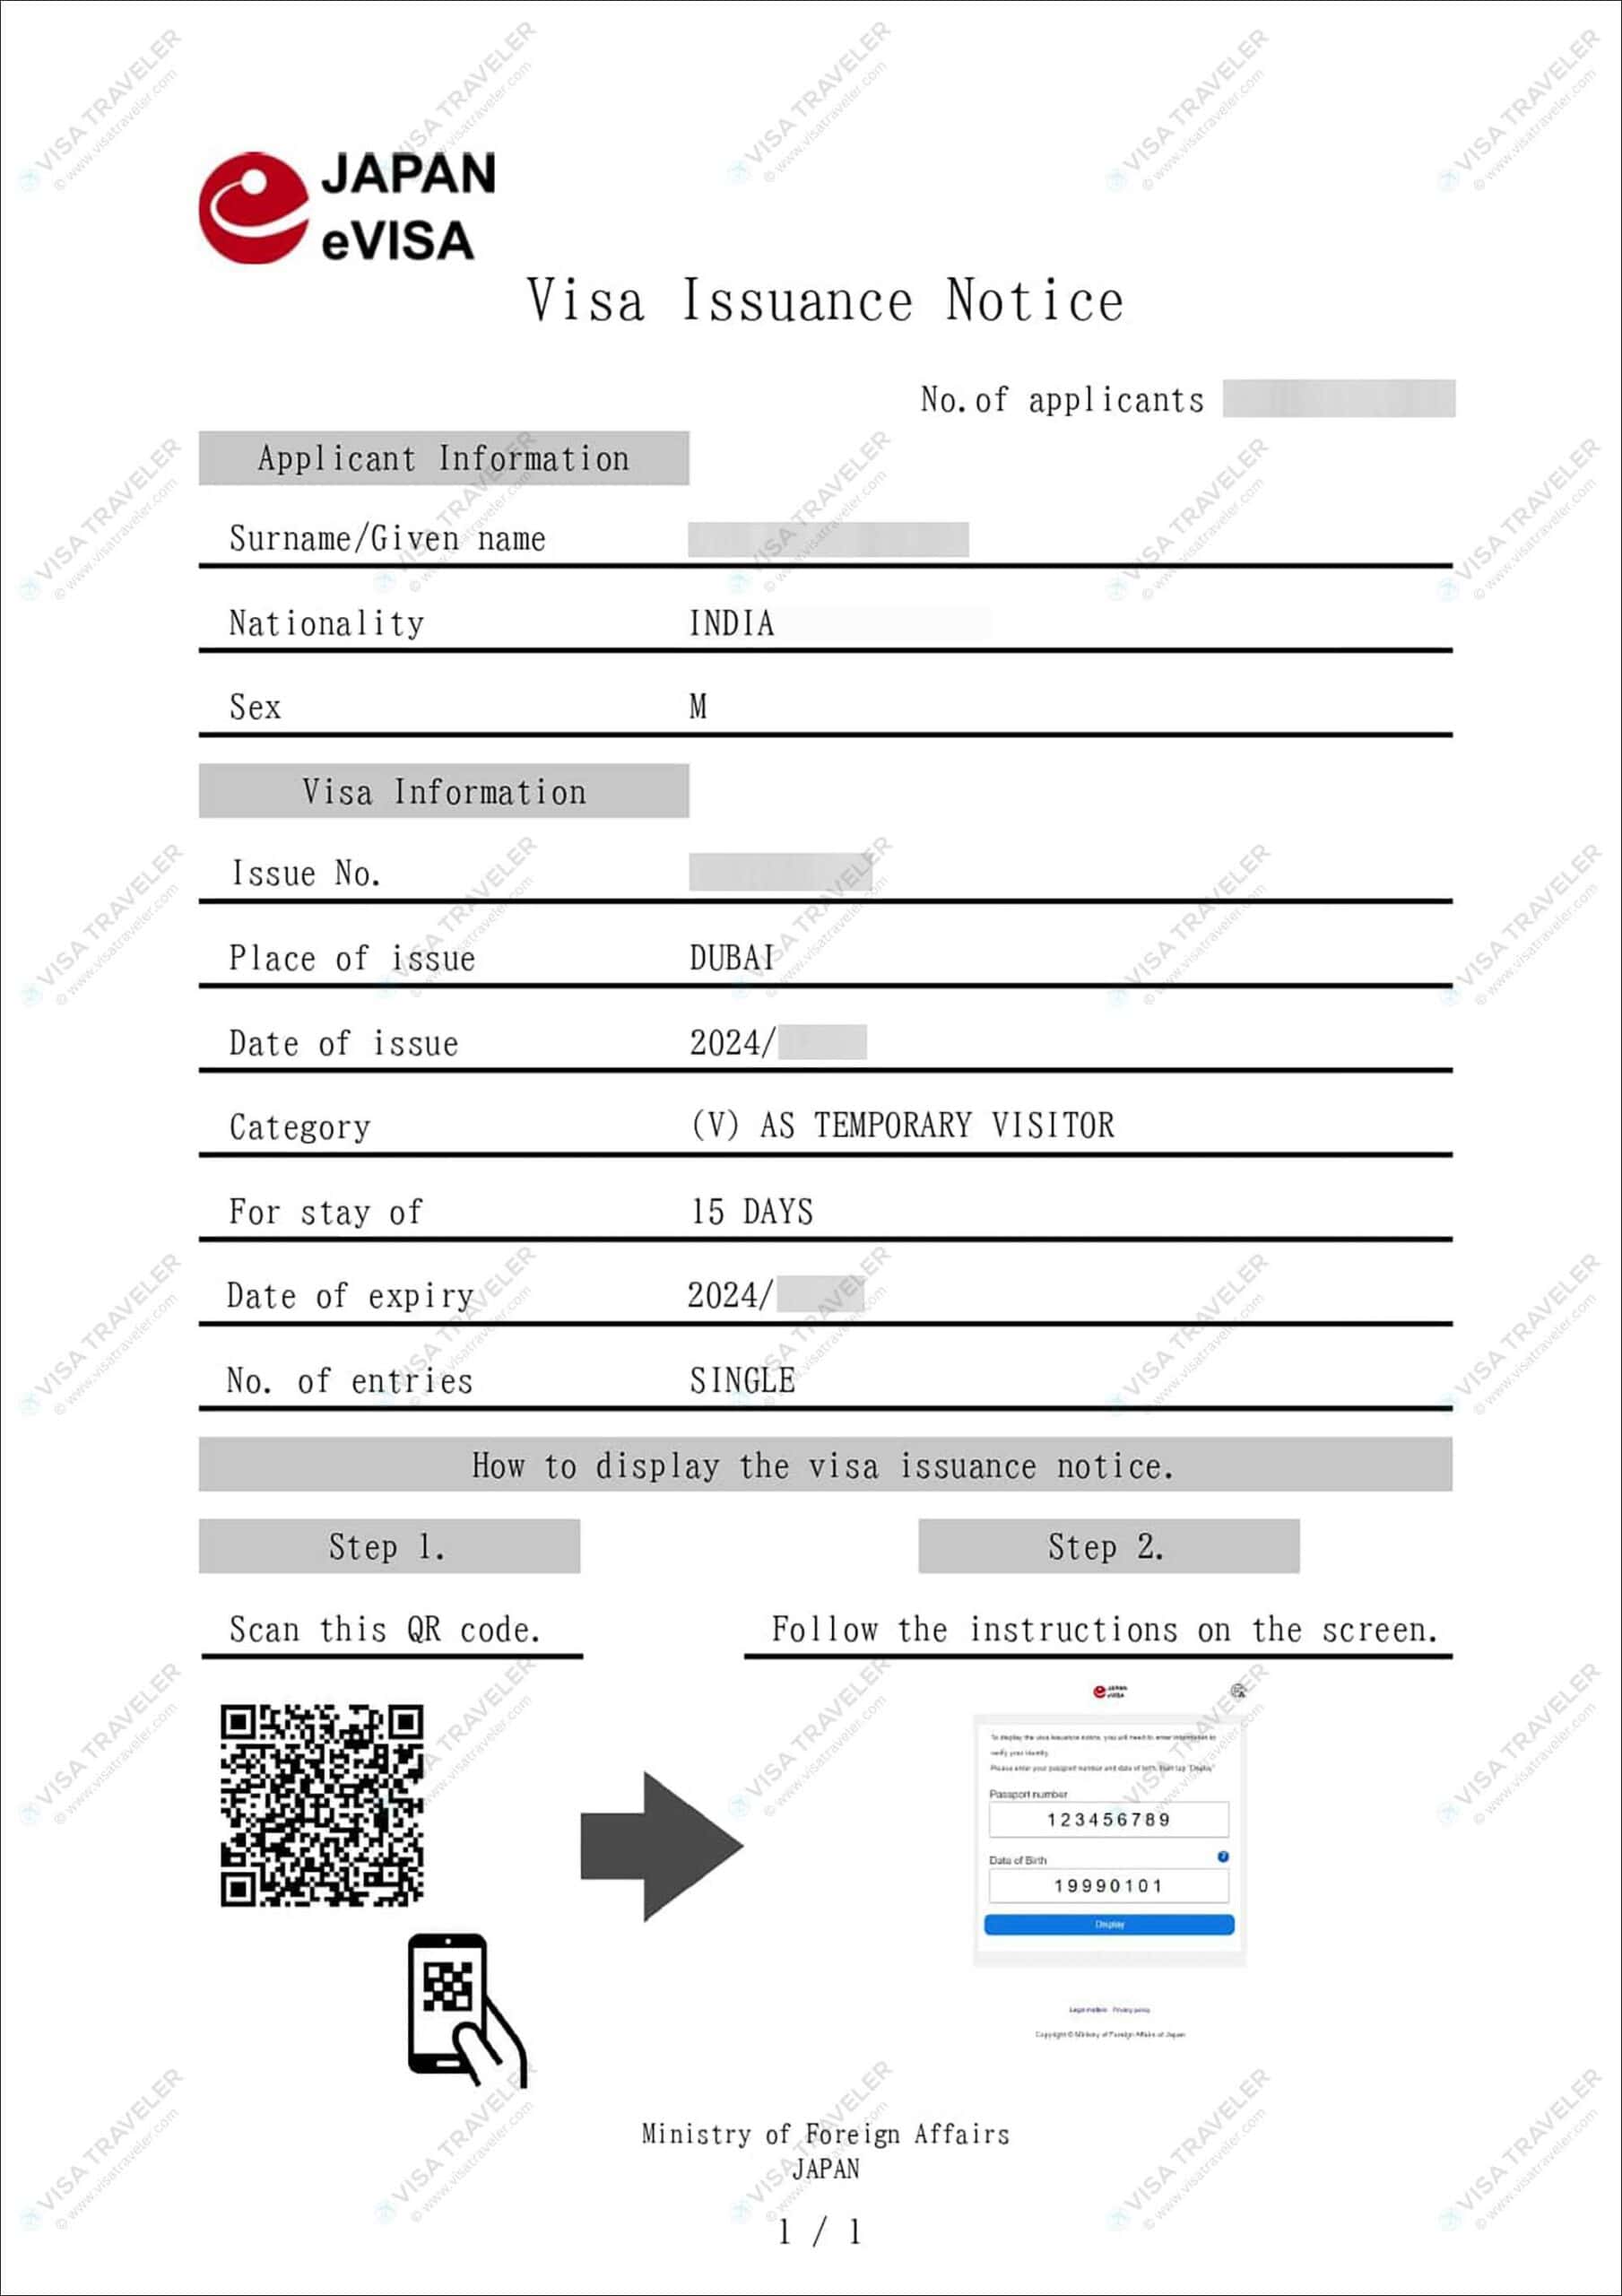
At the immigration, you must present the online version of your Visa Issuance Notice on your phone. Printouts of Visa Issuance Notice are not accepted as proof.
You can still carry a print of your Visa Issuance Notice to show as proof if asked when checking in for your flight.
At the immigration, you have two options to show the online version of the Visa Issuance Notice.
- By navigating to the Japan eVisa website on your phone
- By scanning the QR code on your Visa Issuance Notice print
You can connect to the free airport WiFi and navigate to the Japan eVisa website. Log in and click on “Visa application list”. Then click on “Page for displaying visa issuance notice” button. Then check the box next to your current visa and click on the “Visa Issuance Notice (to display)” button. This will bring up the online, real-time version of your Visa Issuance Notice with a countdown timer.
The second option is to scan the QR code on your Visa Issuance Notice print. This will bring up the Japan eVisa webpage. Enter your passport number, and date of birth and click on the display button. A real-time, online version of your Visa Issuance Notice will be displayed. A countdown timer on the top-right side of the screen indicates that it’s the online, real-time version.
After you clear immigration and enter Japan, you will receive an email saying your eVisa has expired. This means you cannot use it to enter Japan again.
Check your passport for the Landing Permission stamp to see how long you can stay inside Japan.
***
Frequently Asked Questions (FAQs)
Can Indians apply for a Japan e-Visa?
Indians can apply for a Japan e-Visa if and only if they are legal residents of Australia, Brazil, Cambodia, Canada, Saudi Arabia, Singapore, South Africa, Taiwan, UAE, the UK, or the US.
It’s been XX days and the status of my Japan eVisa is still stuck at “Temporarily Received”. What should I do?
After you submit the eVisa application, its default status is “Temporarily received”. It’s normal for it to stay like this for up to 2 weeks as the Japanese embassy is examining it. If it’s been like this for longer than 2 weeks, contact the Embassy to enquire about the status.

