It’s super easy to get a UAE or Dubai visa online. All you need is a scanned copy of your passport, a digital photo and a credit/debit card. It takes about 10 minutes to fill out the form and you will have your visa within a few hours.
UAE visas can only be applied through a sponsor. A UAE-based airline, UAE-based hotel, UAE-based company, an Emirate national or resident can sponsor your UAE tourist visa.
My preferred sponsor or agent is Etihad Airways. I prefer a reputed international agent, so I have used Etihad Airways for my UAE visa.
DO YOU HAVE TO FLY WITH ETIHAD AIRWAYS IF YOU APPLY FOR UAE/DUBAI VISA WITH THEM?
NO. Etihad Airways only acts as a sponsor for your visa and you don’t need to fly with Etihad Airways. You can fly with any airline including budget airlines. I flew with Indigo to Sharjah and I was fine.
DO YOU HAVE TO FLY TO ABU DHABI AIRPORT IF YOU APPLY FOR UAE/DUBAI VISA WITH ETIHAD AIRWAYS?
NO. You can travel to/from any international airport or seaport in the UAE. I flew with Indigo to Sharjah and I was fine.
Most tourists usually need a 30-day single-entry UAE visa. Etihad Airways charges about 361 AED (equivalent to $98 USD) and processes your visa application within a few hours.
The procedure to apply for a 90-day single-entry or multiple-entry Dubai visa online is pretty much the same, except for the fee.
In this article, we will go over the steps for applying for a 30-day single-entry UAE or Dubai visa online using Etihad Airways.
***
Documents needed before starting
- A scan of your Passport ID page
- A digital passport size photo
- A debit/credit card for visa fee
Allowed formats: JPEG, JPG or PDF
Max file size: 2MB
Digital photo specification: Min 600×600 pixels, max 1200×1200 pixels with minimum 96dpi resolution
***
Steps to apply for UAE or Dubai visa online
01. Start
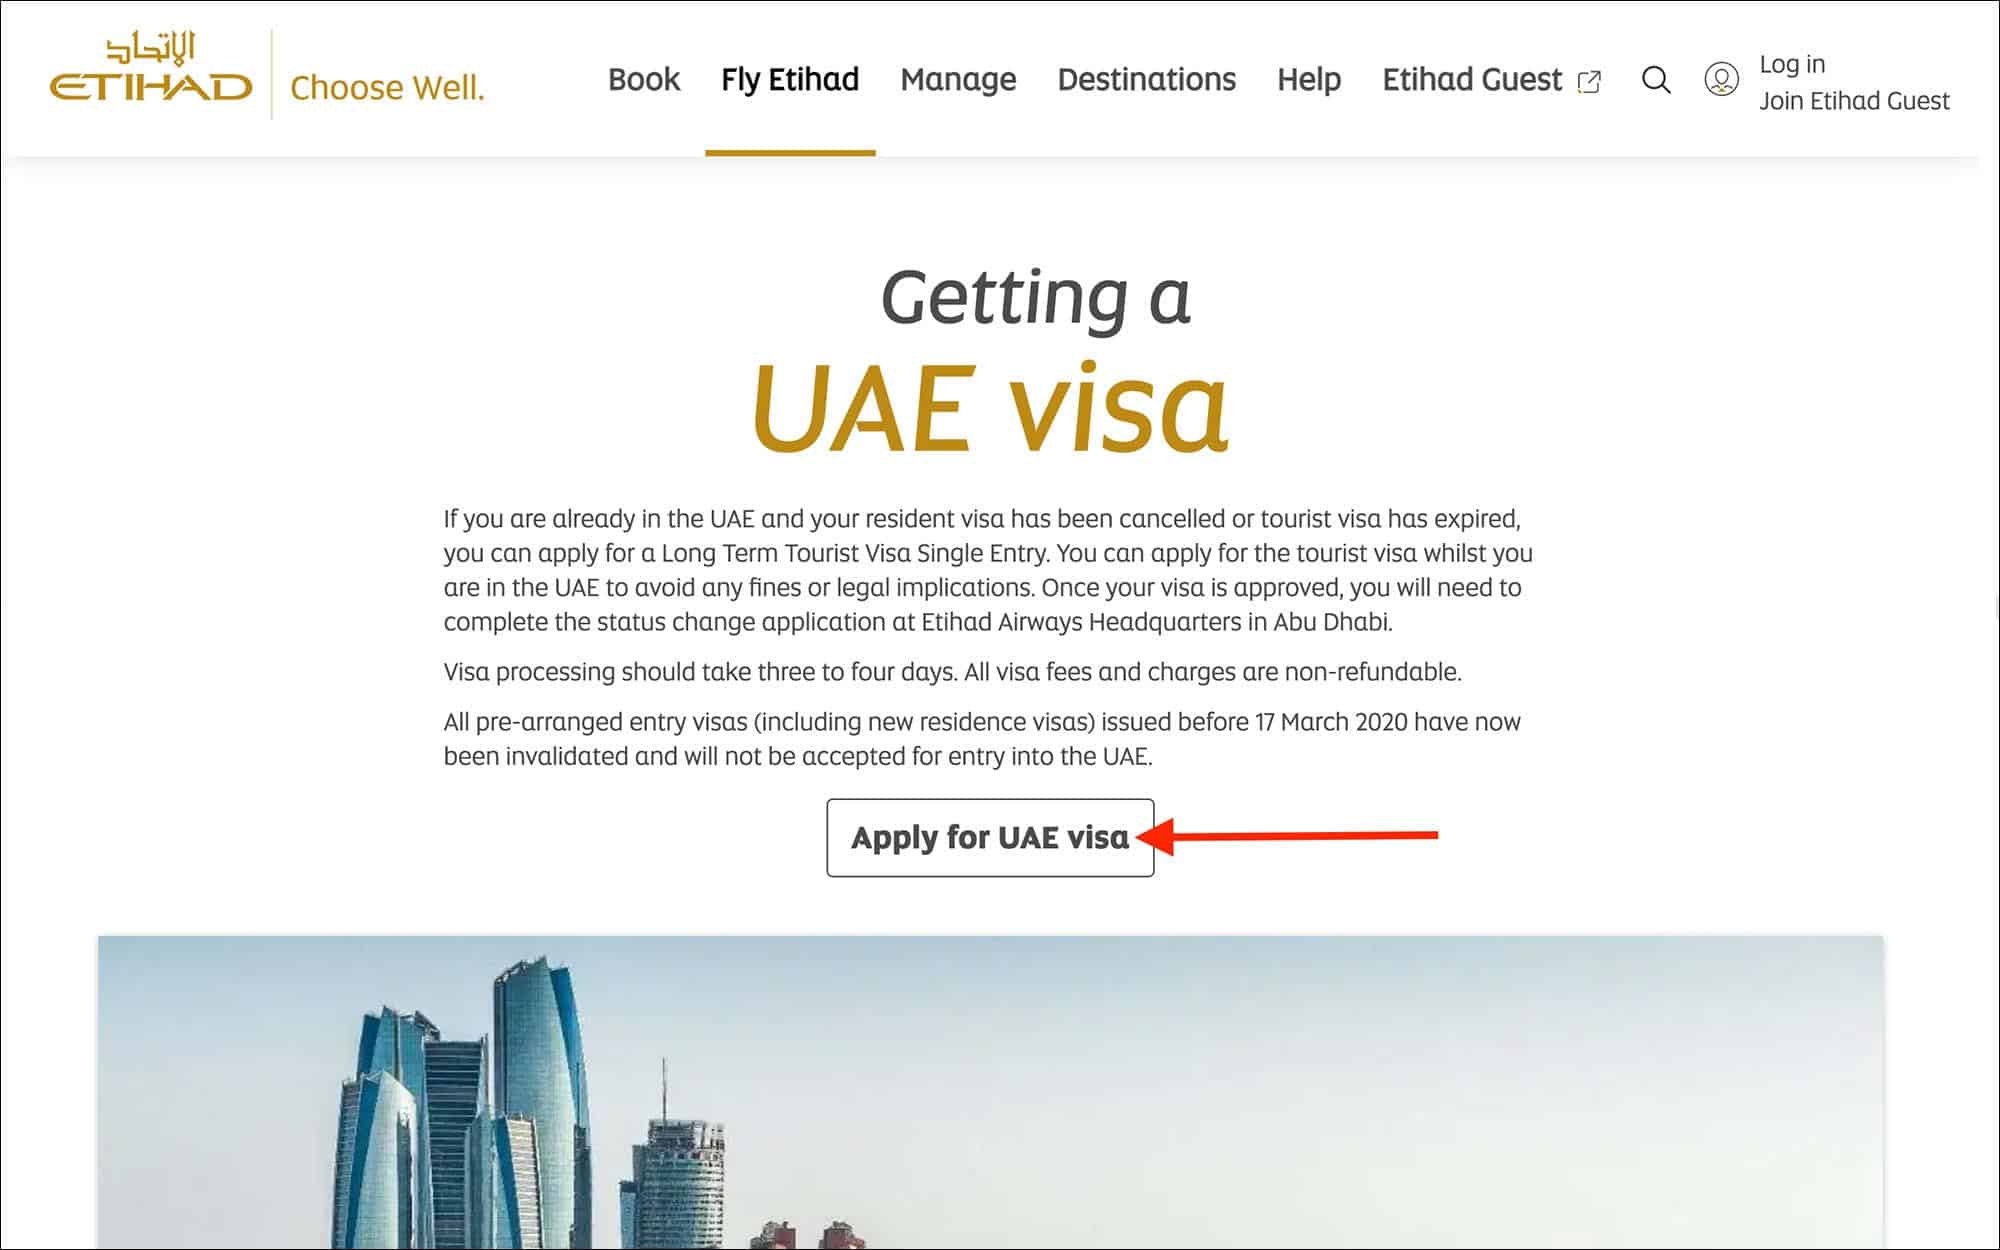
- Go to Etihad Airways Visa Portal
- Click on the “Apply for UAE visa” button
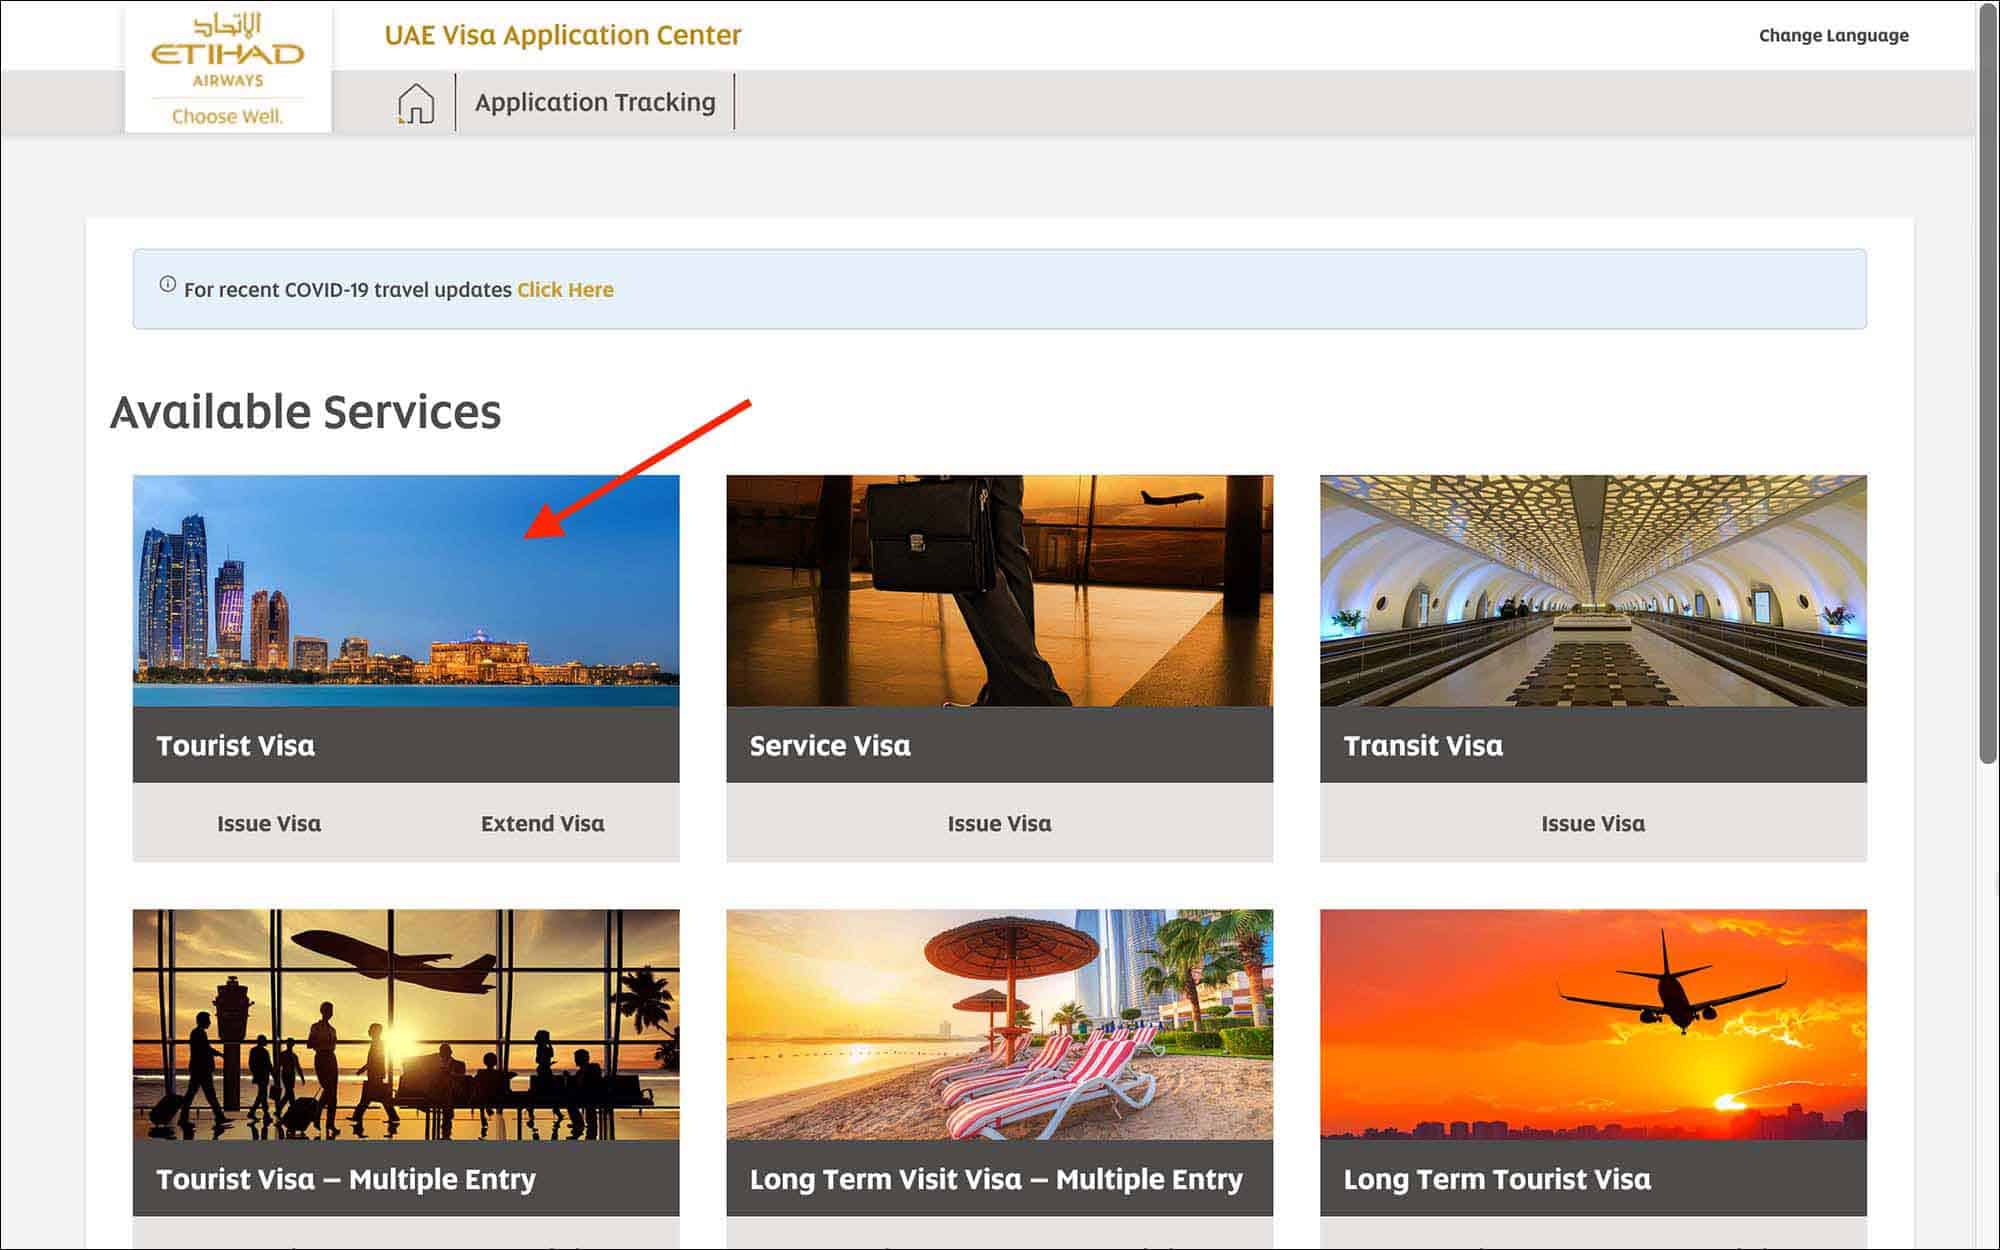
Under “Available Services”, click on the first option “Tourist Visa”.
—
02. Trip Info
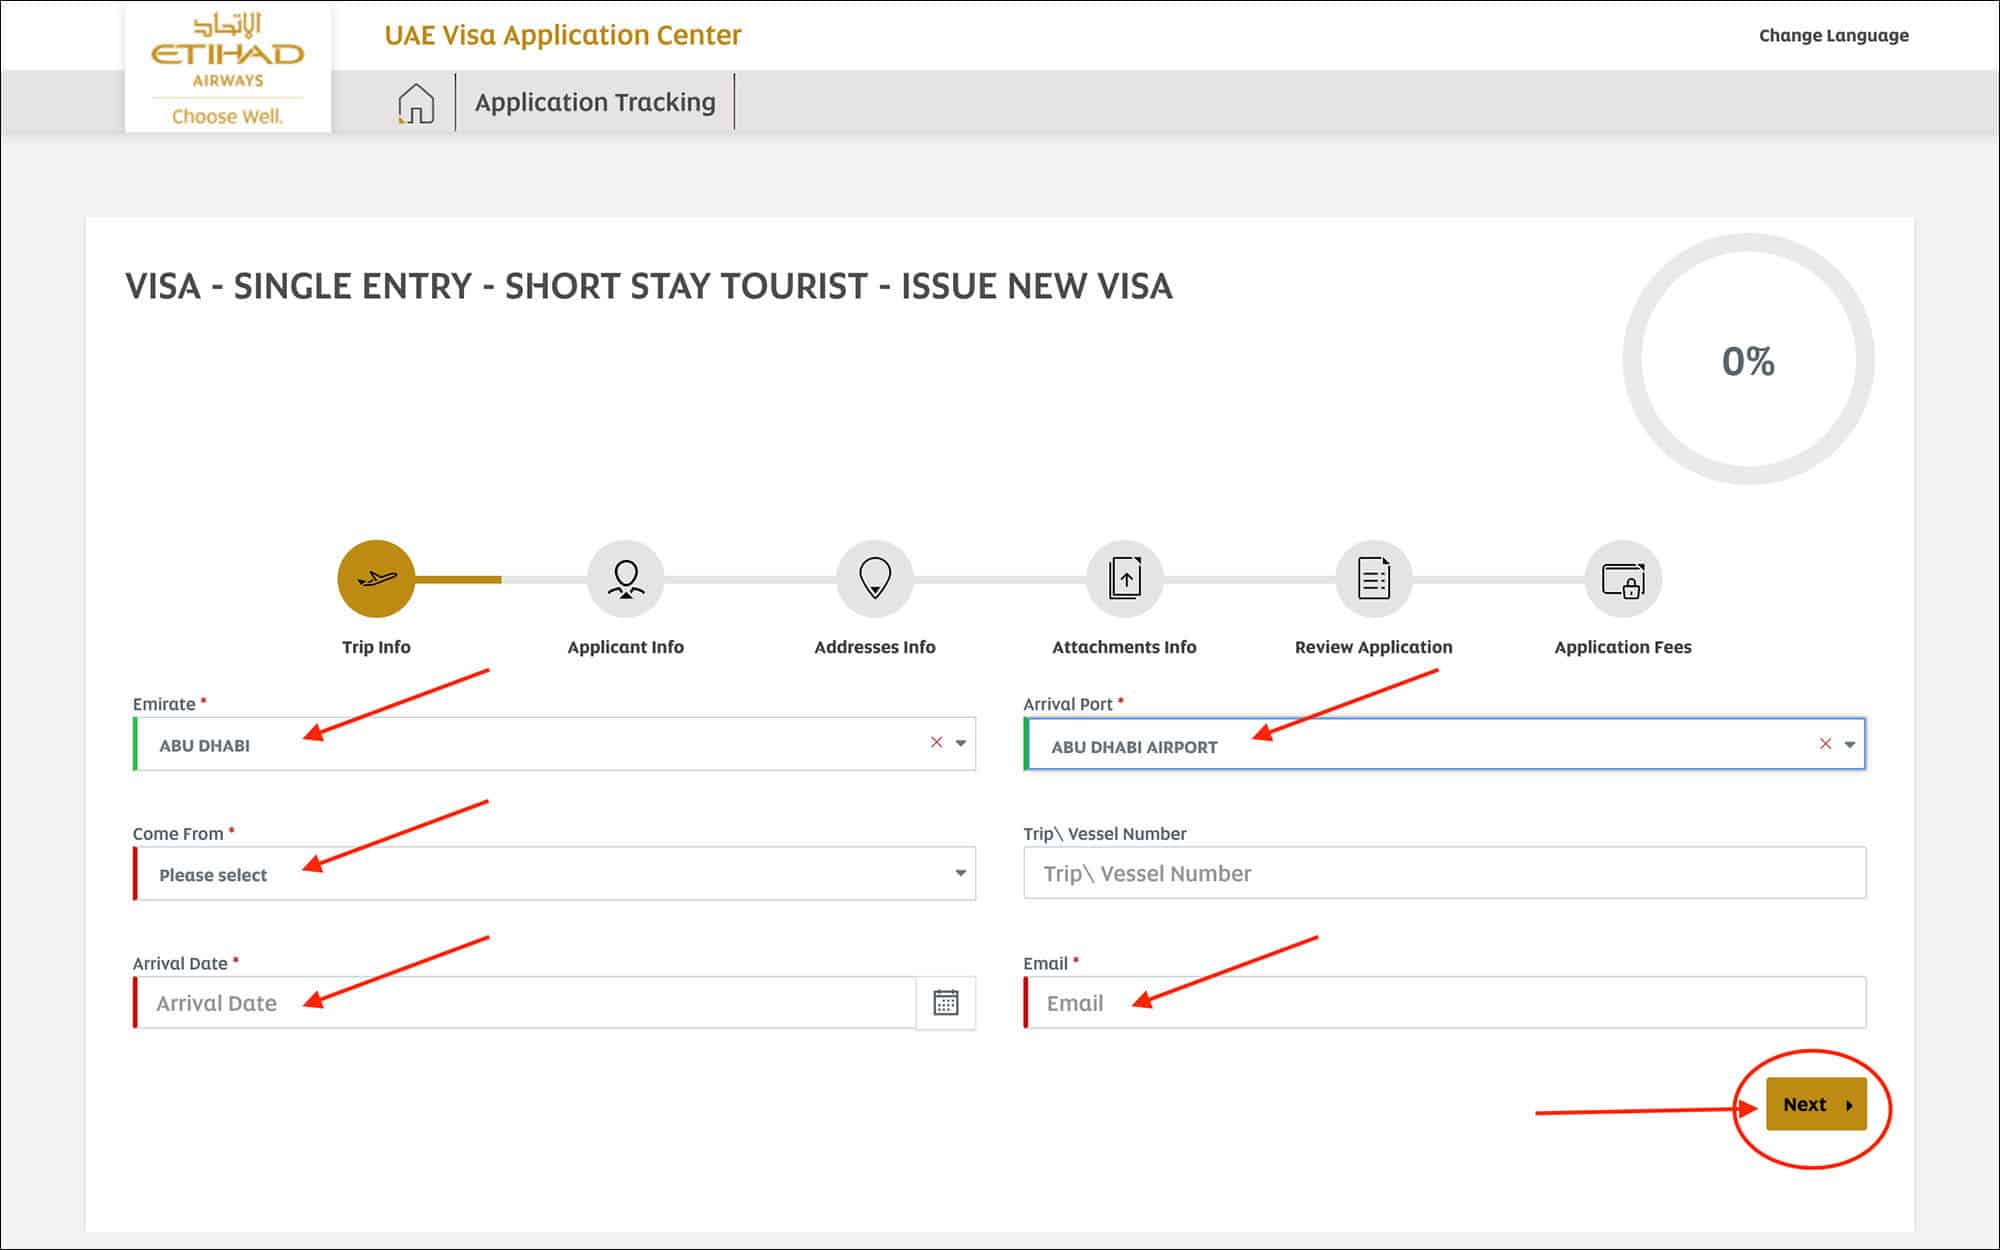
Enter the following information on the “Trip Info” page.
- Emirate [Comment: Select the emirate that you plan to enter the UAE from, from the below options]
- ABU DHABI
- DUBAI
- SHARJAH
- AJMAN
- UMM AL QUWAIN
- RAS AL KHAIMAH
- FUJAIRAH
- Arrival Port [Comment: Select the airport or seaport that you plan to enter the UAE from]
- Come From [Comment: Select your departure country]
- Trip/Vessel Number [Comment: This field is not mandatory, so enter your flight number or ship number only if you know]
- Arrival Date [Comment: Enter your tentative arrival date]
- Email [Comment: Enter your email address]
IMPORTANT
You can select any emirate and/or any arrival port in your visa application. When you enter the UAE, you can enter from any emirate or airport irrespective of what you have mentioned in your visa application.

After you enter your “Arrival Date”, your visa validity dates will be shown below. Check the dates and make sure you are aware of the visa start and end dates and how many days you are allowed to stay in the UAE.
Click on the “Next” button.
You will be taken to the “Applicant Info” page.
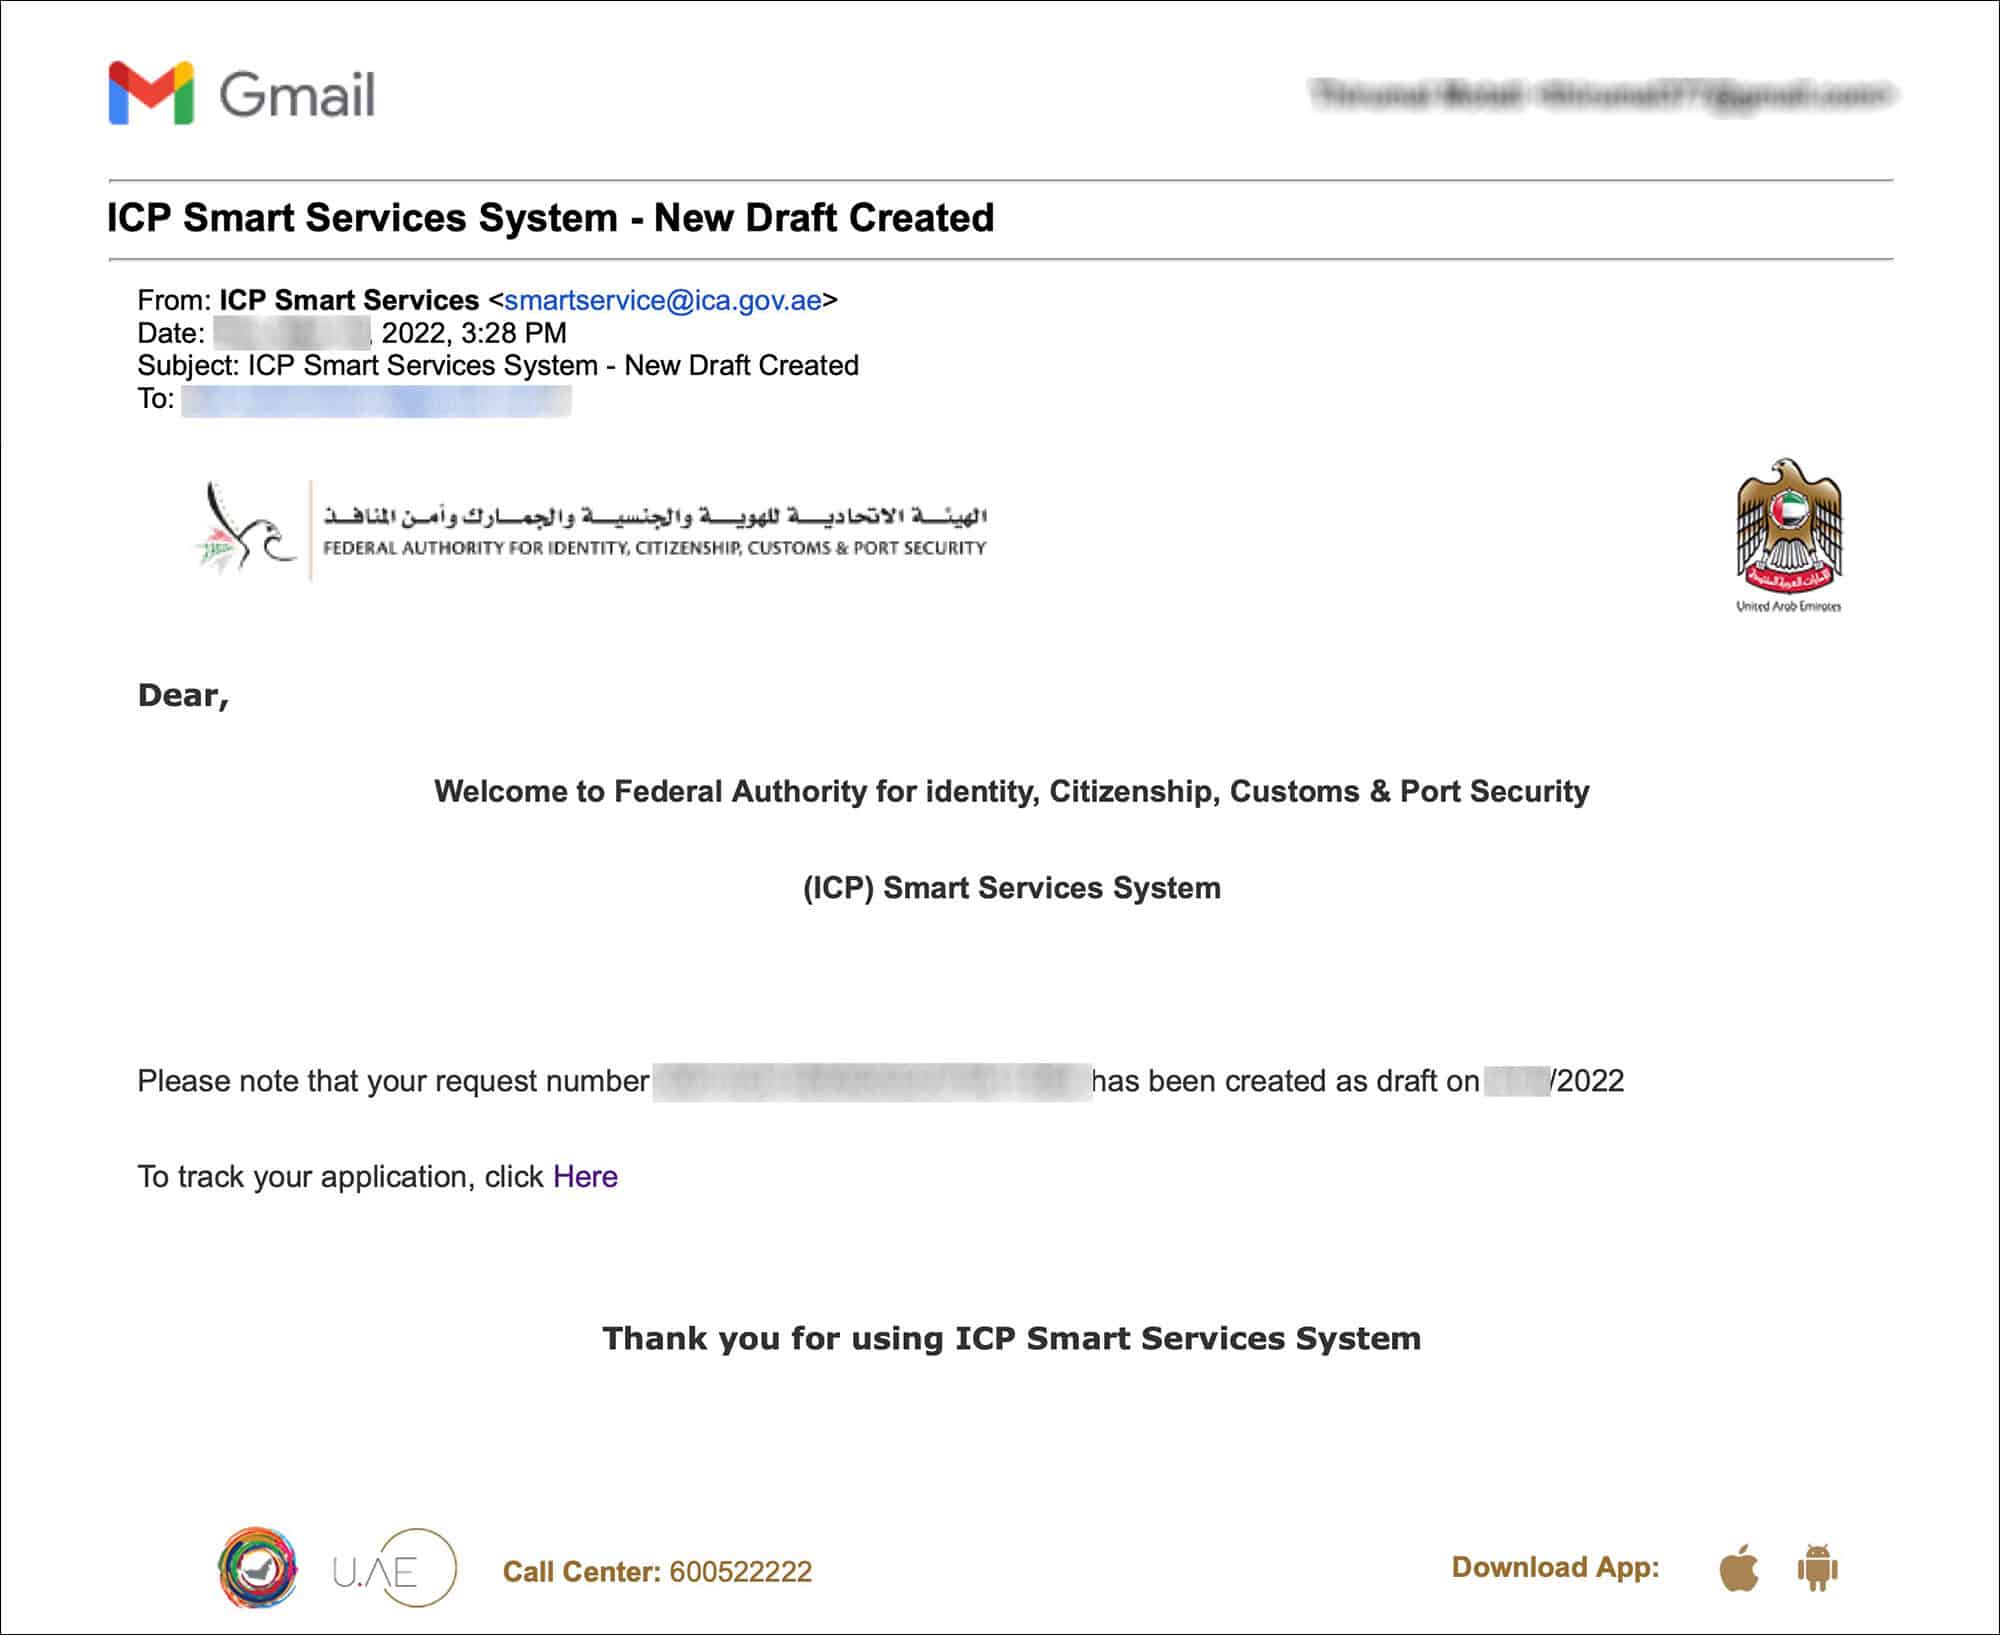
Once you pass this step, a draft of your application will be created and an email will be sent to you with a link to your draft. If you want to complete the application at a later point, you can always use the link in the email to access your draft.
—
03. Applicant Info
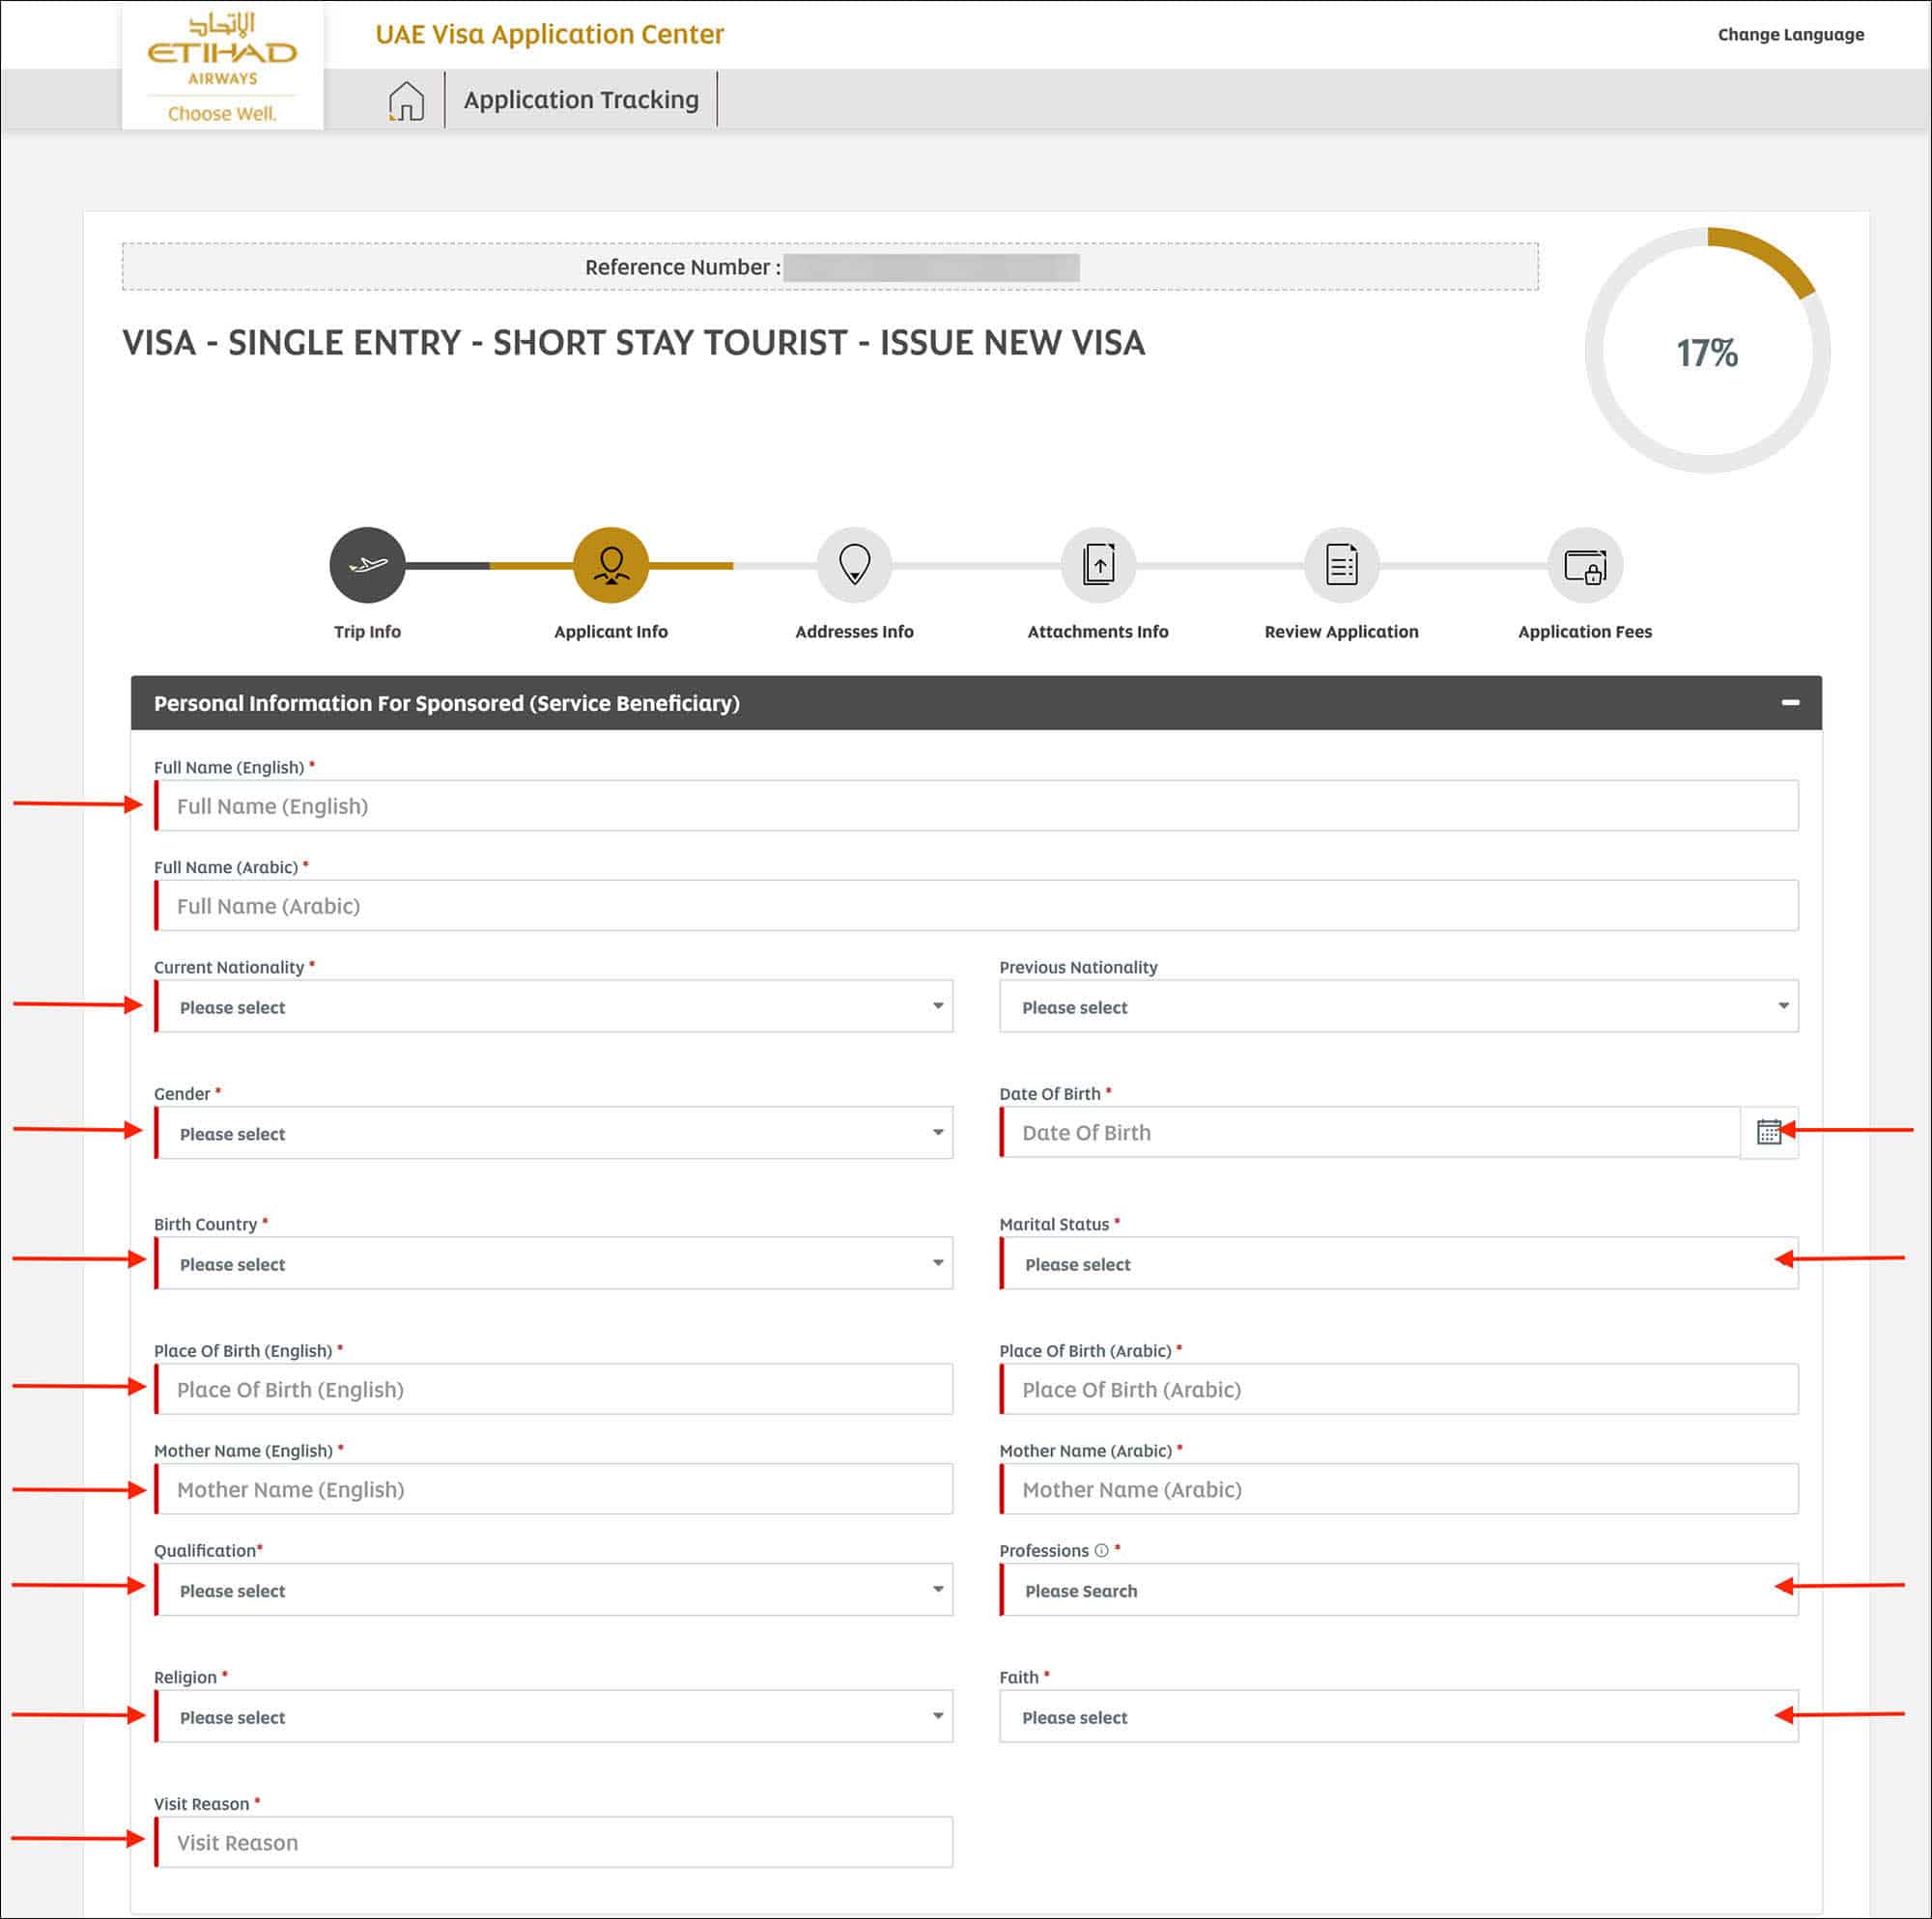
Enter the following information in the “Personal Information For Sponsored (Service Beneficiary)” section.
- Full Name (English) [Comment: Enter your full name as per your passport. Combine your first/given name, middle name and last name and enter it in this field]
- Full Name (Arabic) [Comment: No need to do anything here. Your name in Arabic will be auto populated]
- Current Nationality [Comment: Select the country of your nationality/passport from the list]
- Previous Nationality [Comment: Select a country in this list only if you had a different nationality earlier]
- Gender [Comment: Select your gender from the list]
- Date of Birth [Comment: Select your date of birth from the calendar]
- Birth Country [Comment: Select your country of birth from the list]
- Marital Status [Comment: Select your marital status from the options]
- SINGLE
- MARRIED
- DIVORCED
- WIDOWED
- Place of Birth (English) [Comment: Enter your place of birth]
- Place of Birth (Arabic) [Comment: No need to do anything here. Your place of birth in Arabic will be auto populated]
- Mother Name (English) [Comment: Enter your mother’s name]
- Mother Name (Arabic) [Comment: No need to do anything here. Your mother’s name in Arabic will be auto populated]
- Qualification [Comment: Select your educational background from the options]
- HIGH DIPLOMA
- NONE
- PRIMARY EDUCATION
- LOWER SECONDARY EDUCATION
- HIGHER SECONDARY EDUCATION
- DIPLOMA
- BACHELOR
- MASTER
- DOCTORAL
- Professions [Comment: Search for your profession and select the appropriate profession]
- Religion [Comment: Select your religion from the options]
- CHRISTIANITY
- HINDUISM
- NON RELIGIOUS
- BUDDHISM
- BAHA’I
- SIKHISM
- JUDAISM
- QADIANI
- Faith [Comment: Select your faith from the options]
- Visit Reason [Comment: Enter “Tourism” as your reason]
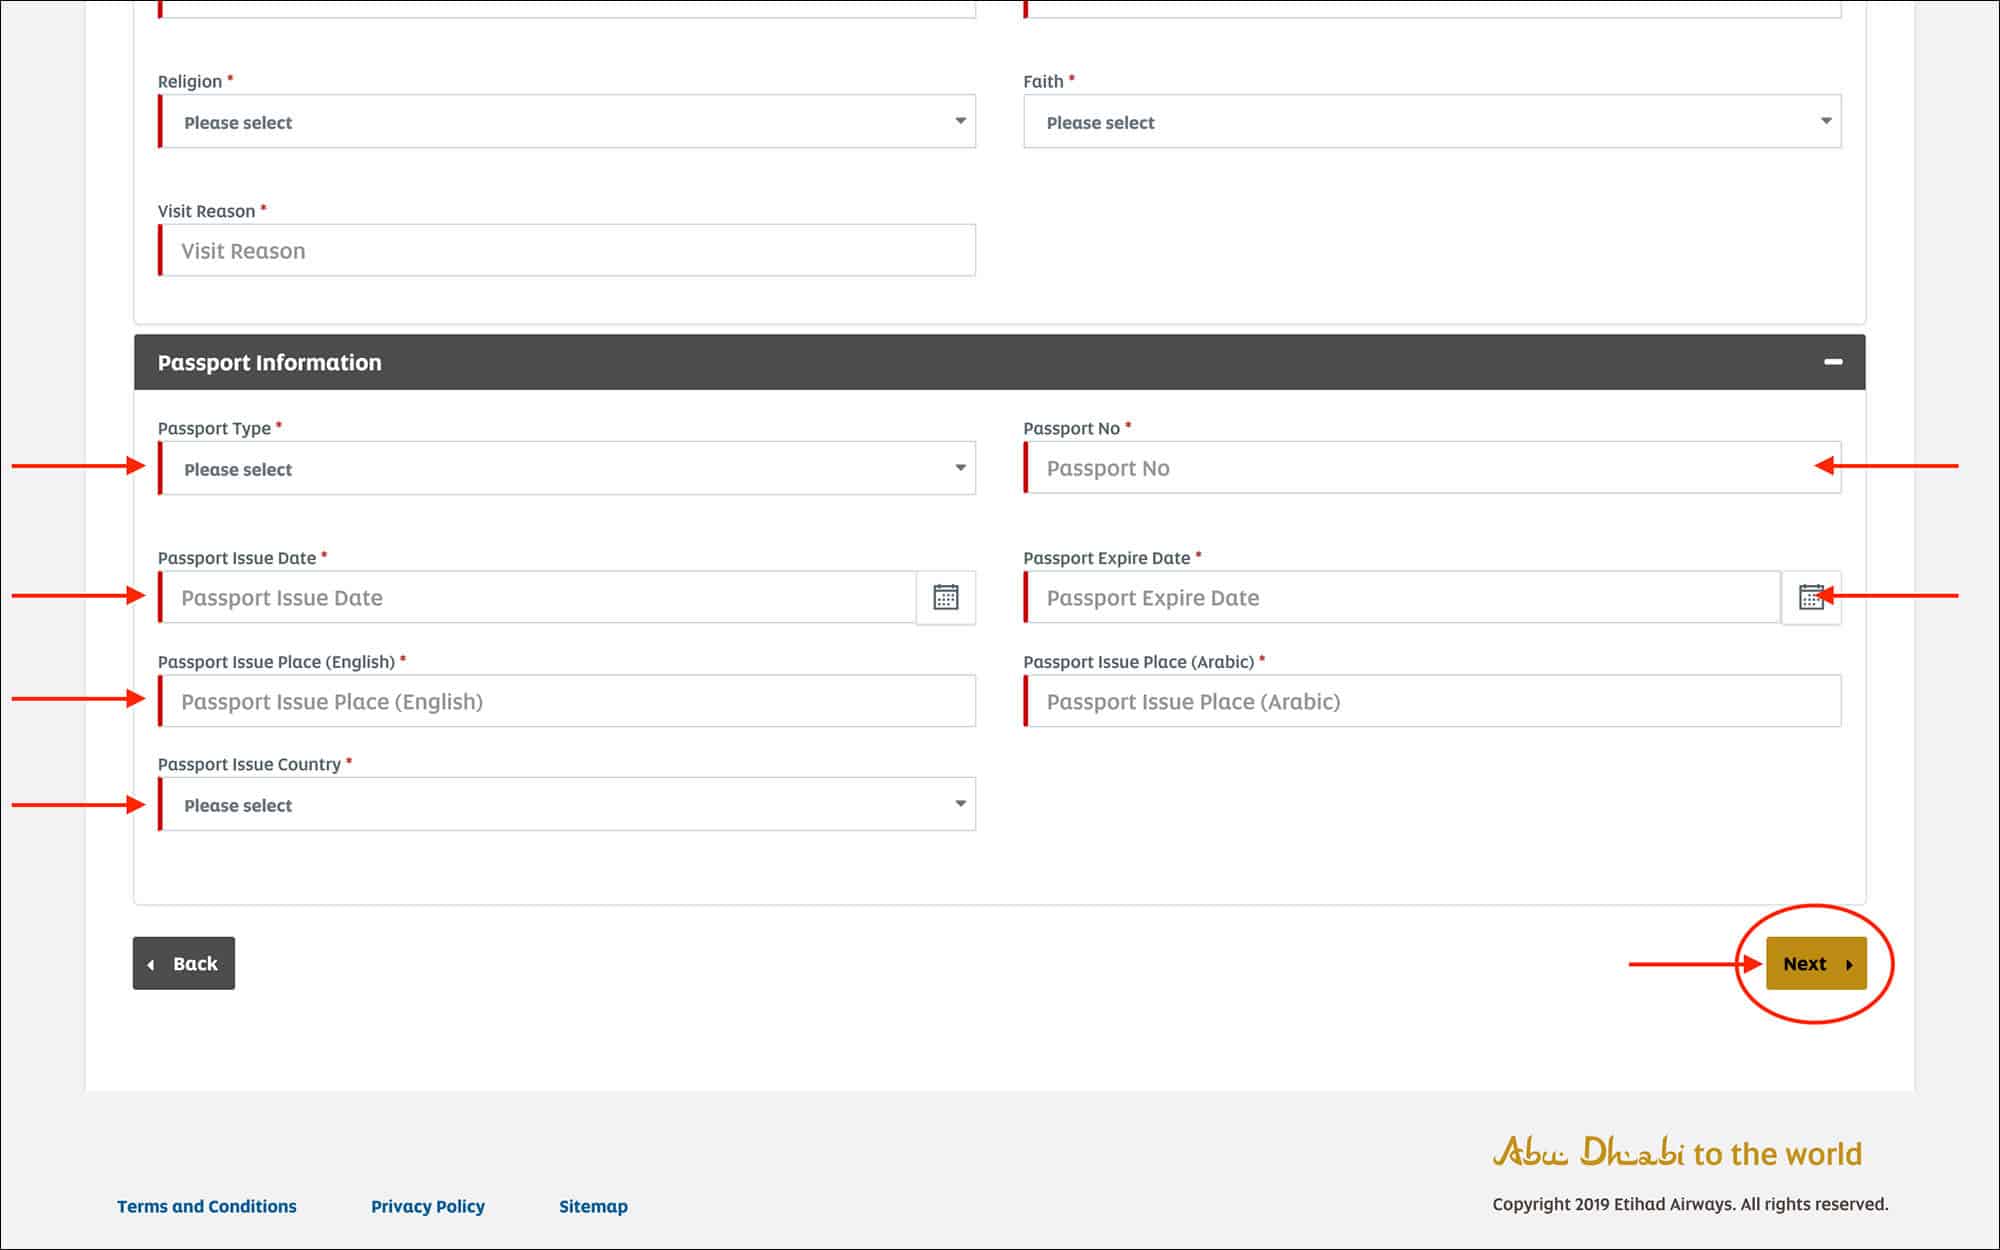
Enter the following information in the “Passport Information” section.
- Passport Type [Comment: Select “Ordinary” from the options]
- Passport No [Comment: Enter your passport number]
- Passport Issue Date [Comment: Enter your passport issue date]
- Passport Expiry Date [Comment: Enter your passport expiry date]
- Passport Issue Place (English) [Comment: Enter your passport place of issue]
- Passport Issue Place (Arabic) [Comment: No need to do anything here. Your passport issue place in Arabic will be auto-populated]
- Passport Issue Country [Comment: Select the country of your passport from the list]
Click on the “Next” button.
You will be taken to the “Address Info” page.
—
04. Address Info
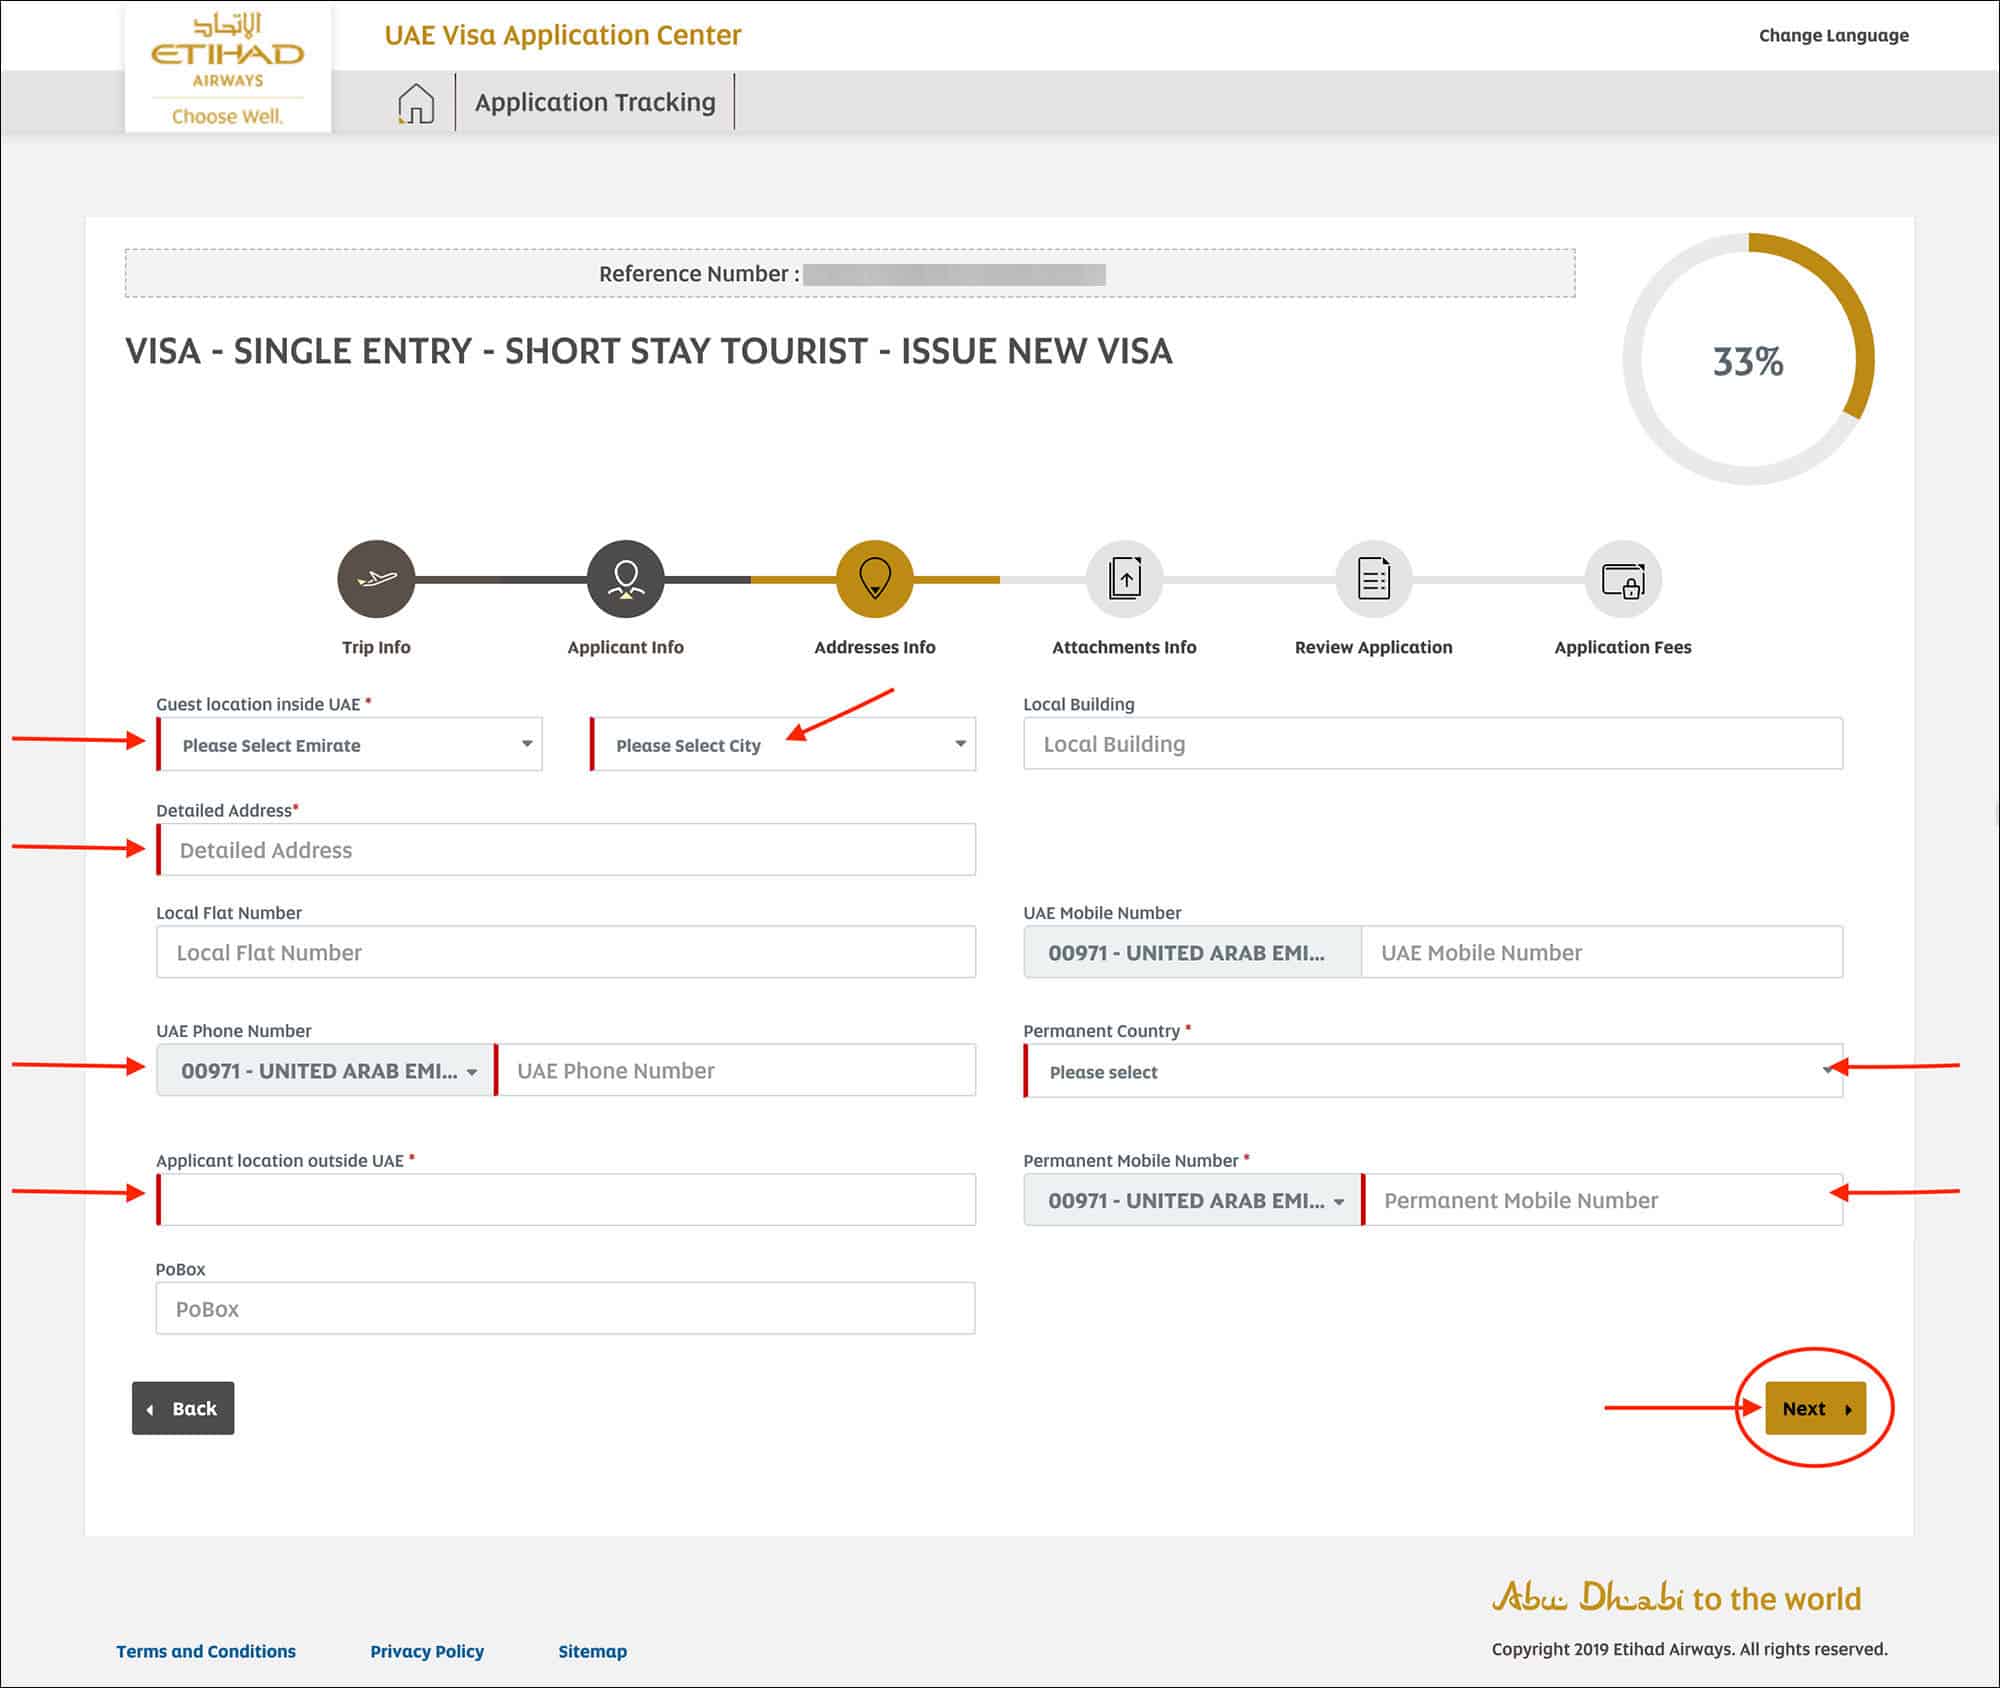
Enter the following information on the “Address Info” page.
- Guest location inside UAE [Comment: Select the emirate and the city where your hotel is]
- Local Building [Comment: No need to enter anything here, leave it blank]
- Detailed Address [Comment: Enter your hotel address here]
- Local Flat Number [Comment: No need to enter anything here too, leave it blank]
- UAE Mobile Number [Comment: No need to enter anything here too, leave it blank]
- UAE Phone Number [Comment: Enter your hotel’s phone number]
- Permanent Country [Comment: Enter your country of residence]
- Applicant Location Outside UAE [Comment: Enter your current residential address from your country]
- Permanent Mobile Number [Comment: Enter your phone number from your country]
- PO Box [Comment: No need to enter anything here, leave it blank]
Click on the “Next” button.
You will be taken to the “Attachments Info” page.
—
05. Attachments Info
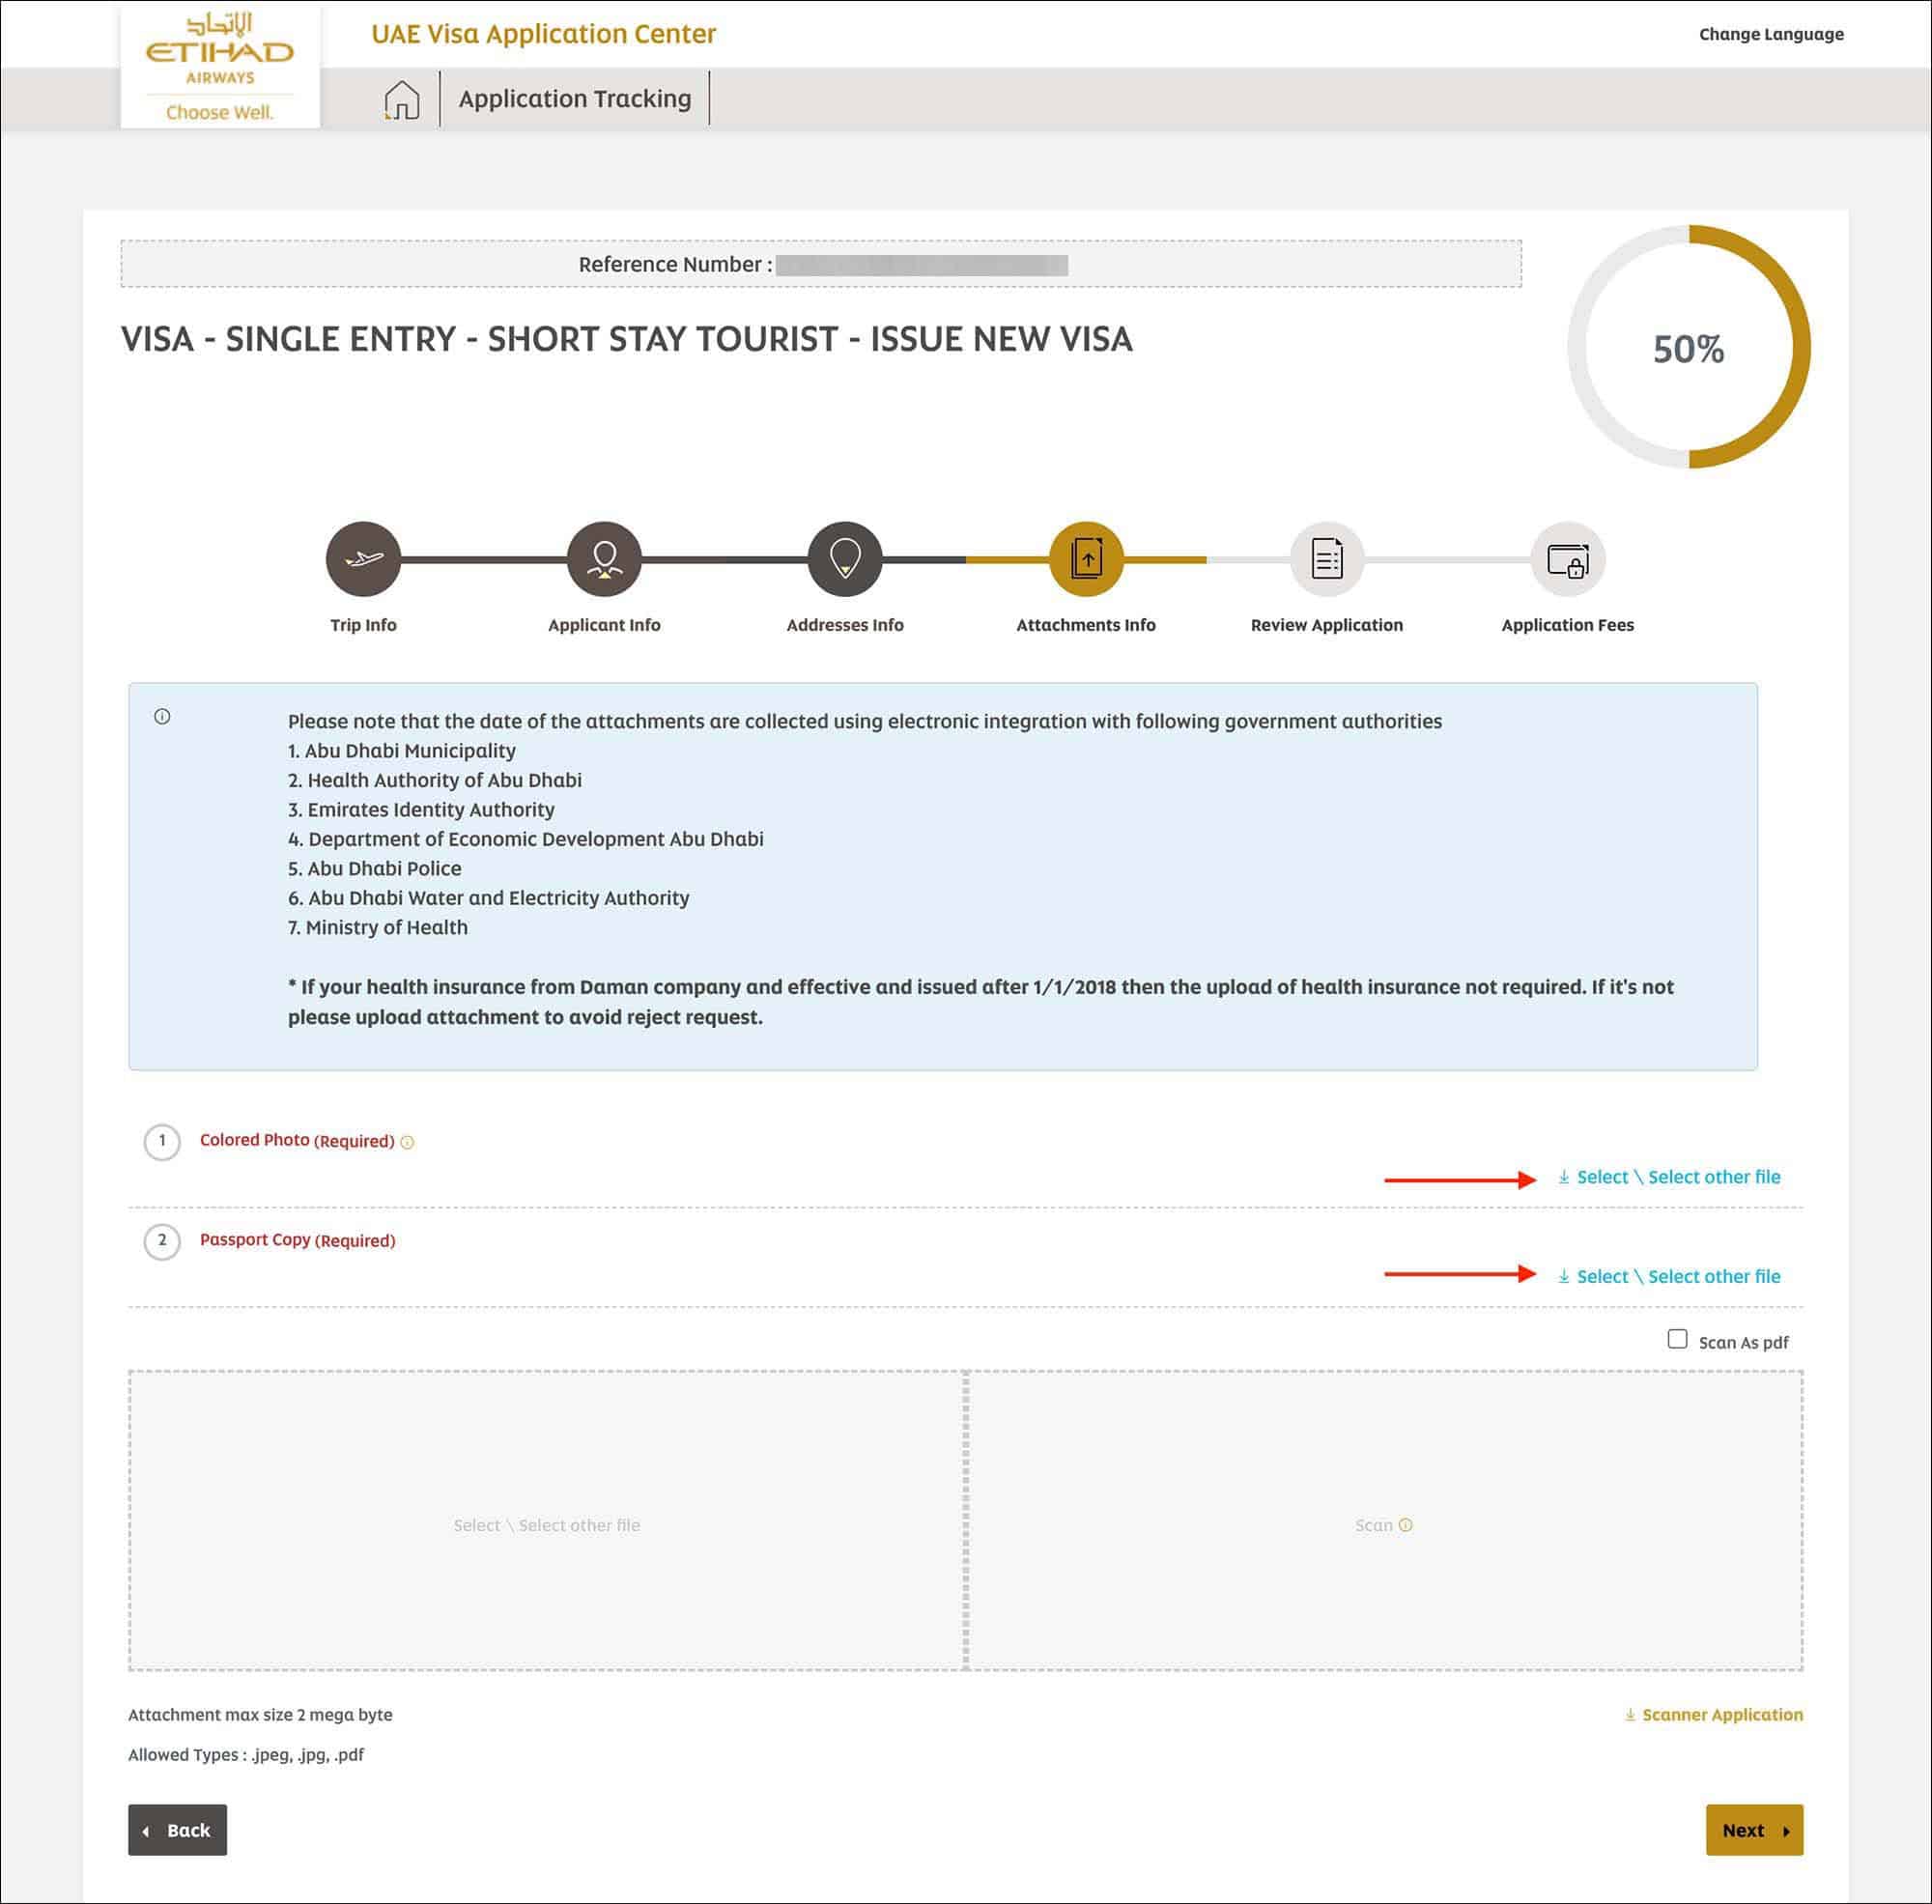
Upload the following documents on the “Attachments Info” page.
- Colored Photo [Comment: Click on “Select” and upload your digital passport size photo]
- Passport Copy [Comment: Click on “Select” and upload a scan of your passport ID page]
NOTE
Only JPEG, JPG or PDF formats are allowed. The file size cannot be more than 2MB. The digital photo must be in color with min 600×600 pixels, max 1200×1200 pixels with minimum 96dpi resolution.
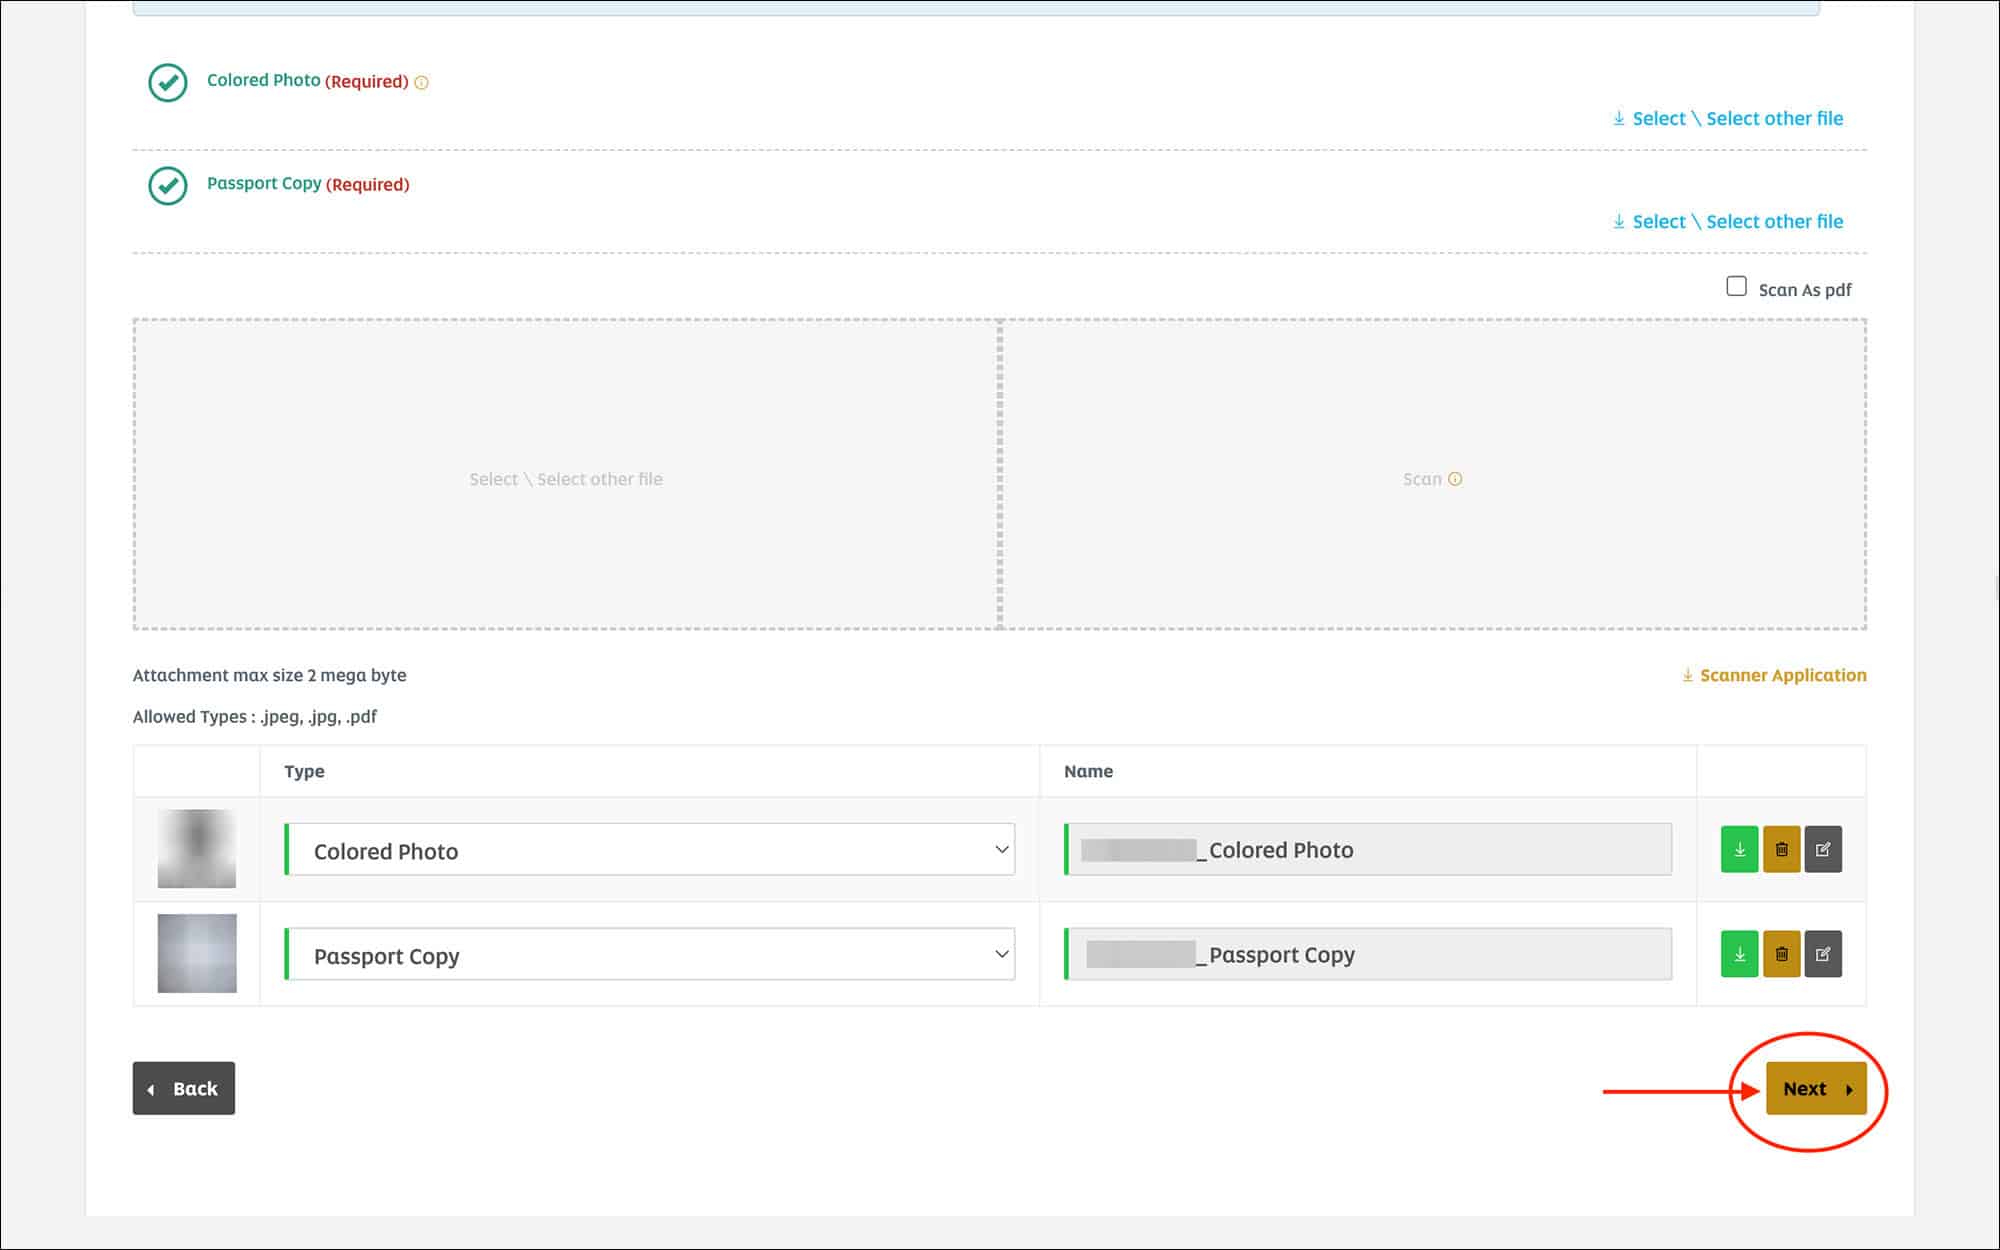
Make sure your photo and passport copy is uploaded.
Then, click on the “Next” button.
You will be taken to the “Review Application” page.
—
06. Review Application
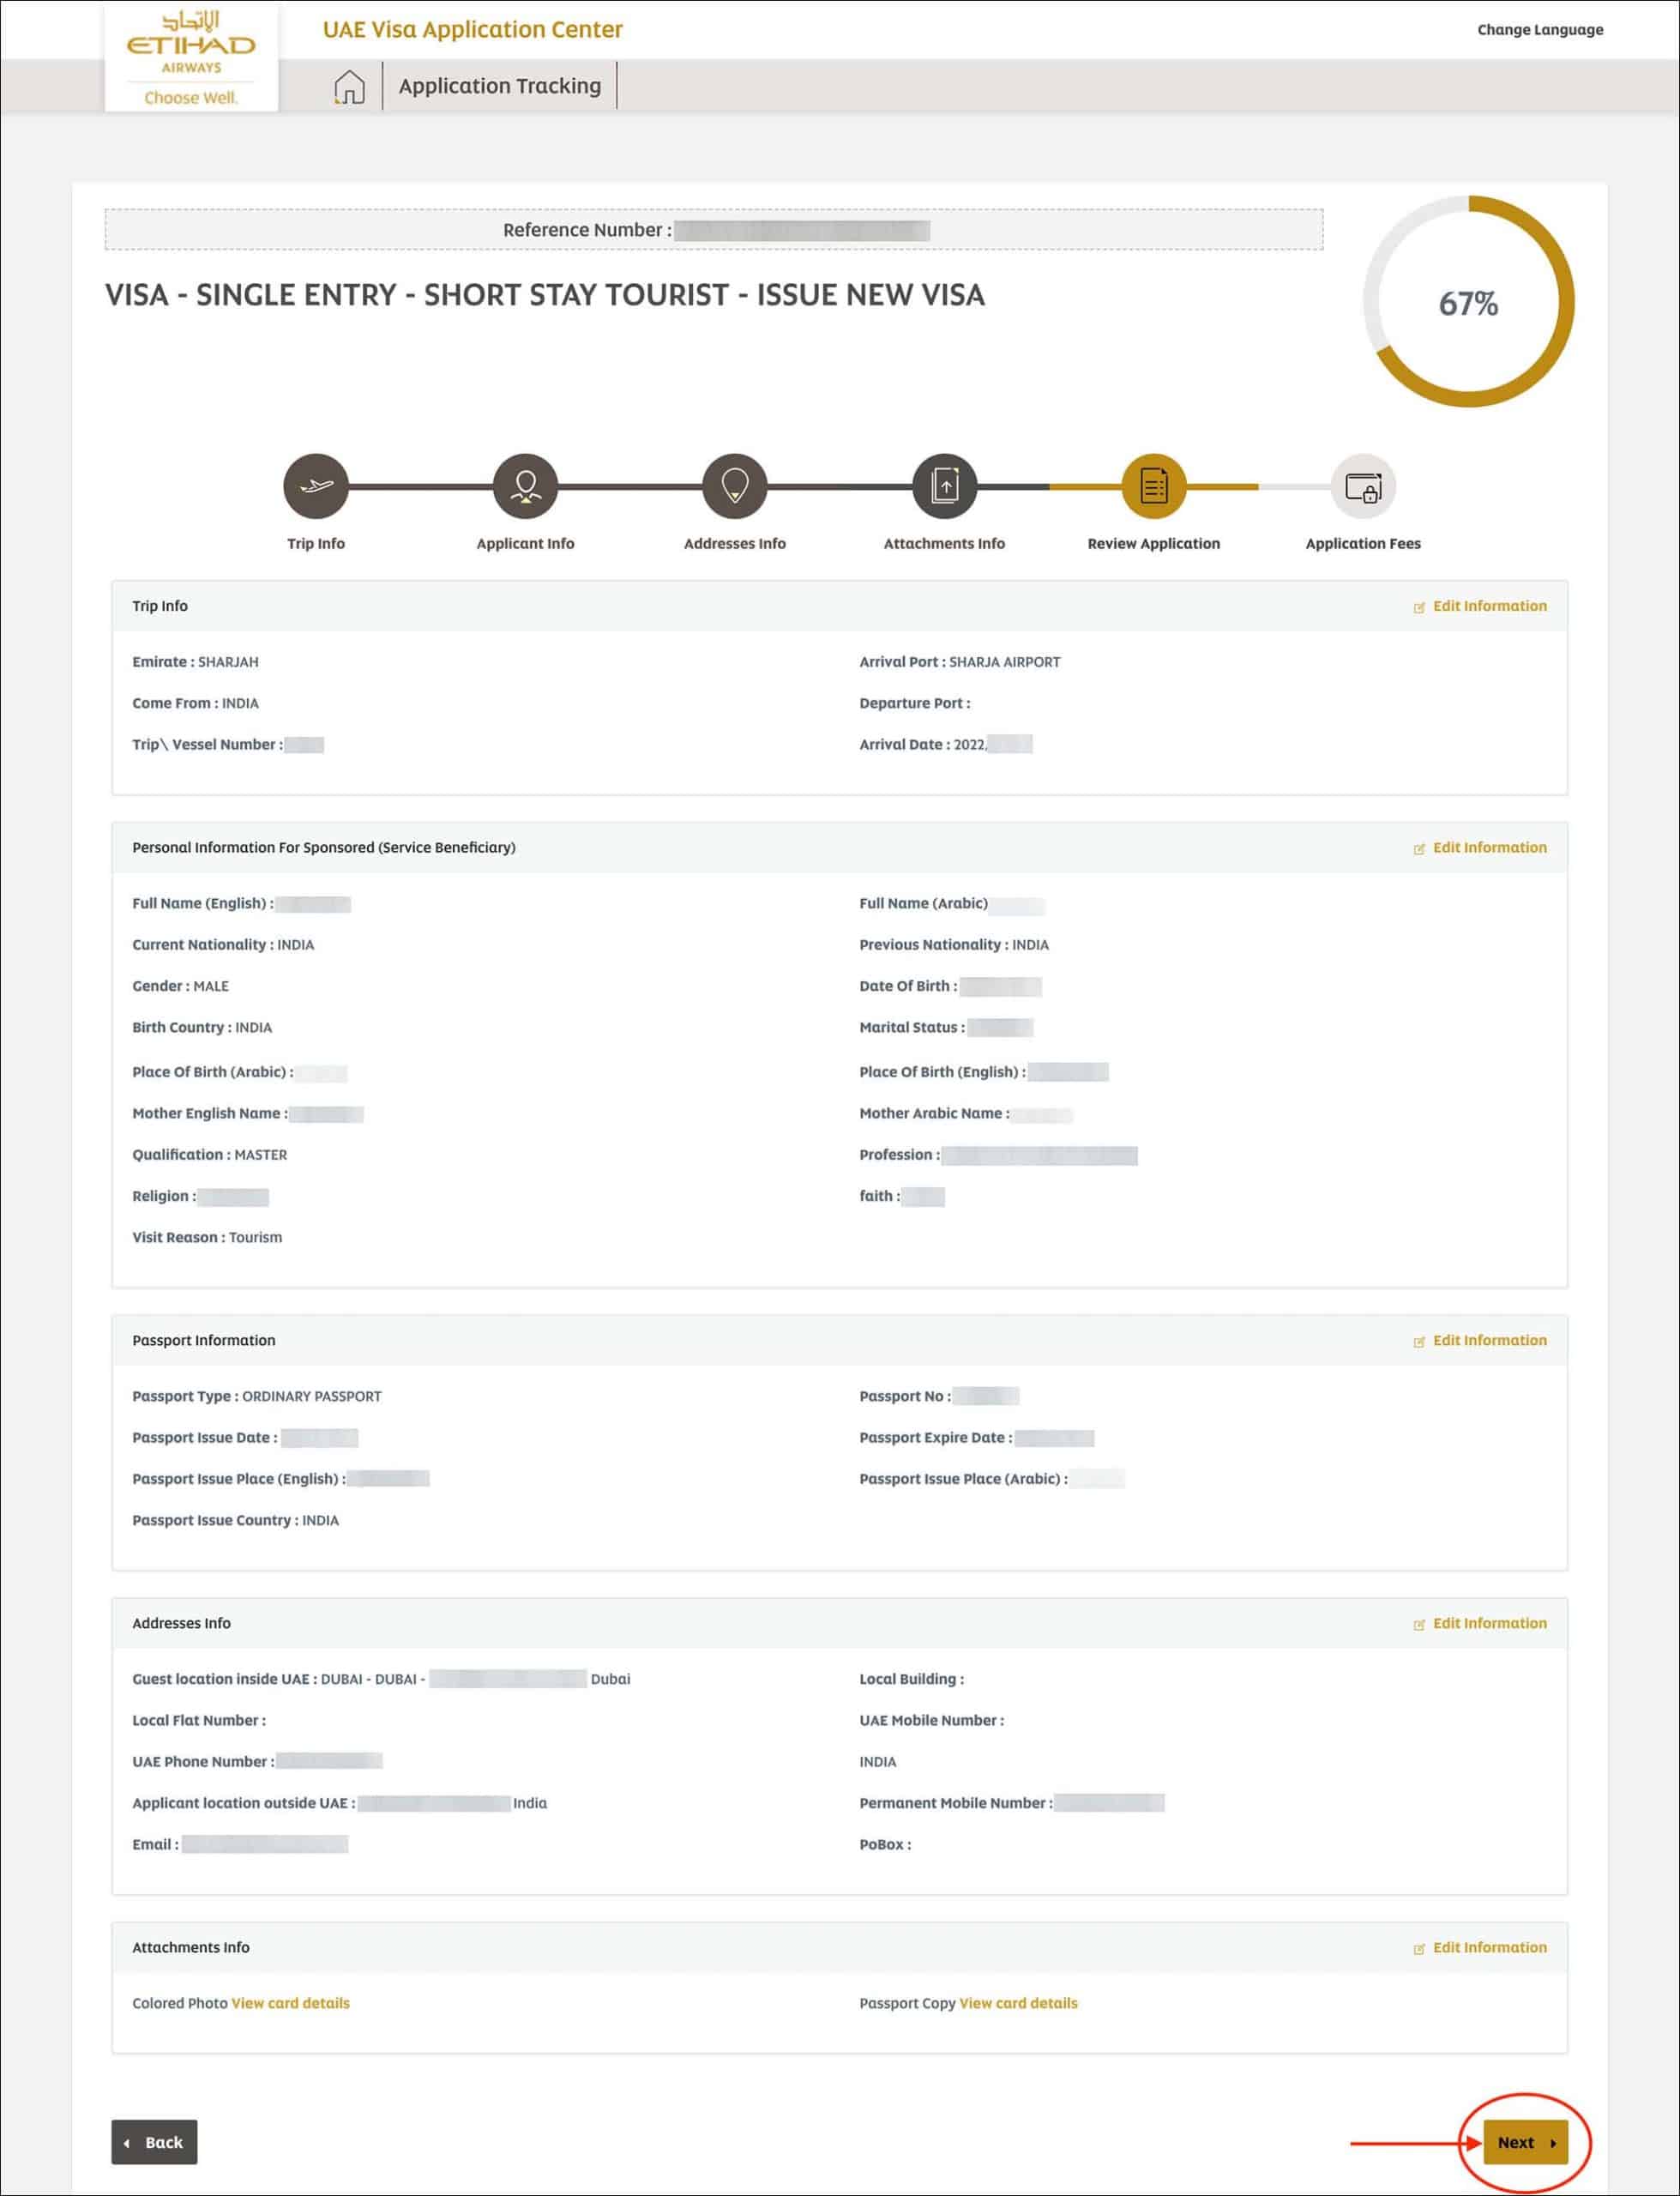
Review the following sections.
- Trip Info
- Personal Information for Sponsored (Service Beneficiary)
- Passport Information
- Address Info
- Attachments Info
If you see any discrepancies or errors in any section, click on the “Edit Information” for that section to go back and fix the errors.
After you review everything, click on the “Next” button.
You will be taken to the “Application Fee” page.
—
07. Application Fee
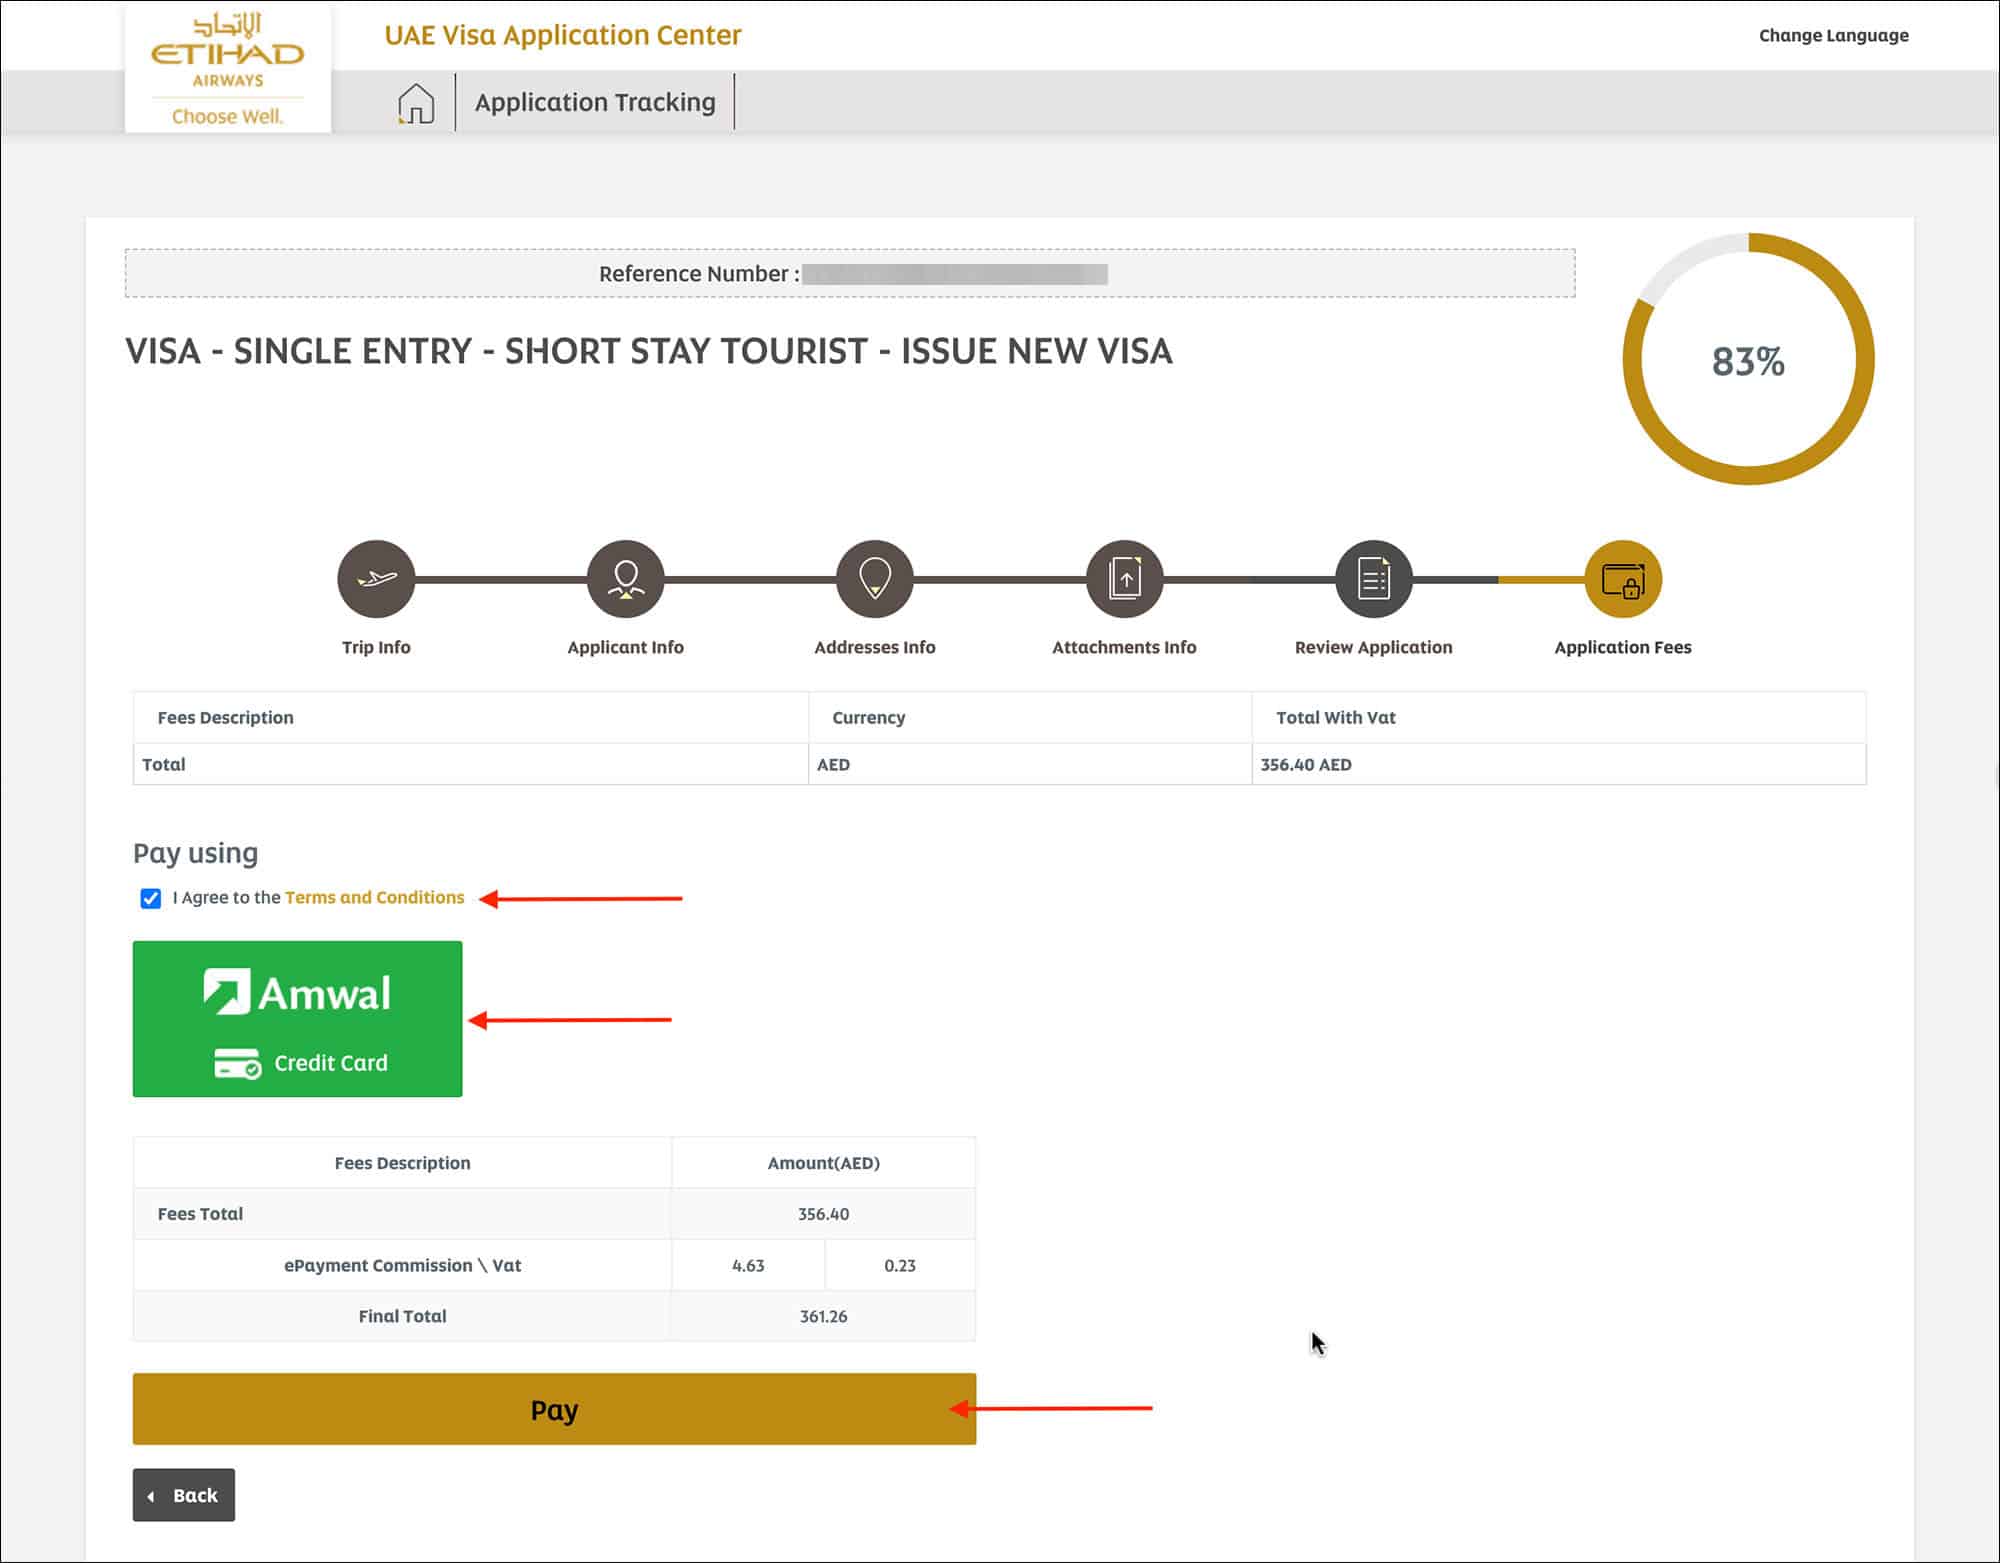
Under the “Pay Using”, check the box for “I Agree to the Terms and Conditions”.
Then click on the “Amwal Credit Card” button below it.
Then you will see the total visa fee including vat and agent commission.
Click on the “Pay” button.
You will be taken to the credit card form.
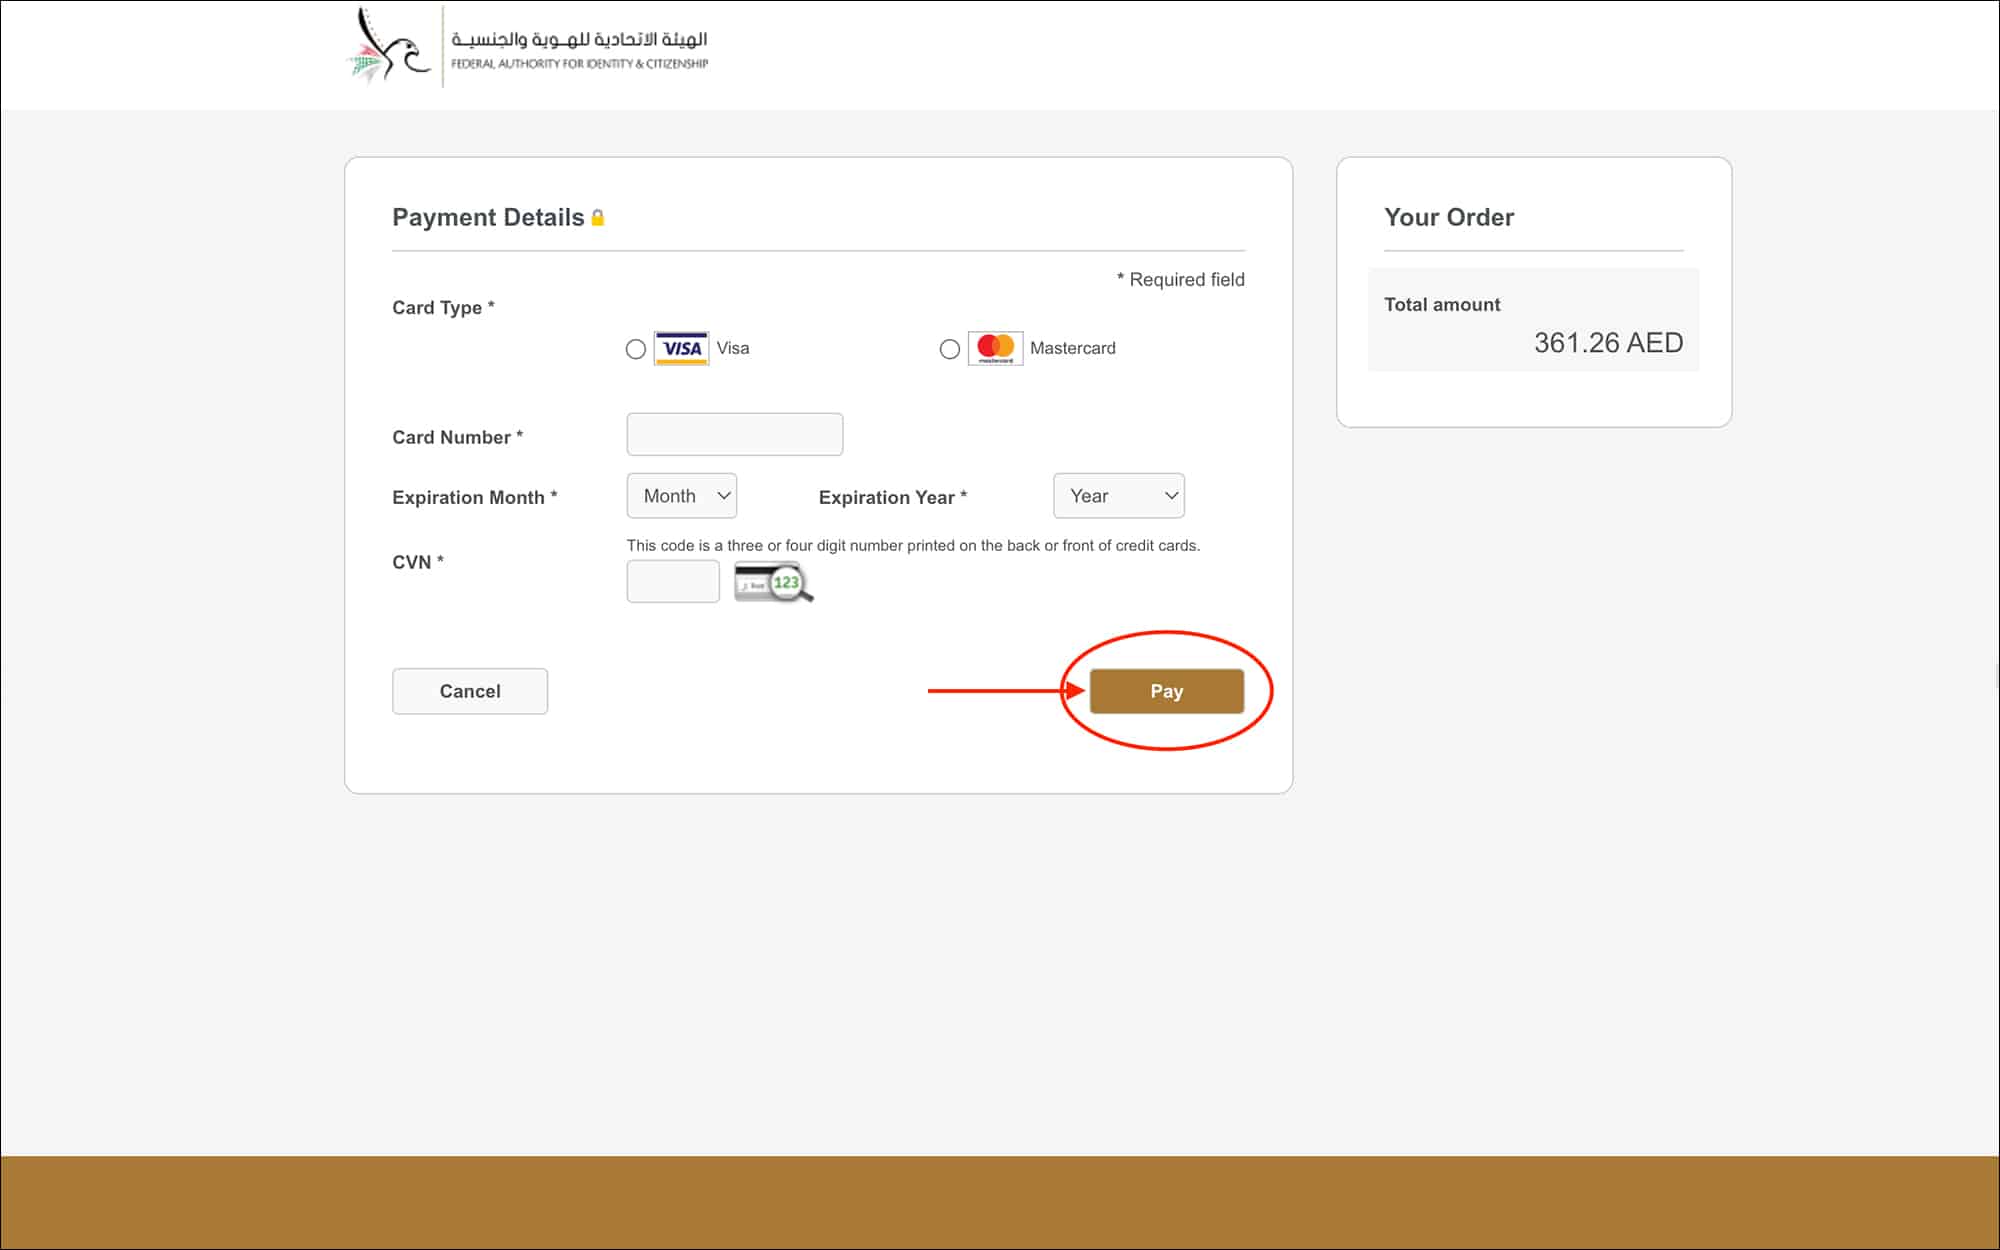
Select your card type and enter your credit/debit card details.
Click on the “Pay” button.
You will be taken to the “Requests Applied Successfully” page.
—
08. Application Success
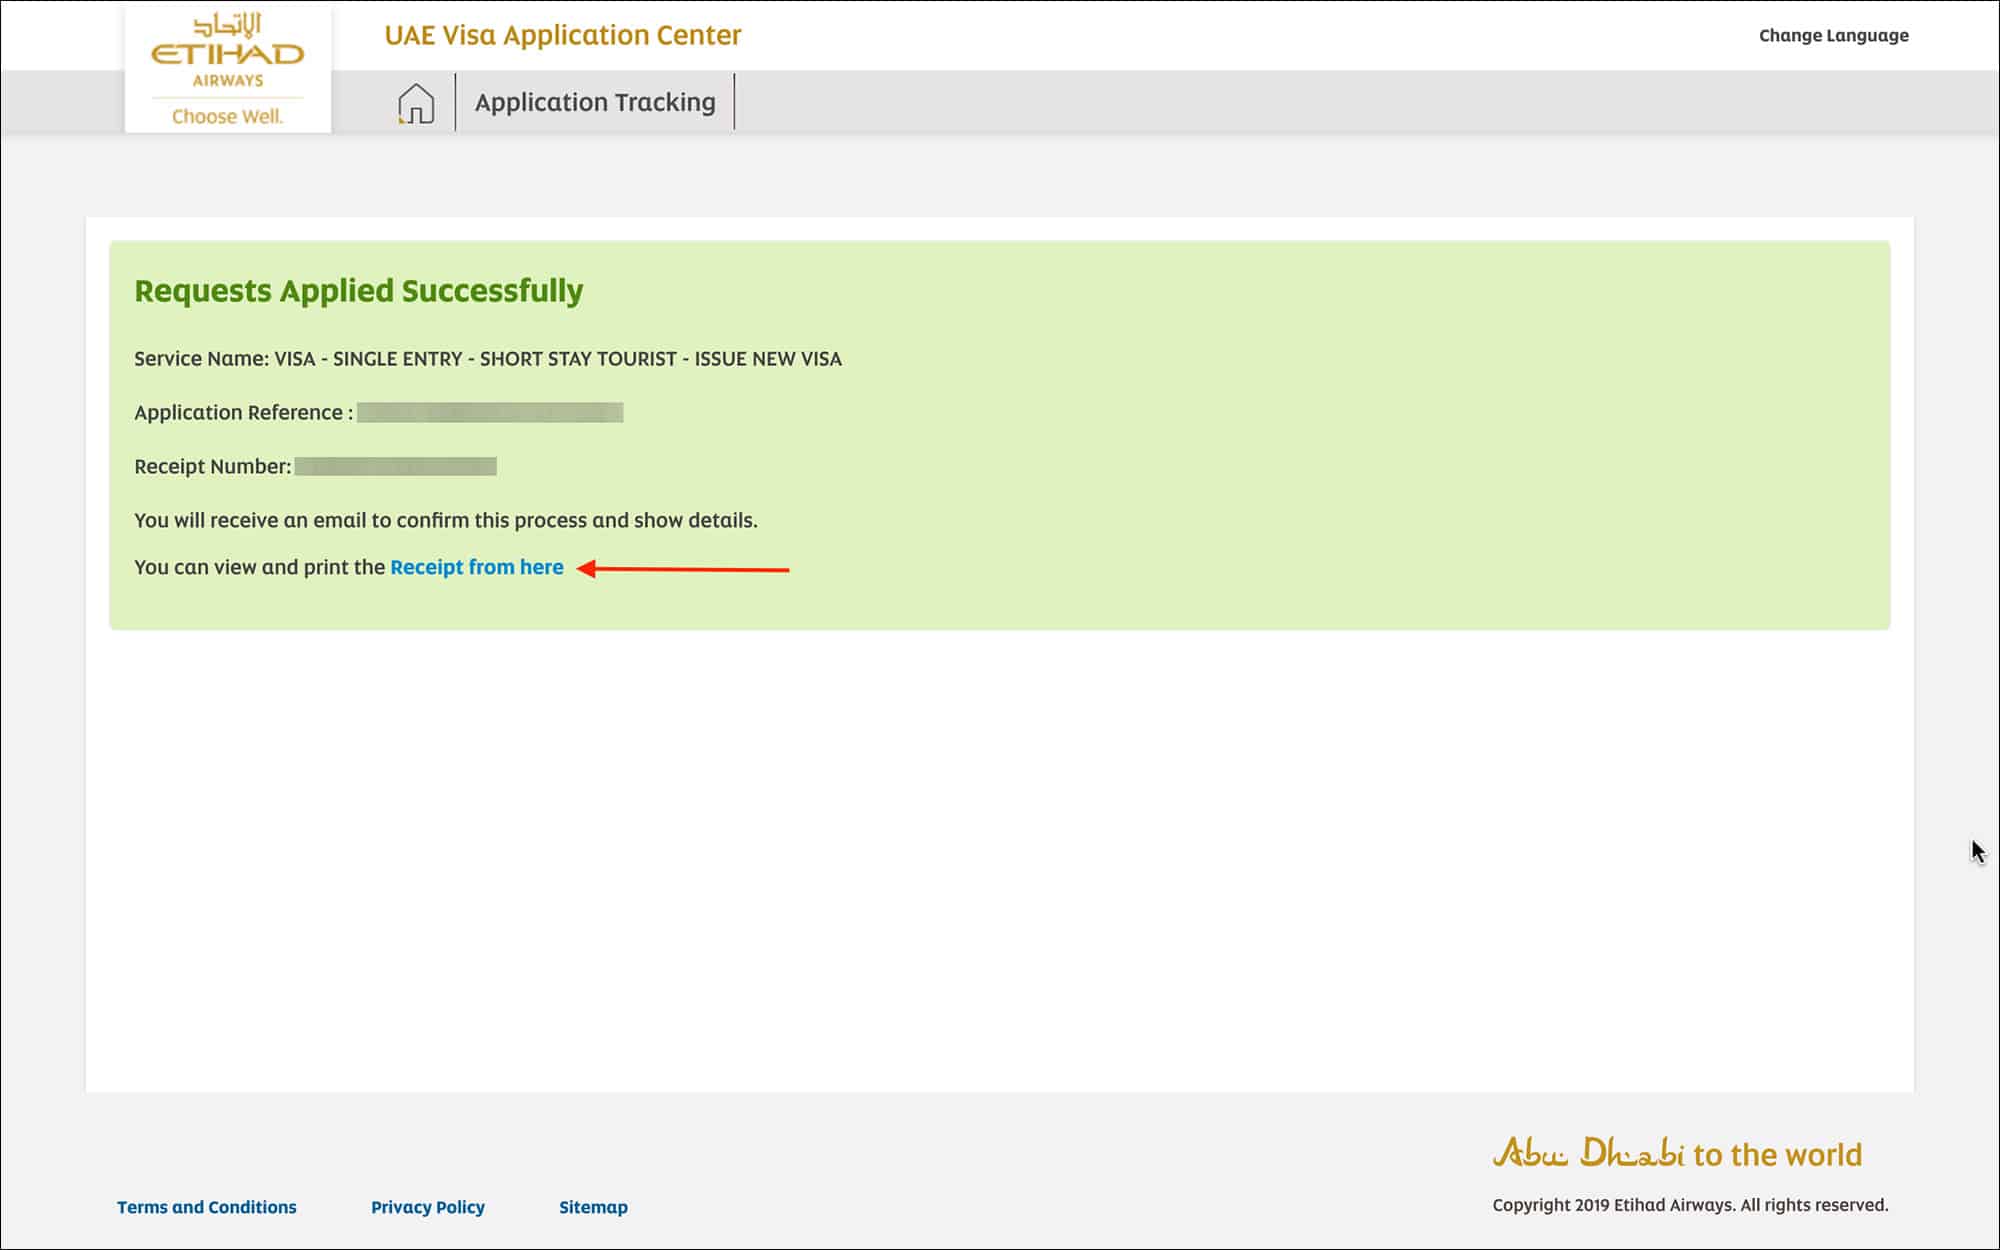
On this page, you will see the “Requests Applied Successfully” message.
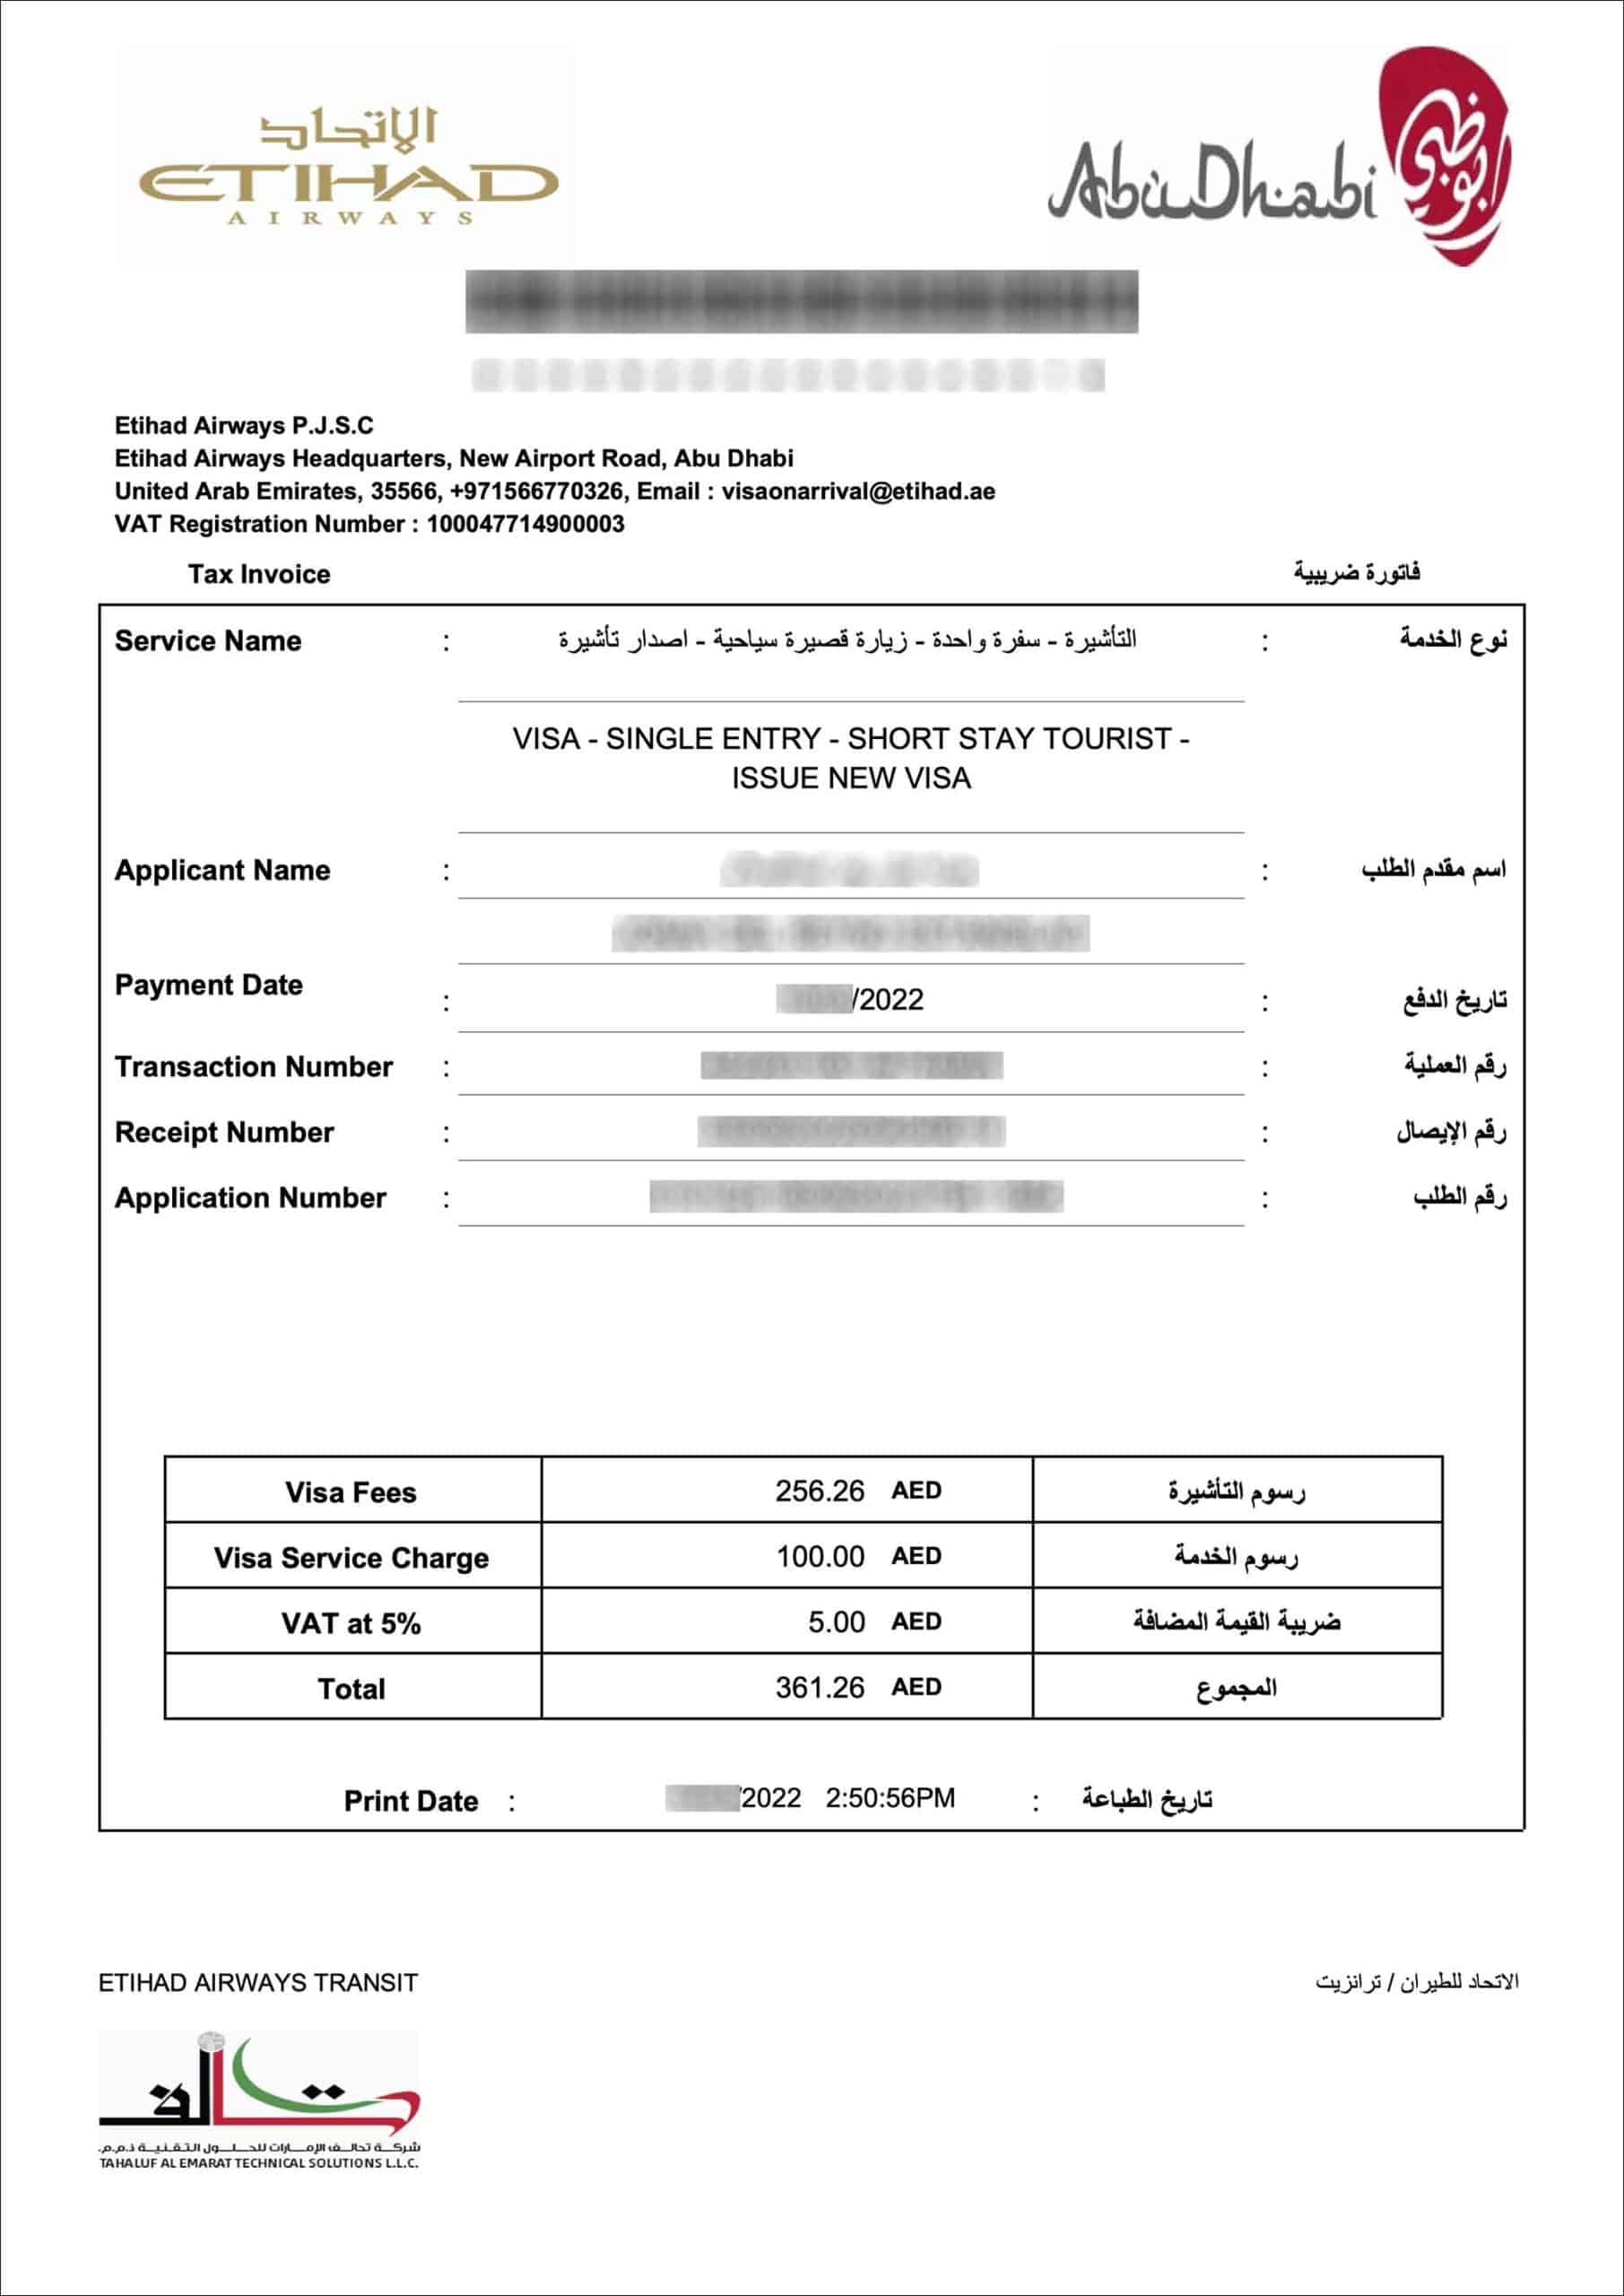
Print your receipt for the visa fee payment by clicking the “You can view and print your Receipt from here” link.
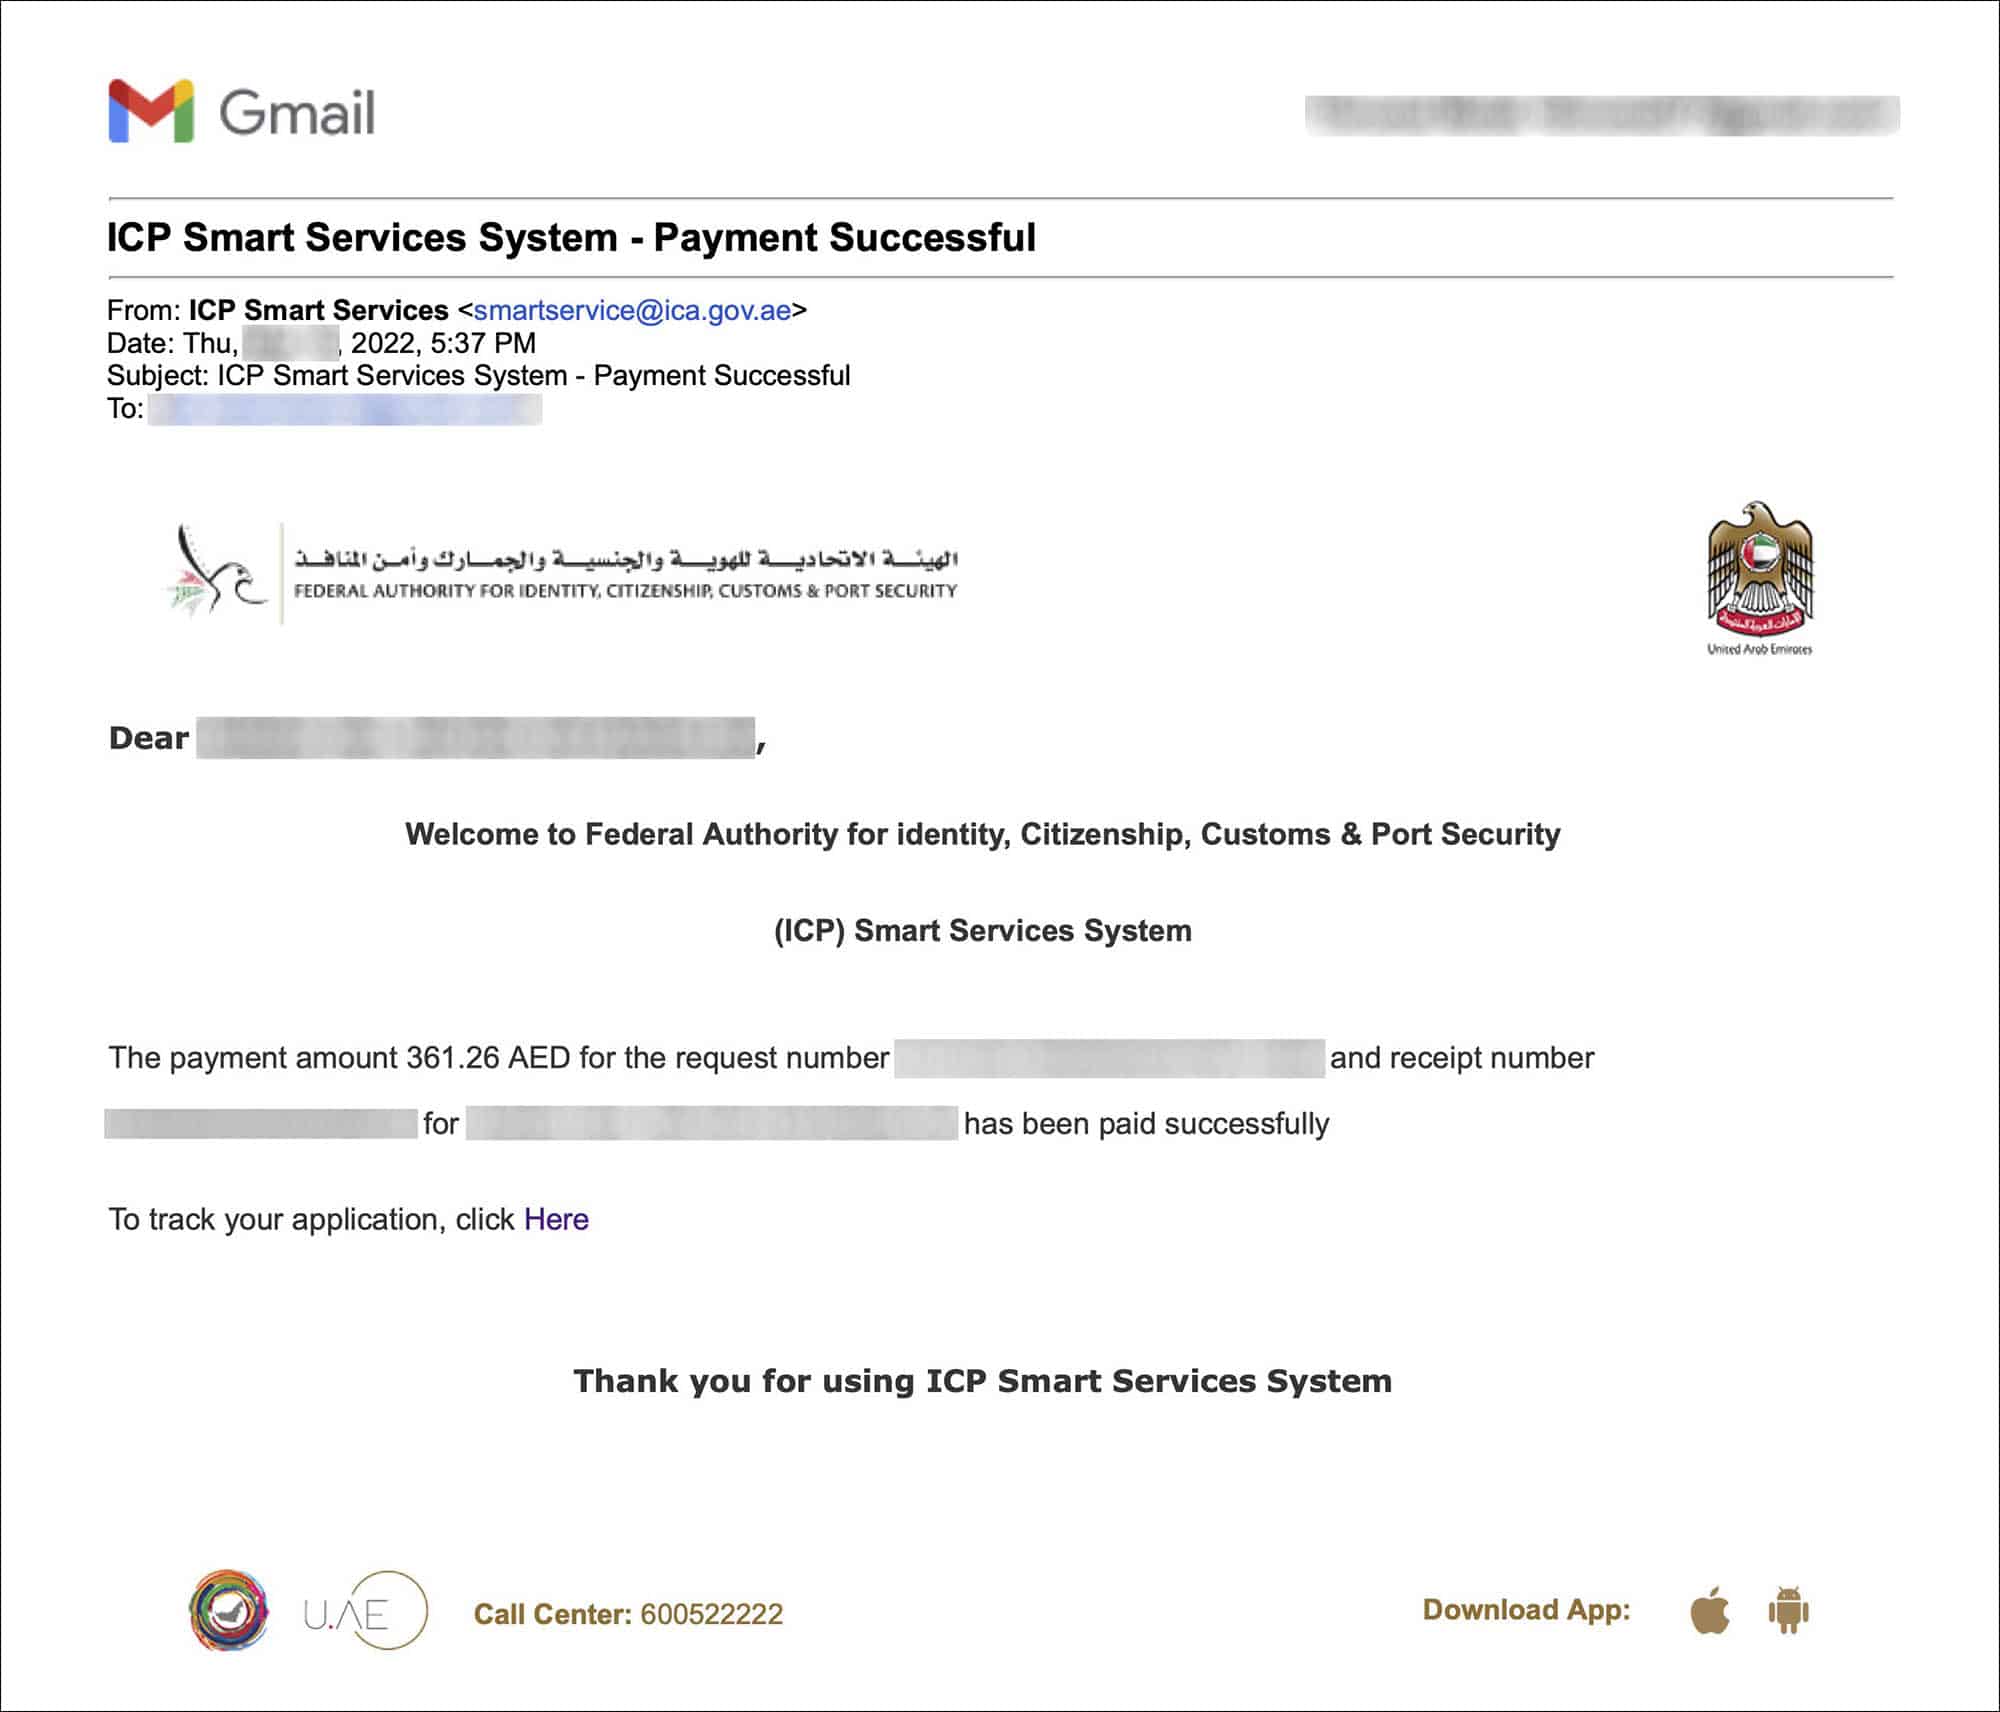
You will also receive an email with subject “ICP Smart Services System – Payment Successful” confirming your visa fee payment.
—
09. Application Processing
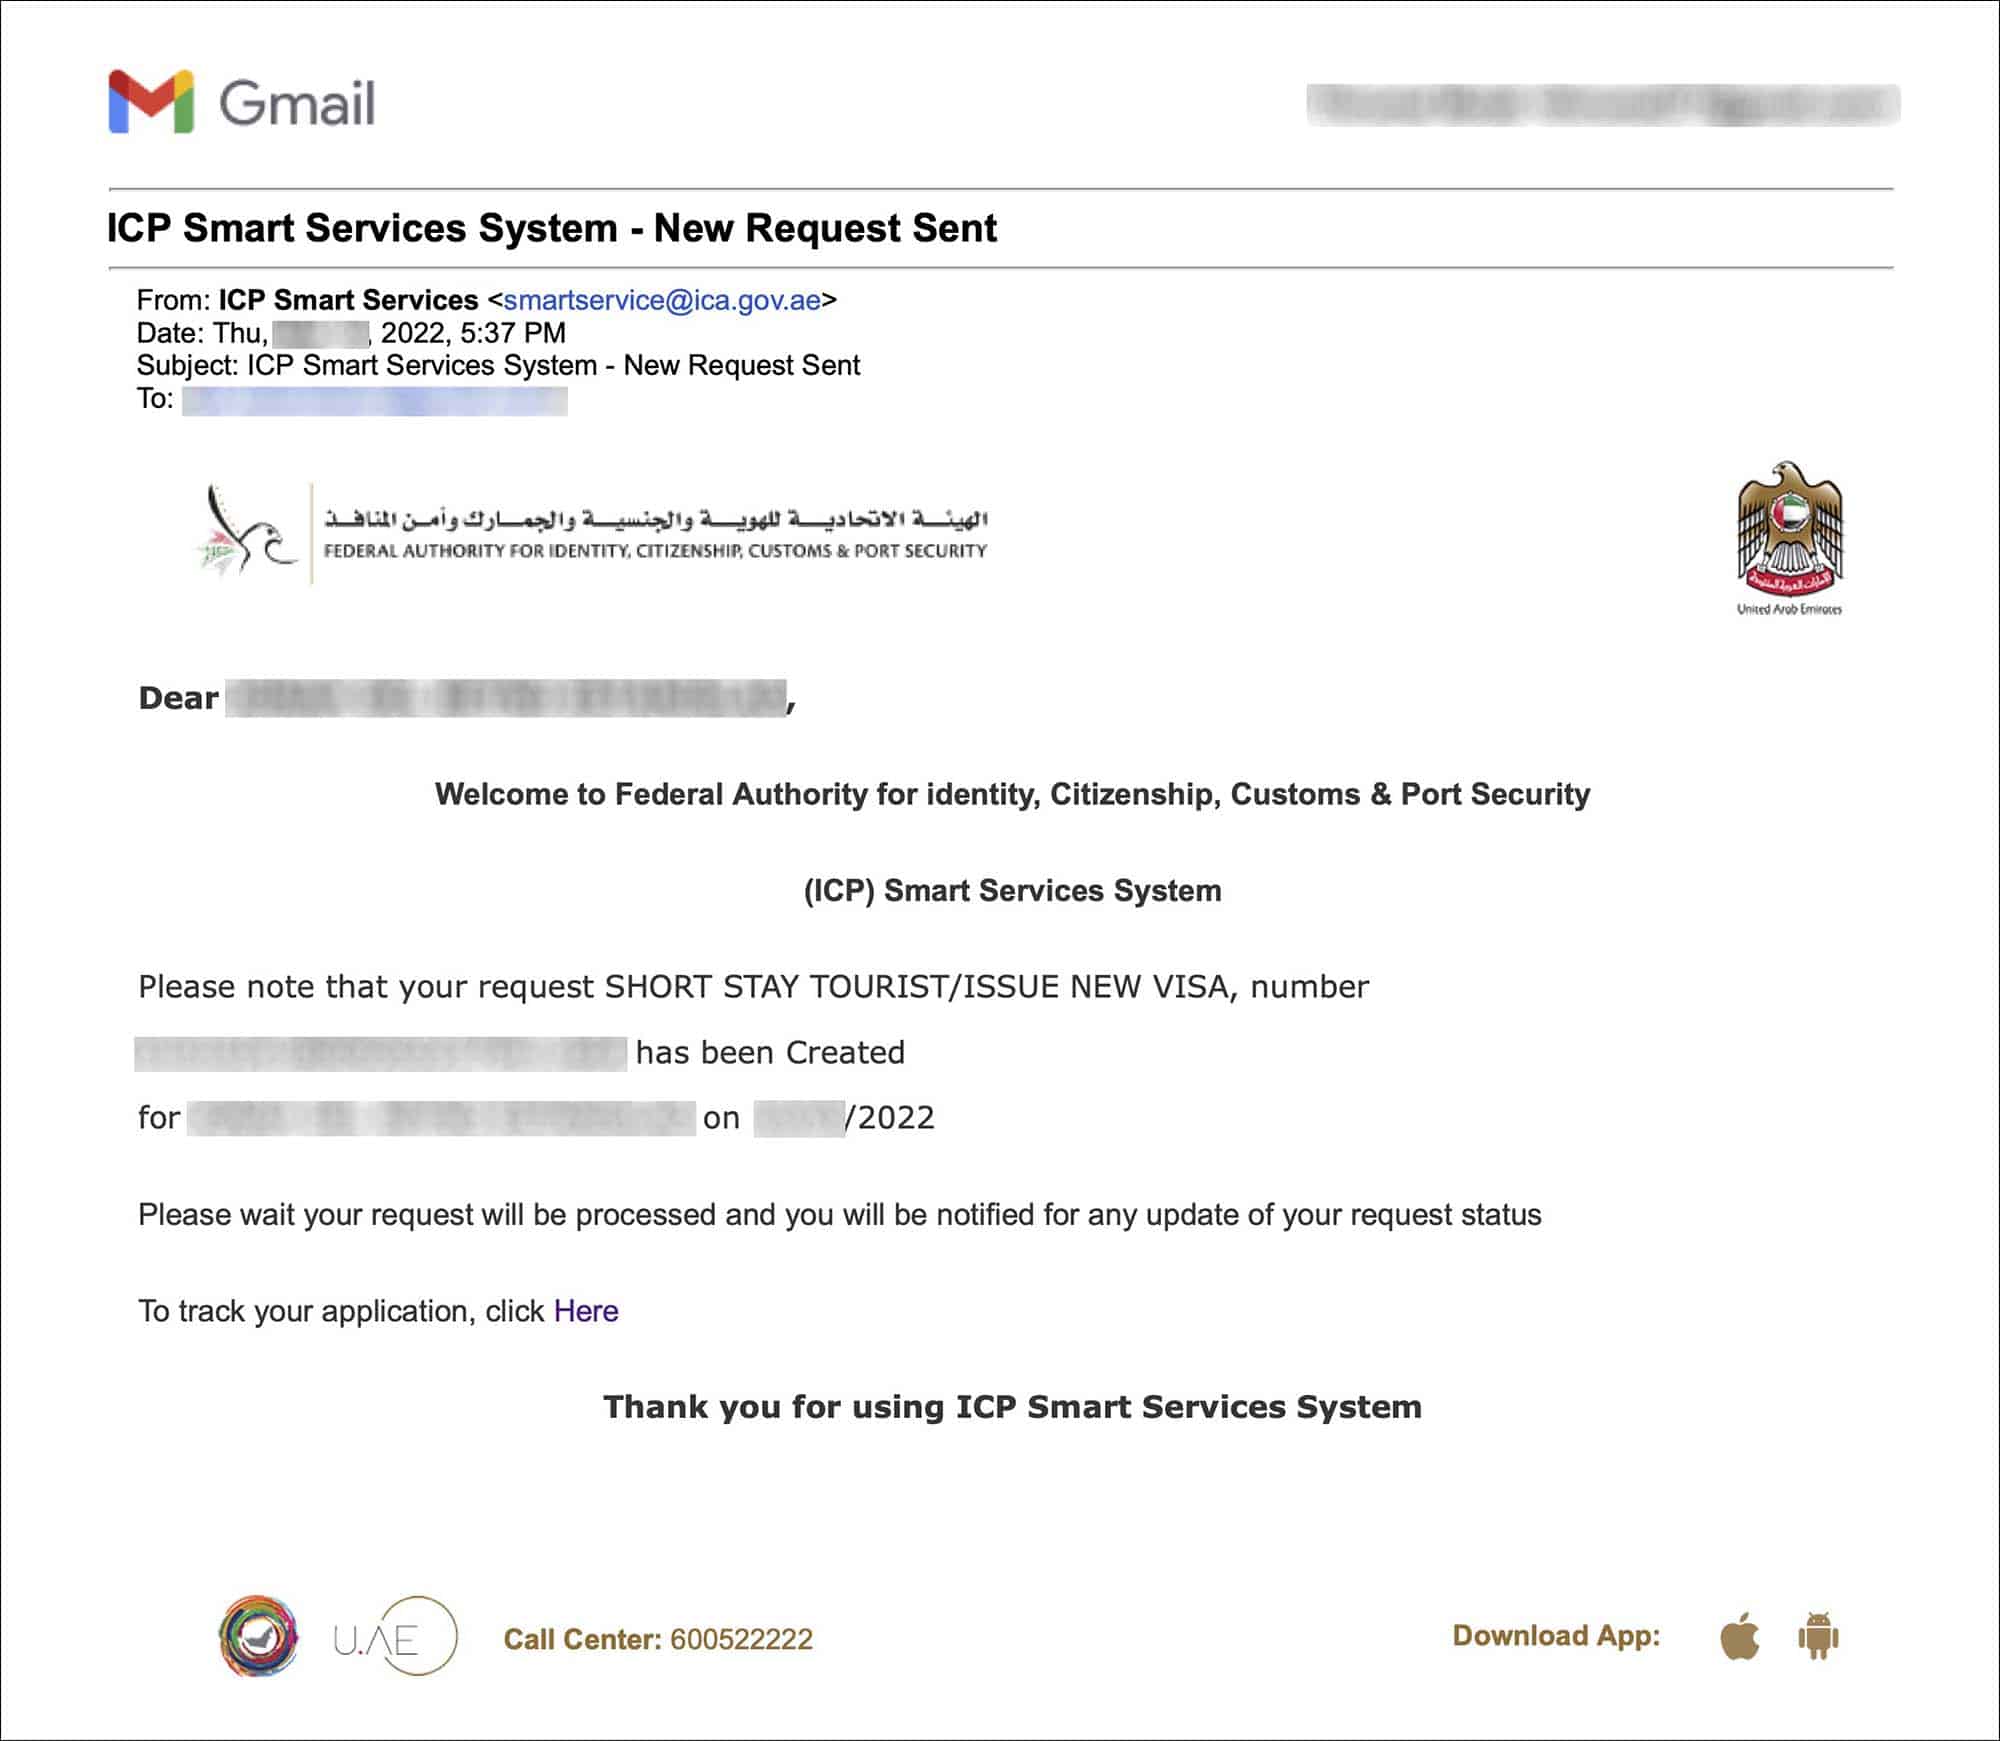
Right after you have successfully submitted your visa application, you will receive an email with the subject “ICP Smart Services System – New Request Sent” saying that your visa application has been received and will be processed soon.
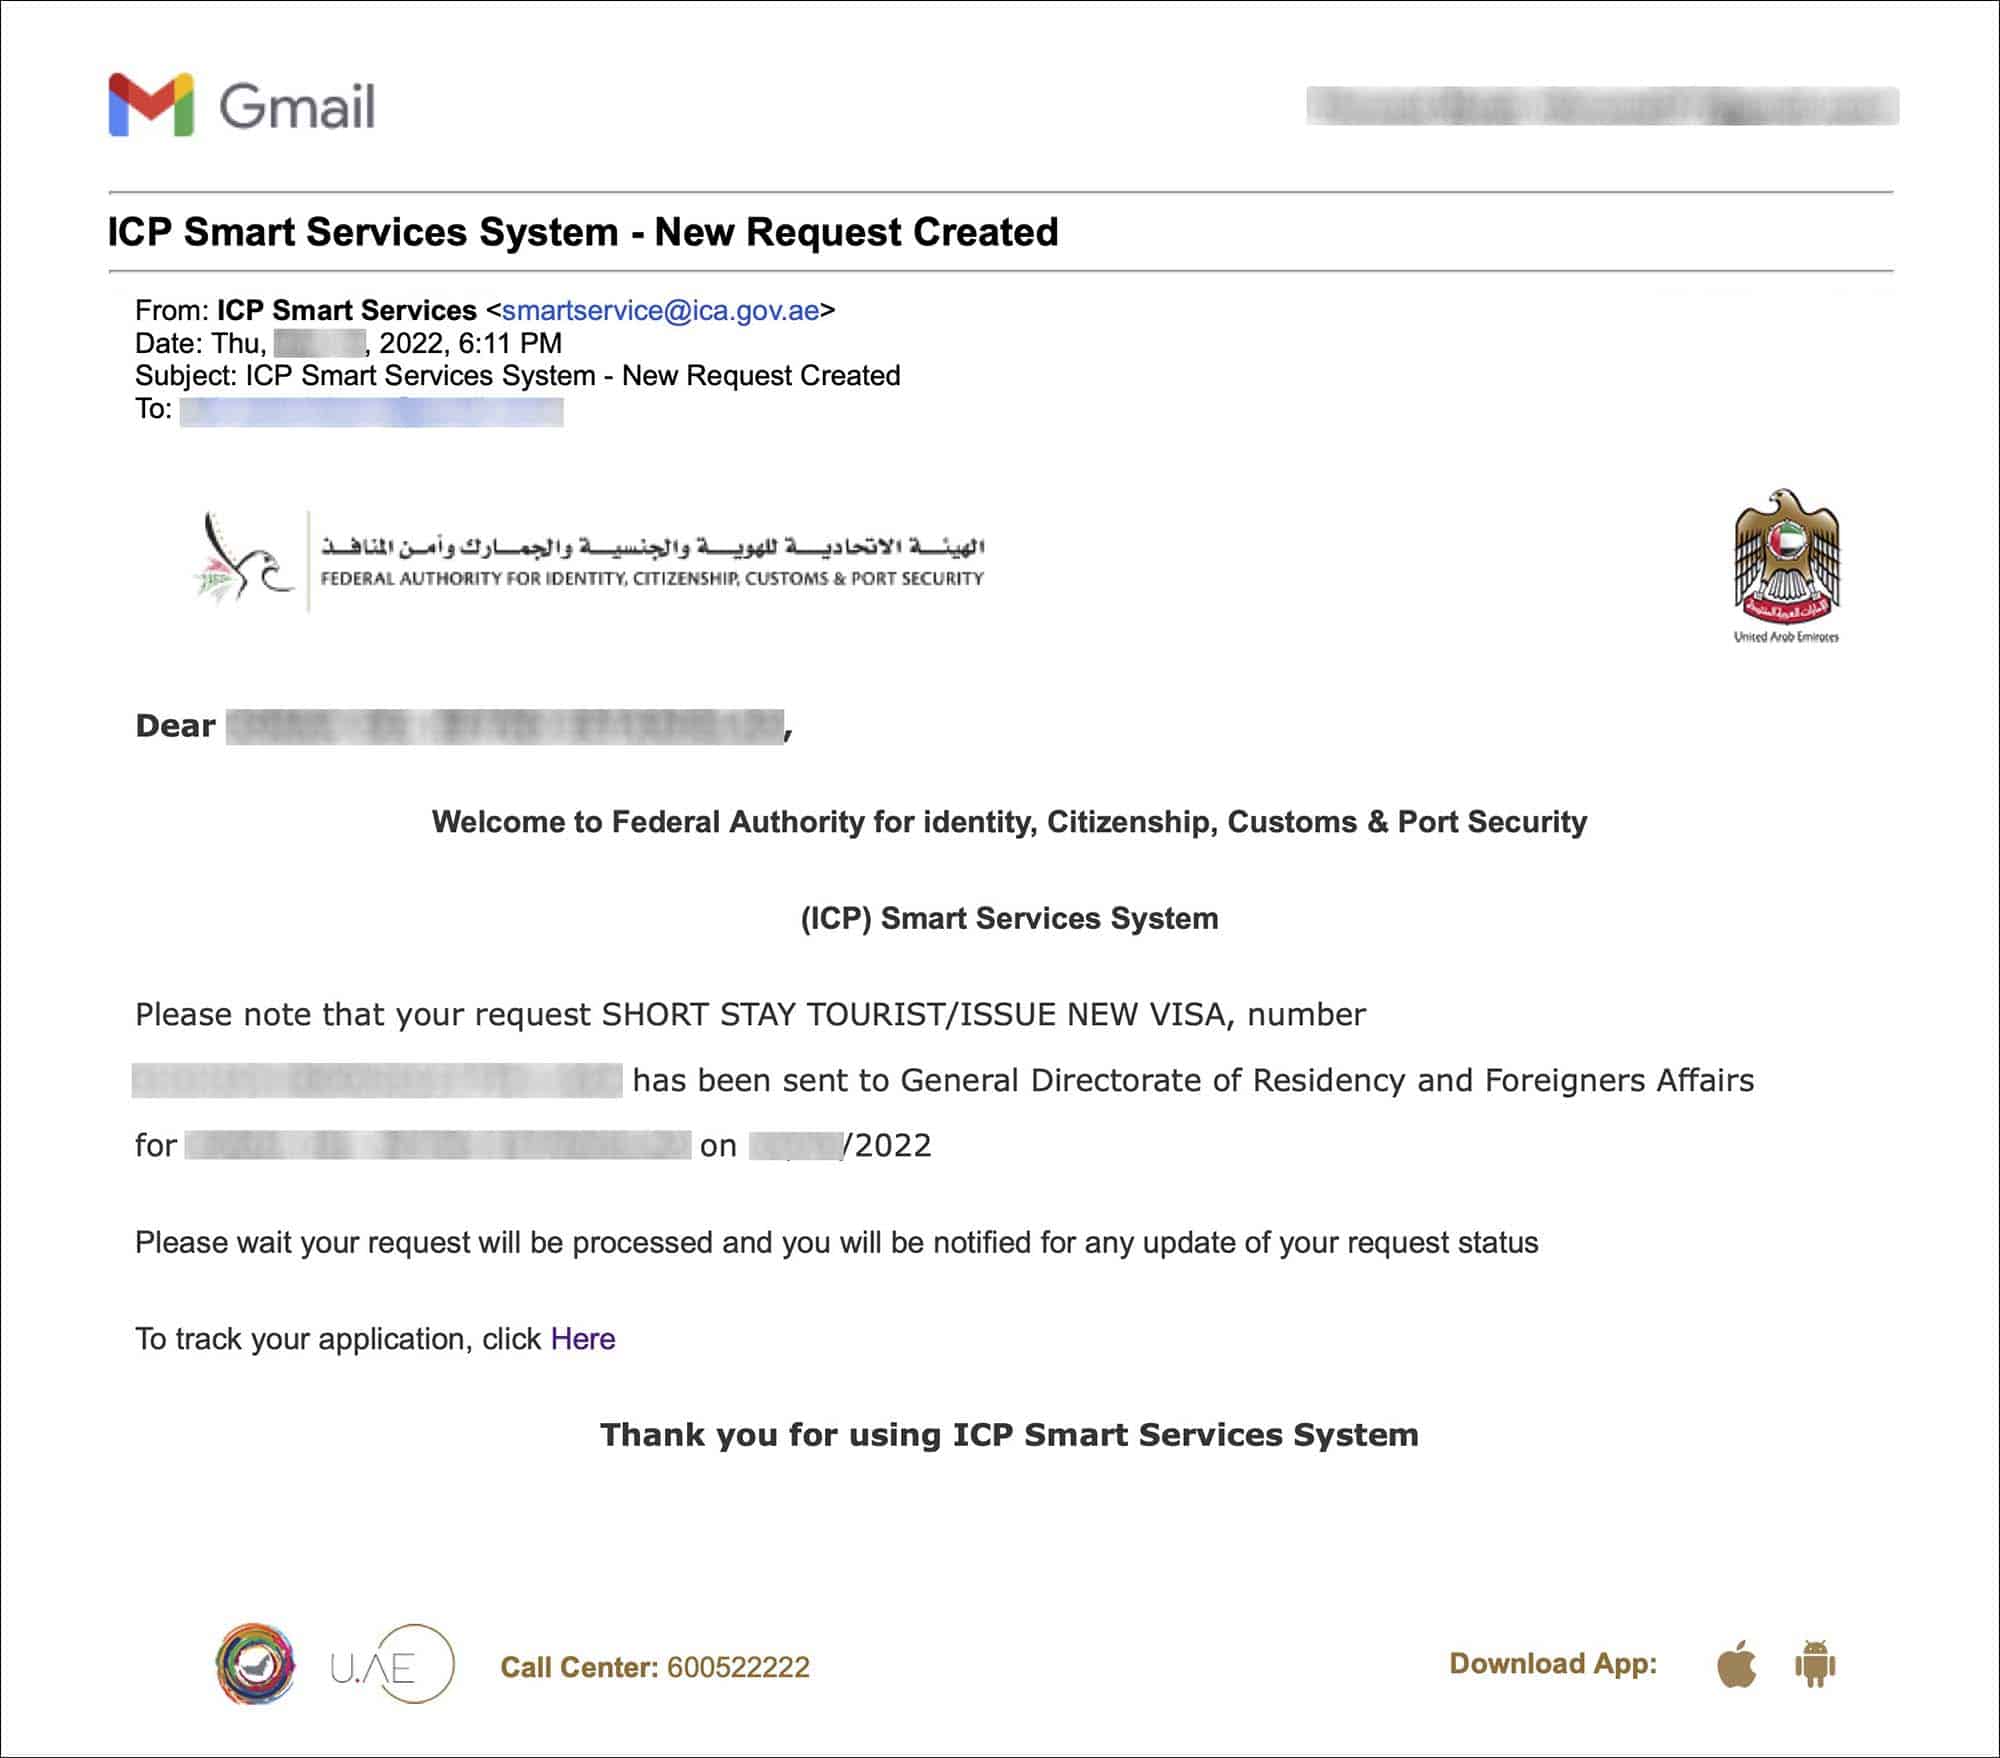
Your visa application will then be sent to the General Directorate of Residency and Foreign Affairs (GDRFA) for processing. When that happens, you will receive another email with the subject “ICP Smart Services System – New Request Created” saying that your visa application has been sent to the GDRFA.
—
10. Visa Approval
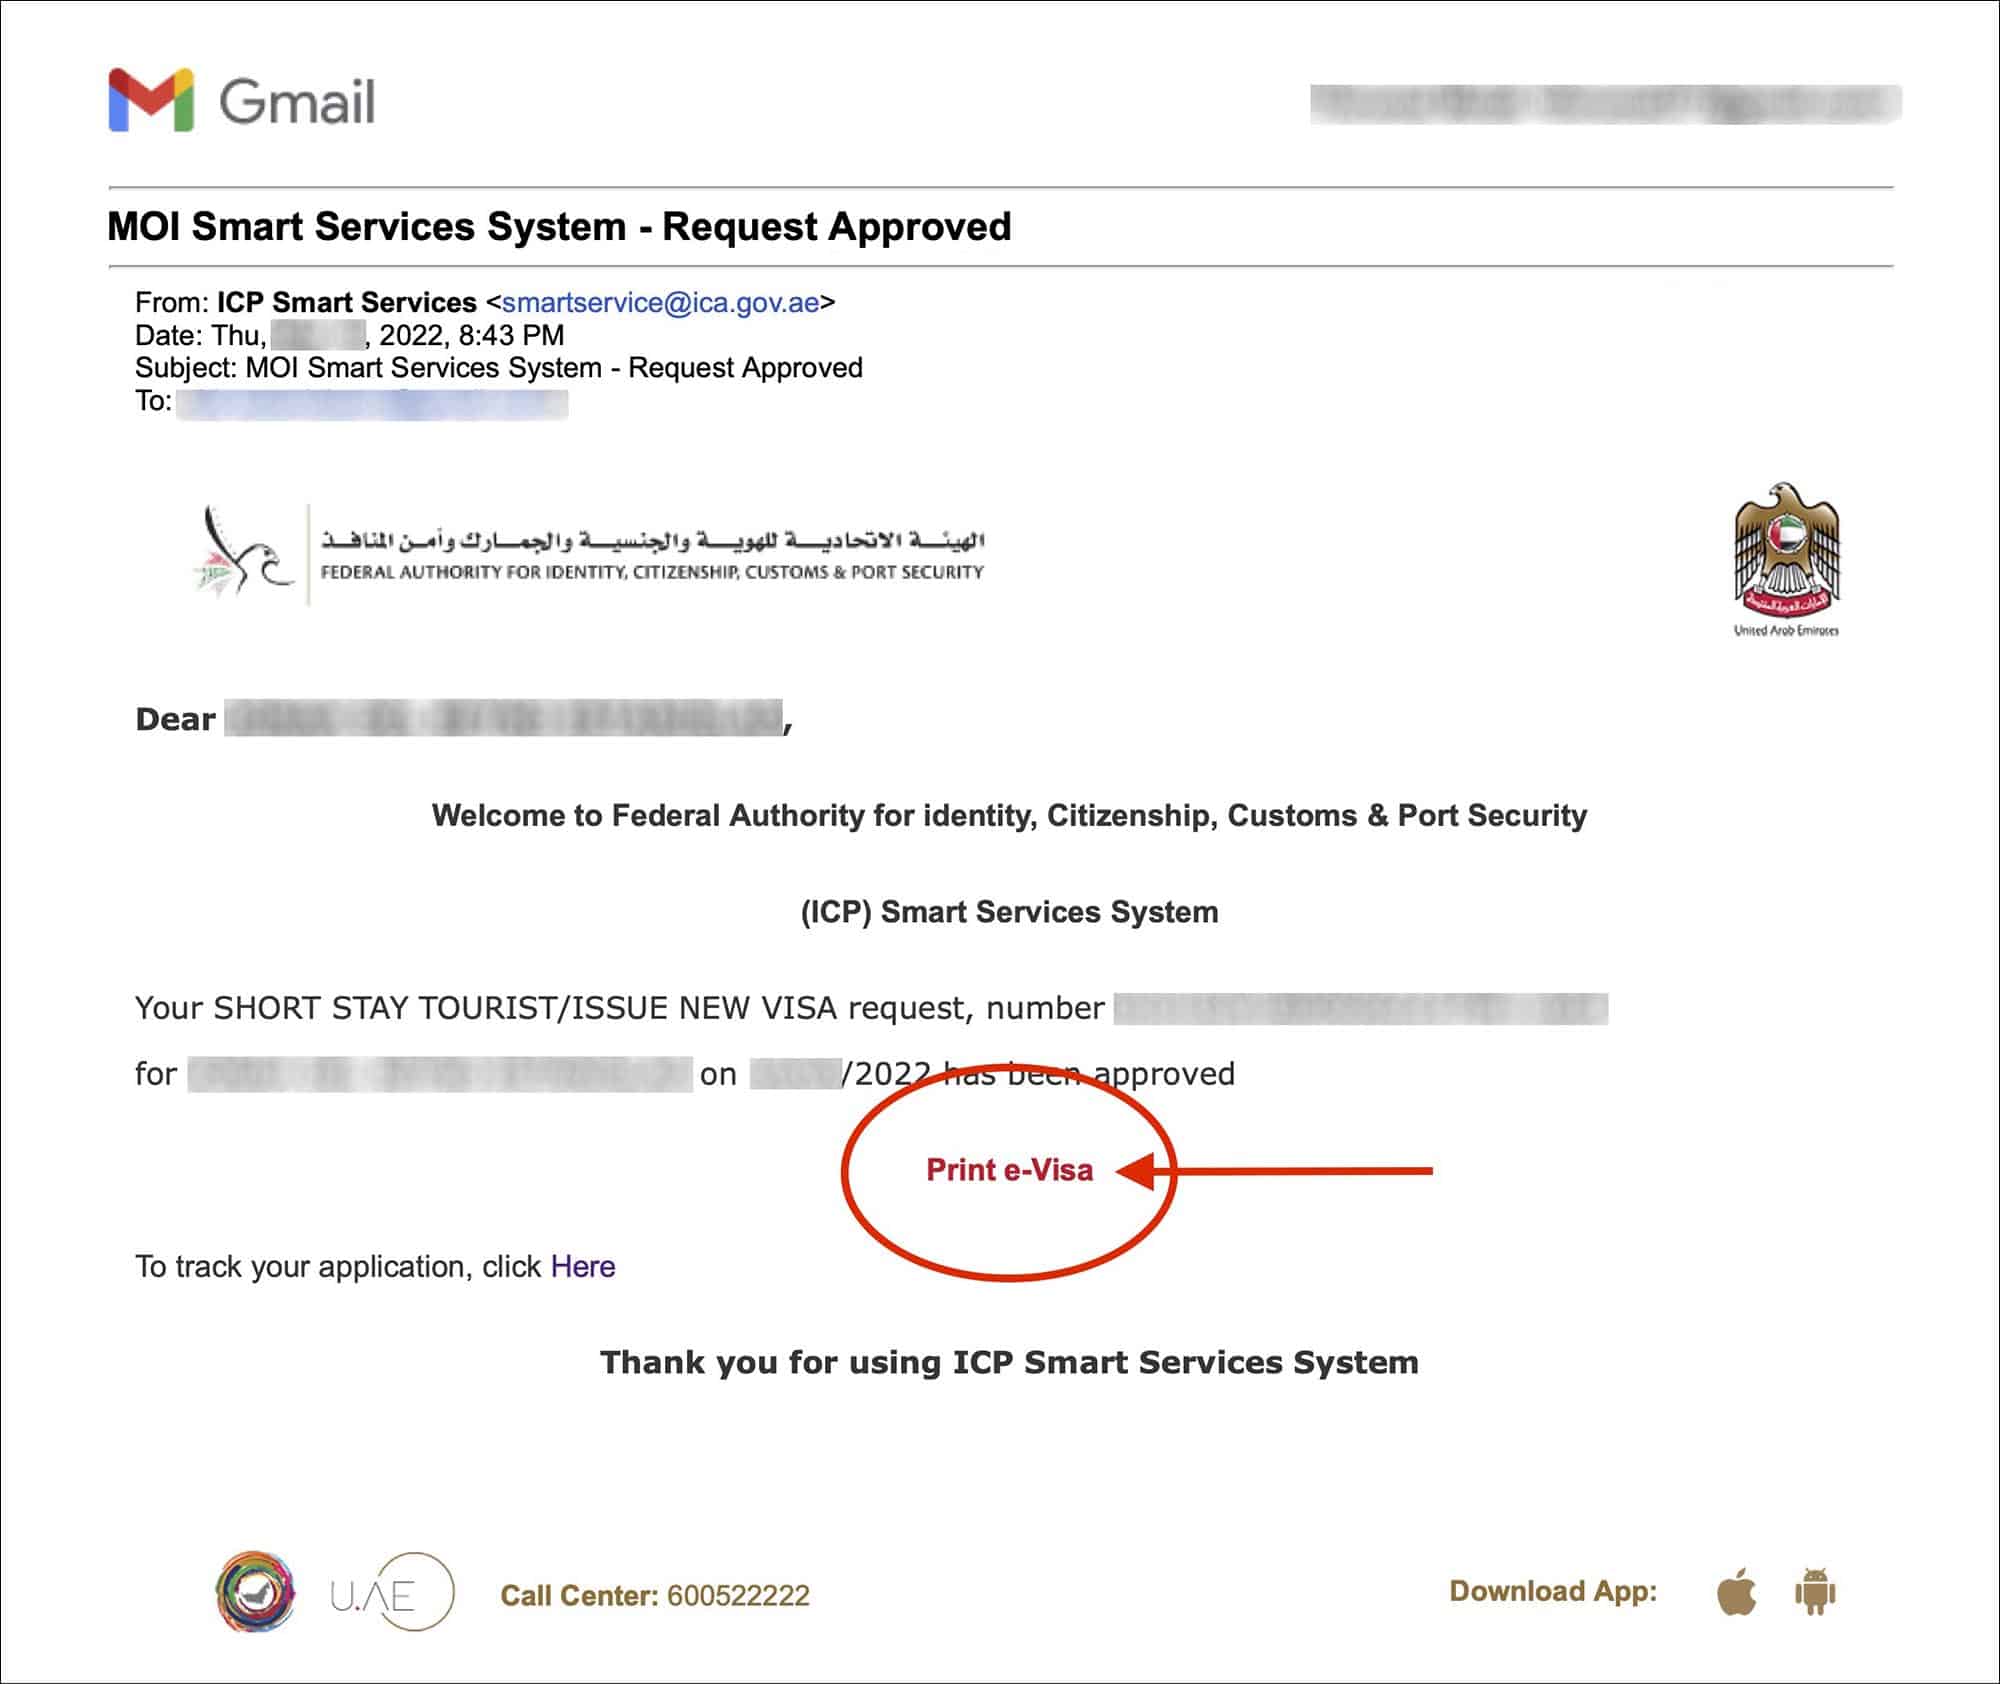
In a few hours, you will receive an email with the subject “MOI Smart Services System – Request Approved” saying that your visa is approved and can be downloaded.
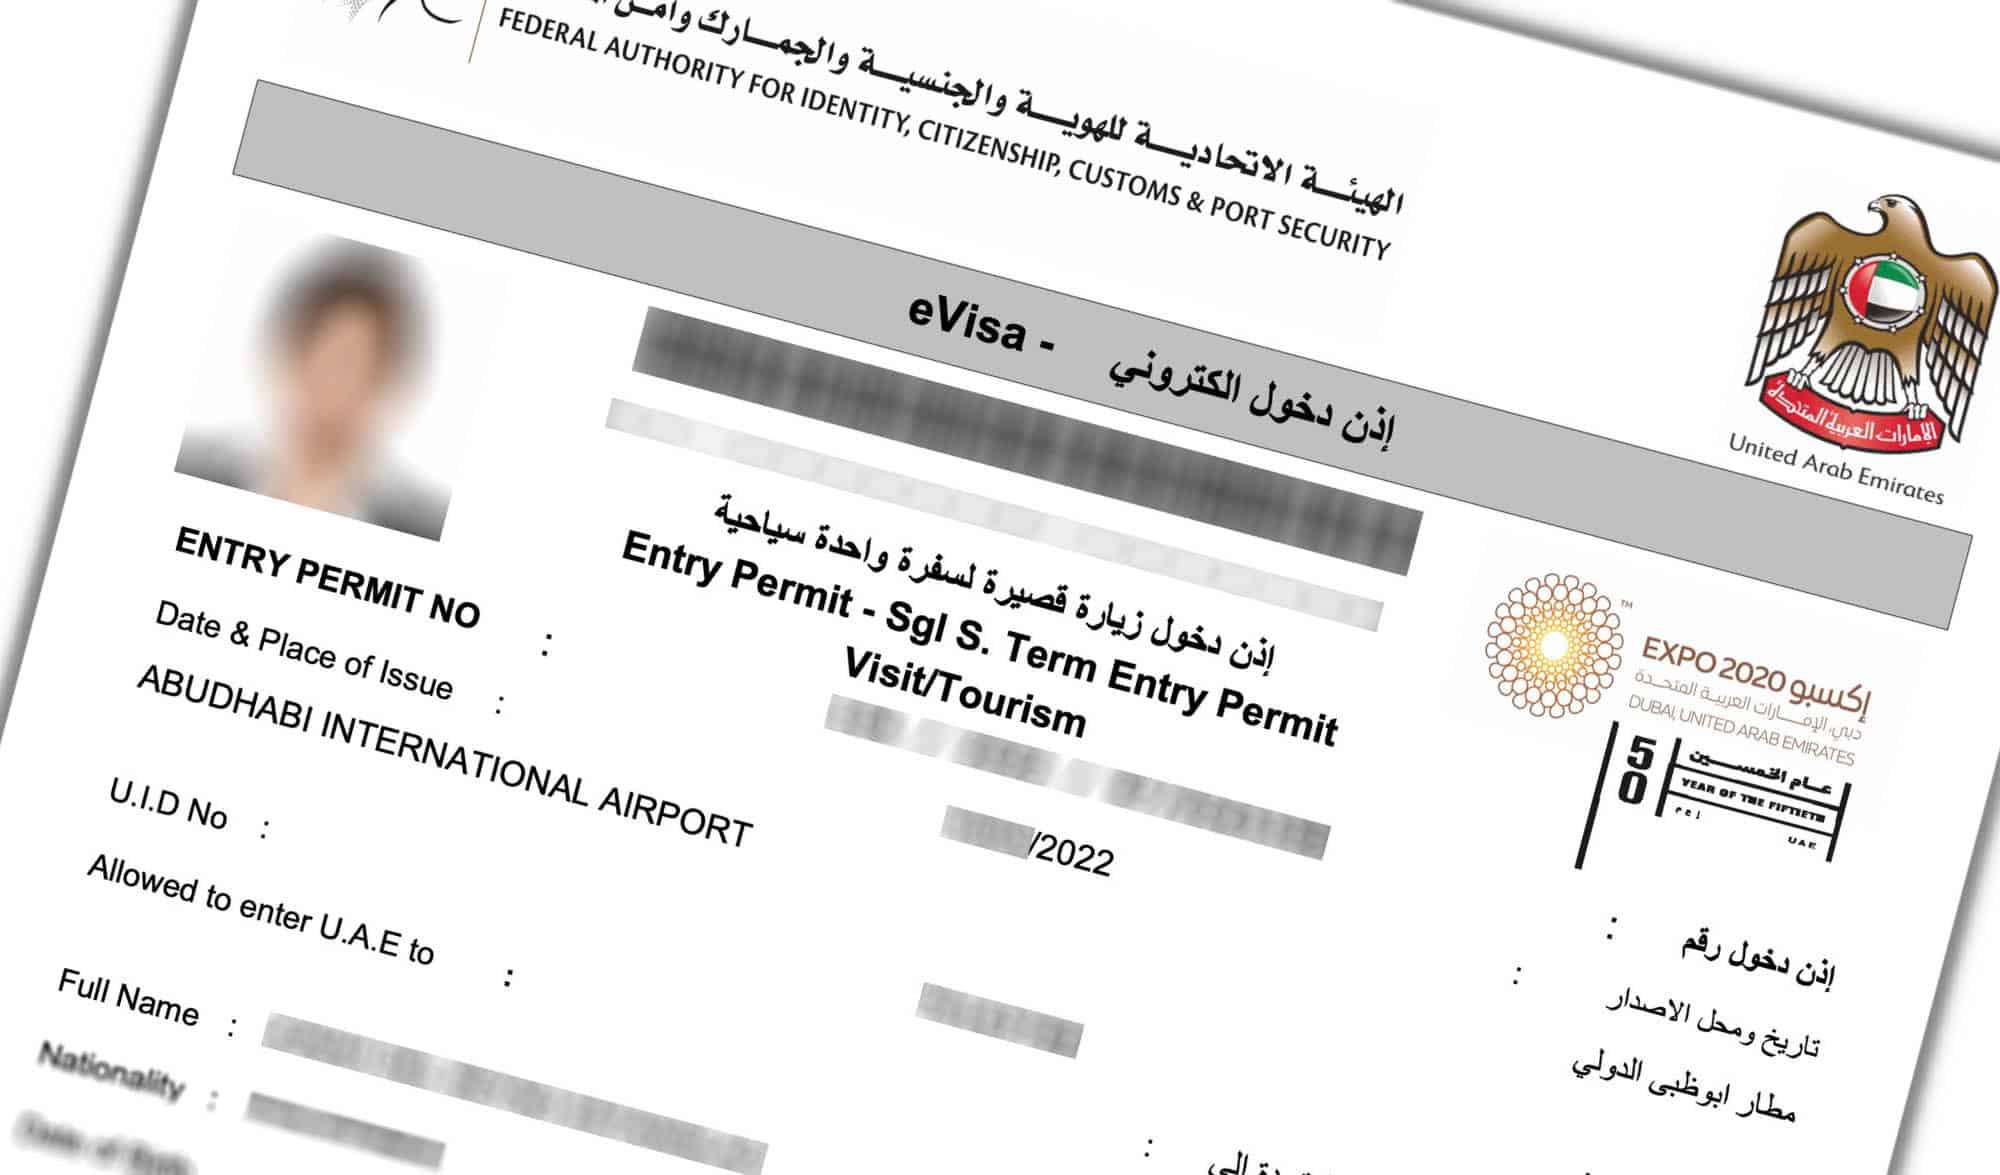
Click on the “Print e-Visa” link in your email to download a PDF copy of your approved UAE eVisa.

Check your Dubai eVisa PDF for any errors and make sure everything is looking good. Print and carry your Dubai eVisa when you travel.
***
Conclusion
There you go, guys! The process to get a UAE or Dubai visa online in just a few hours. If you run into any issues, comment below. I will see if I can help.
If you have used another agent, let me know in the comments about your experience with them, their fee and how long it took to get the visa.

 How to get UAE or Dubai Visa on Arrival with Indian passport and US visa
 You are approaching the maximum number of times: What causes this CGI error and how to avoid it?
 53 countries you can travel VISA-FREE with US visa [2024 edition]