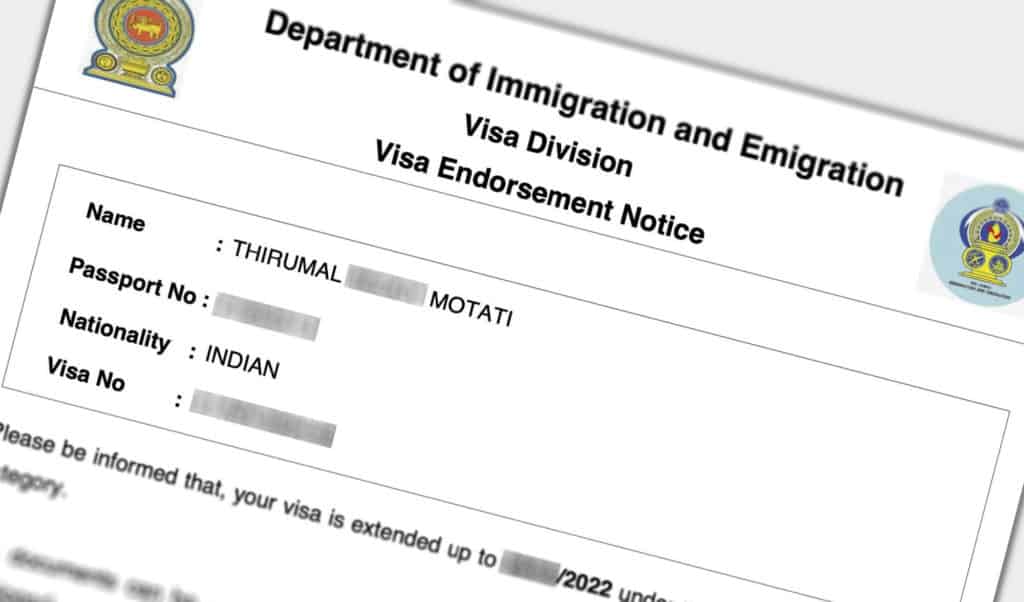
You can apply for a Sri Lanka visa extension from within the country from the comfort of your hotel room. The entire procedure to extend the visa is online, from application submission to payment to receiving the extension.
To prevent tourists from gathering at the immigration office in Colombo, Sri Lanka Immigration and Emigration is encouraging tourists to use their online visa extension portal.
The online visa extension portal is clean, simple and quite easy to use. It takes about 10 minutes to fill the application. About 2 working days to process the extension and another working day for the payment.
For any reason, if you cannot extend your visa online, you will have to go to the Immigration and Emigration office in Colombo or you have to take the help of an agent.
TABLE OF CONTENTS
- How long is the visa extension valid for?
- When should you extend your visa?
- How long does it take to process the visa extension?
- How much does the visa extension cost?
- STEPS FOR ONLINE SRI LANKA VISA EXTENSION
- APPENDIX 1: How to reduce the file size to 50kb or less?
- CONCLUSION
***
How long is the visa extension valid for?
Sri Lanka ETA allows you to stay up to 30 days in Sri Lanka. You can extend your visa twice from within the country, once for 60 days and again for 90 days.
| Visa | Stay |
| ETA | 30 days |
| First Extension | 60 days |
| Second Extension | 90 days |
The maximum time you can remain in Sri Lanka continuously as a tourist is 180 days.
If you exhaust your two allowed extensions, you will have to leave the country.
***
When should you extend your visa?
You can extend your visa anytime after you have entered Sri Lanka on your ETA. You don’t have to wait till the last minute.
I suggest extending your visa at least a week before your current visa expires as the extension procedure takes a minimum of 3 working days.
***
How long does it take to process the visa extension?
The online Sri Lanka visa extension process takes about 3 working days. It takes 2 working days to process your visa extension application and 1 working day to process your visa extension fee payment.
***
How much does the visa extension cost?
The Sri Lanka visa extension fee is $60 USD for the first extension and $90 USD for the second extension. A convenience fee of $2.5 USD will be charged if paying by a Visa/MasterCard and $1.5 USD if paying by American Express.
***
STEPS FOR ONLINE SRI LANKA VISA EXTENSION
STEP 1: REGISTRATION
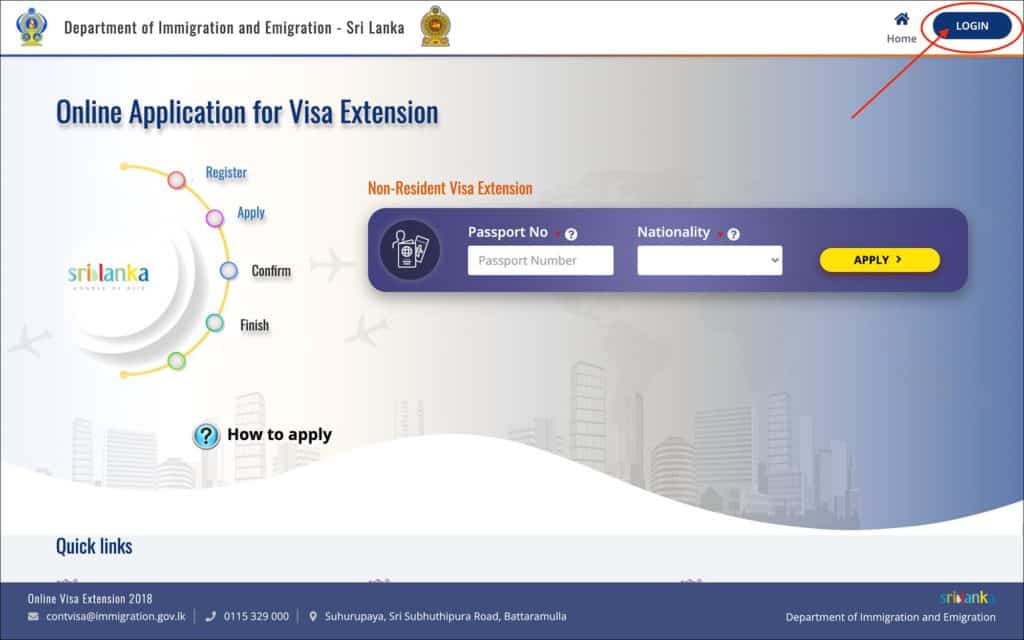
- Go to Sri Lanka Online Application for Visa Extension
- Click on the “LOGIN” button located at the top right corner of the screen
You will be taken to the “SIGN IN” page.
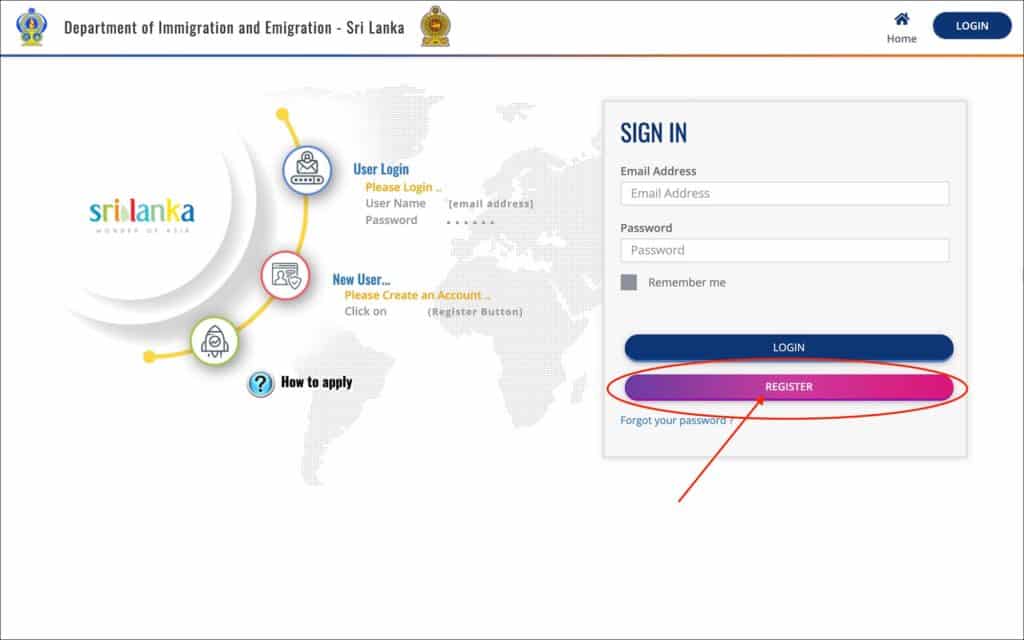
On the “SIGN IN” page, click on the “REGISTER” button.
You will be taken to the “REGISTRATION PAGE”.
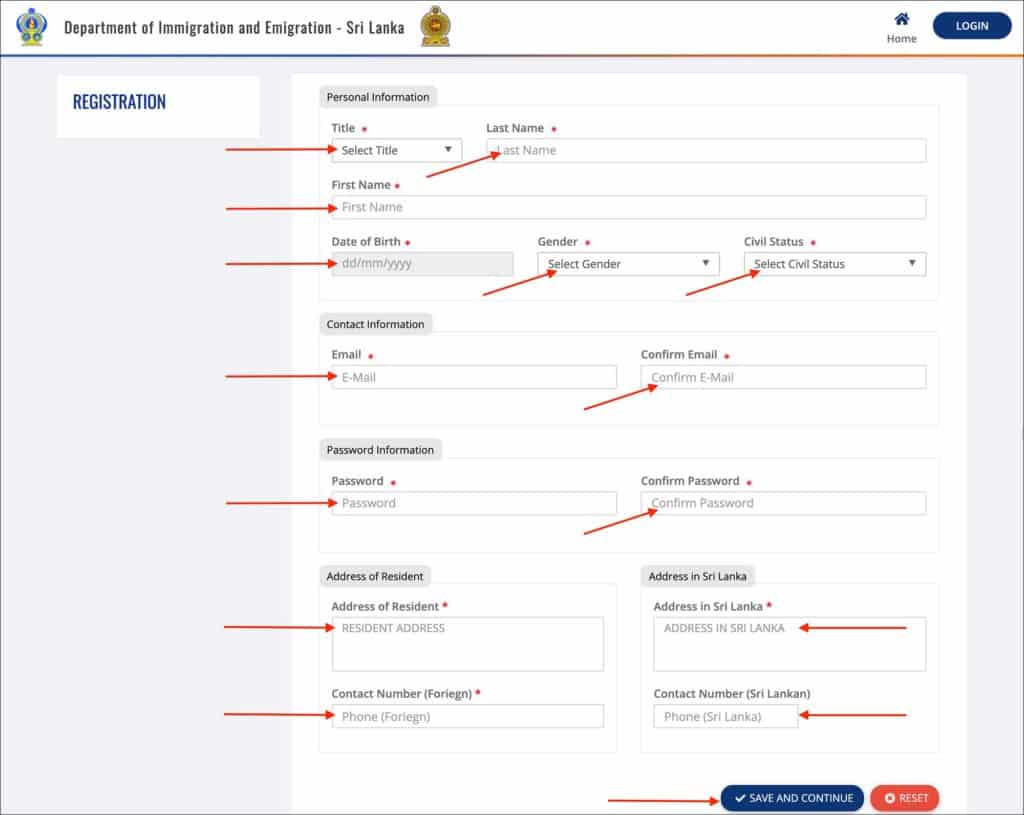
Enter the following in the “Personal Information” section.
- Title [Comment: Select your title depending on your gender,marital status and profession]
- Last Name [Comment: Enter your last name as it appears in your passport]
- First Name [Comment: Enter your given name (or first name + middle name combination) as it appears in your passport]
- Date of Birth [Comment: Enter your date of birth as it appears on your passport]
- Gender [Comment: Enter your gender from the list]
- MALE
- FEMALE
- UNSPECIFIED
- Civil Status [Comment: Enter your civil status from the list]
- Married
- Single
- Divorced
- Widowed
NOTE
The above details DO NOT have to be the same as they appear on your passport. But I suggest keeping them the same so things are clear, clean and leave no room for confusion.
Enter the following in the “Contact Information” section.
- Email [Comment: Enter the email where you would like to receive your visa extension approval]
- Confirm Email [Comment: Re-enter your email to confirm]
Enter the following in the “Passport Information” section.
- Password [Comment: Enter a new password so you can log into the account]
- Confirm Password [Comment: Re-enter the password to confirm]
Enter the following in the “Address of Resident” section.
- Address of Resident [Comment: Enter your address from your country of residence or home country]
- Contact Number (Foreign) [Comment: Enter your phone number from your country or residence or home country]
Enter the following in the “Address in Sri Lanka” section.
- Address in Sri Lanka [Comment: Enter your current hotel or apartment address in Sri Lanka]
- Contact Number (Sri Lankan) [Comment: Enter your Sri Lanka mobile phone number]
Click on the “SAVE AND CONTINUE” button.
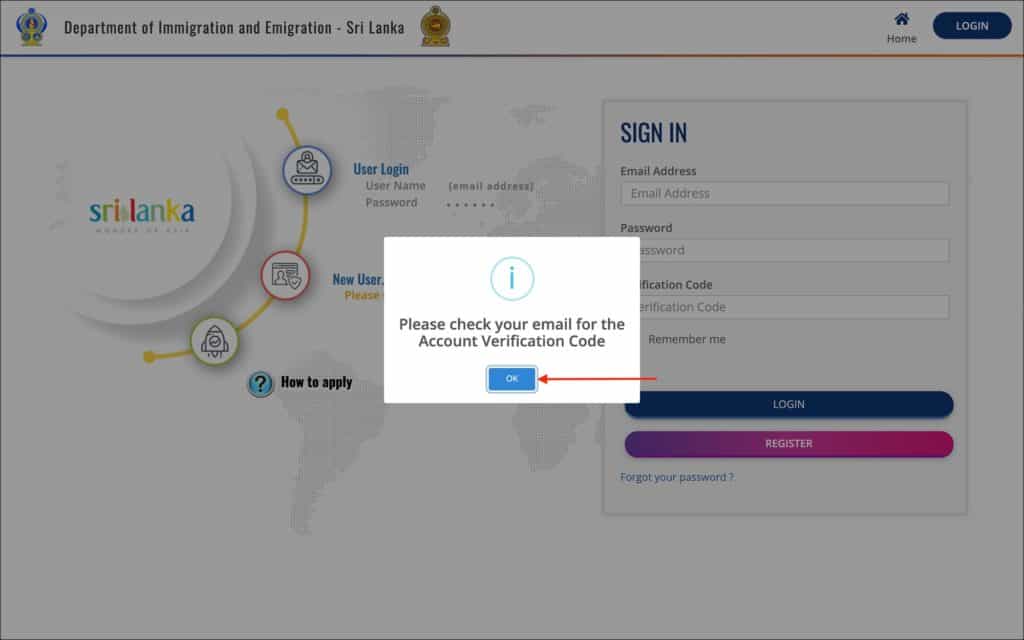
You will be taken back to the SIGN IN page. You will see a “Please check your email for the Account Verification Code” popup.
Click on the “OK” button to close the popup.
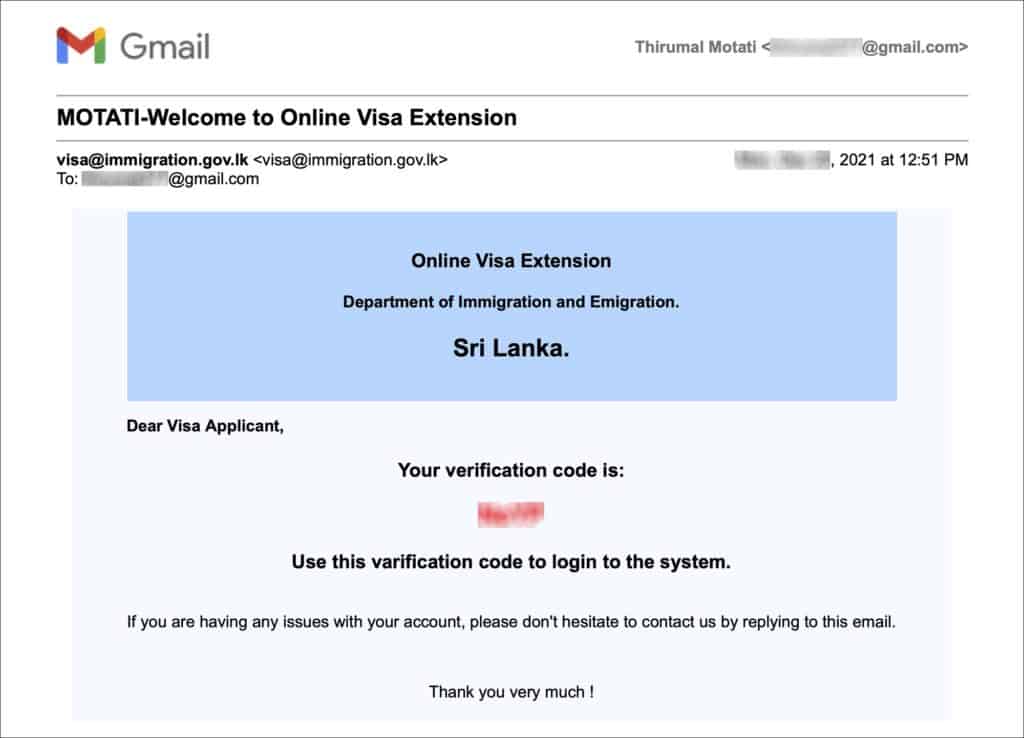
Check your email inbox for an email with the subject “Welcome to Online Visa Extension”. It will have a verification code in it. You need this verification code to sign in.
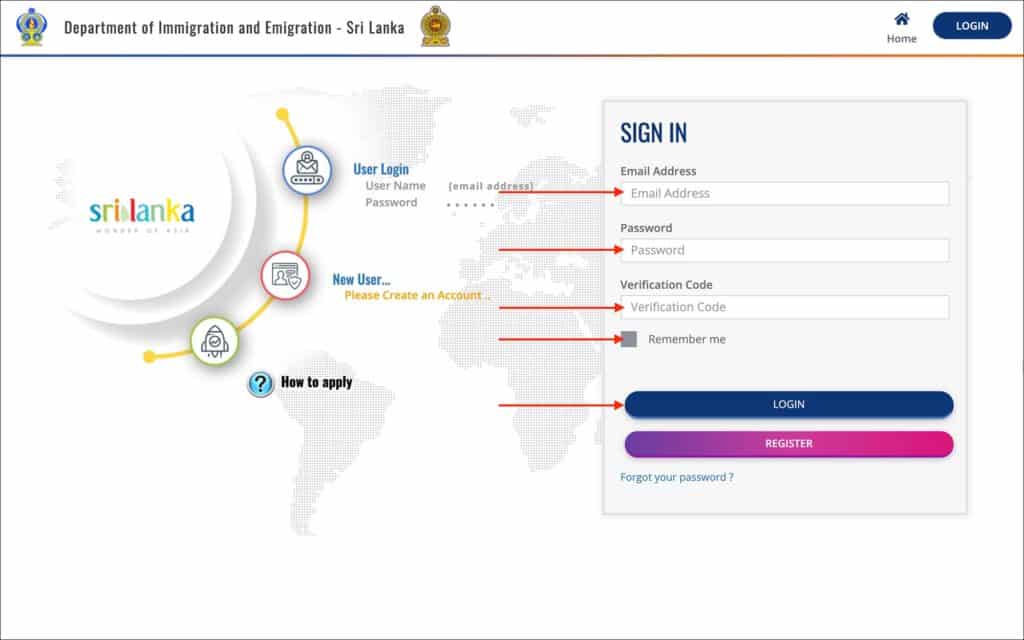
Enter the following on the “SIGN IN” page.
- Email Address [Comment: The email address used to register your account earlier]
- Password [Comment: The password you have created during registration earlier]
- Verification Code [Comment: The verification code from the welcome email]
- Remember me [Comment: Check this box so your browser will remember your info for the next time]
Click on the “LOGIN” button.
You will be taken to the home page again. You should see your email as the logged-in user.
***
STEP 2: APPLY
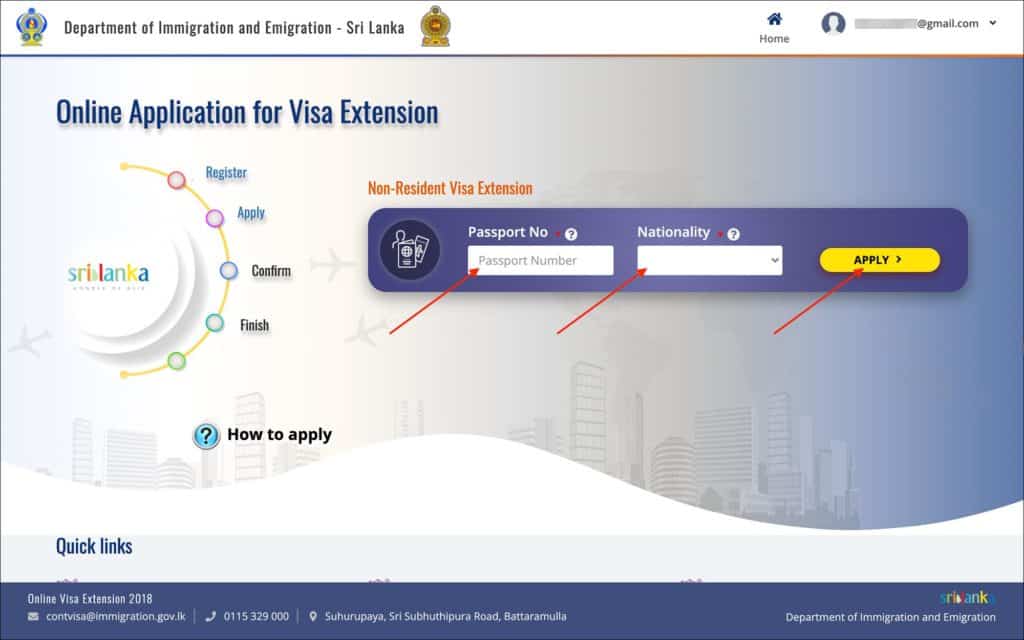
Enter the following information on the home page.
- Passport No [Comment: Enter the number of your passport that you have used to enter Sri Lanka]
- Nationality [Comment: Enter your passport nationality]
Click on the “APPLY>” button.
You will be taken to the “APPLICATION” page.
—
2a. APPLICATION
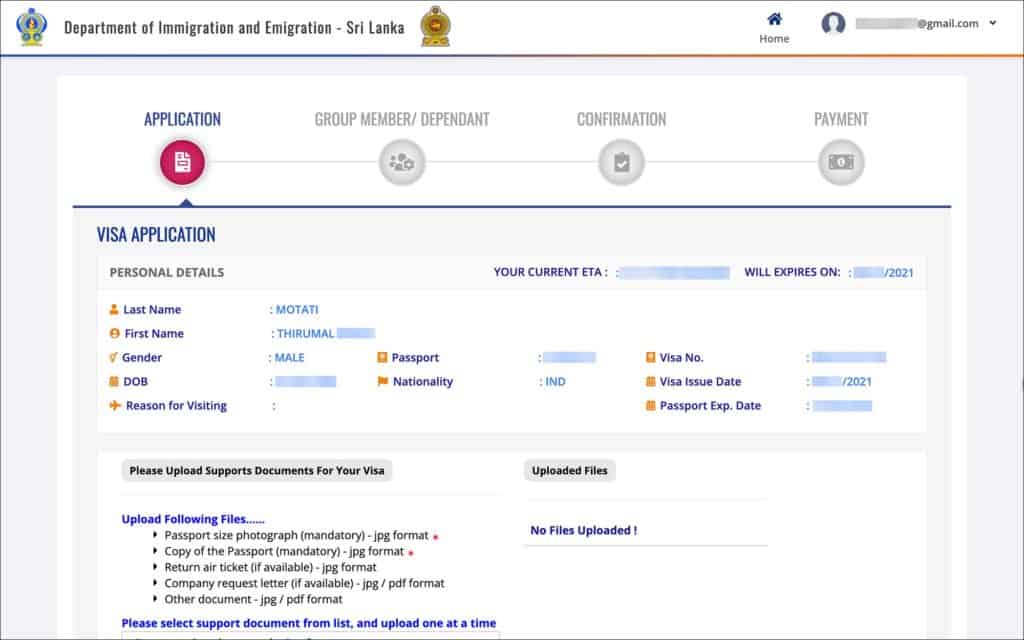
The online visa extension portal automatically pulls your Sri Lanka entry details from their immigration database using your passport number and nationality.
Review the following information in the “Personal Details” section.
- Your Current ETA
- Will Expires On
- Last Name
- First Name
- Gender
- DOB
- Reason for visiting
- Passport
- Nationality
- Visa No.
- Visa Issue Date
- Passport Exp. Date
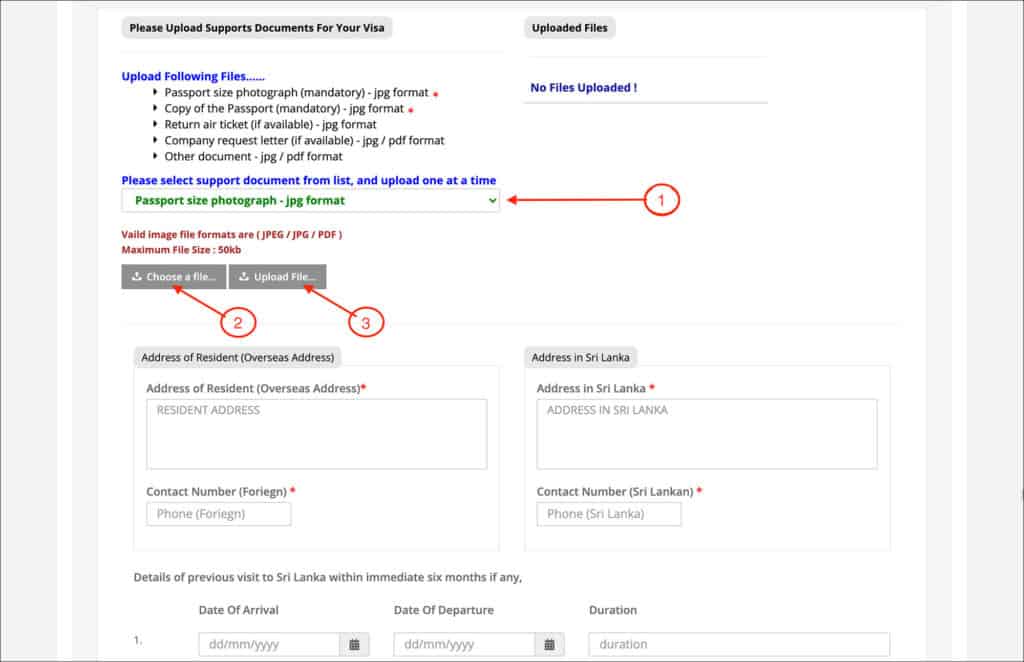
Upload the supporting documents in the “Please Upload Supports Documents For Your Visa” section.
Documents need to be uploaded
- Passport size photograph [Comment: MANDATORY. Upload your passport size digital color photo]
- Copy of the passport [Comment: MANDATORY. Upload a scan of your passport ID page]
- Return air ticket (if available) [Comment: OPTIONAL. Flight ticket is not required for the first extension, but maybe required for the second extension]
- Company request letter (if available) [Comment: NOT REQUIRED]
- Other document [Comment: NOT REQUIRED]
Document file format
The two mandatory documents (a) passport size photo and (b) passport ID page must be in “JPG” format only.
Document file size
Each file must be less than 50kb in size. If the file size is larger than 50kb, the system will not accept the file upload.
50kb is ridiculously small, so it can be quite challenging to compress your documents that small. But there are quite a few online tools that do a good job. I have provided you with a tool that I used and the steps to compress your files to 50kb or less in APPENDIX 1 [GO TO APPENDIX 1].
Follow the below steps to upload your passport size photo
- From the dropdown, select “Passport size photograph”
- Click on “Choose a file” button
- Select the your 50kb or less passport size digital photo in JPG format
- Click on “Upload File”
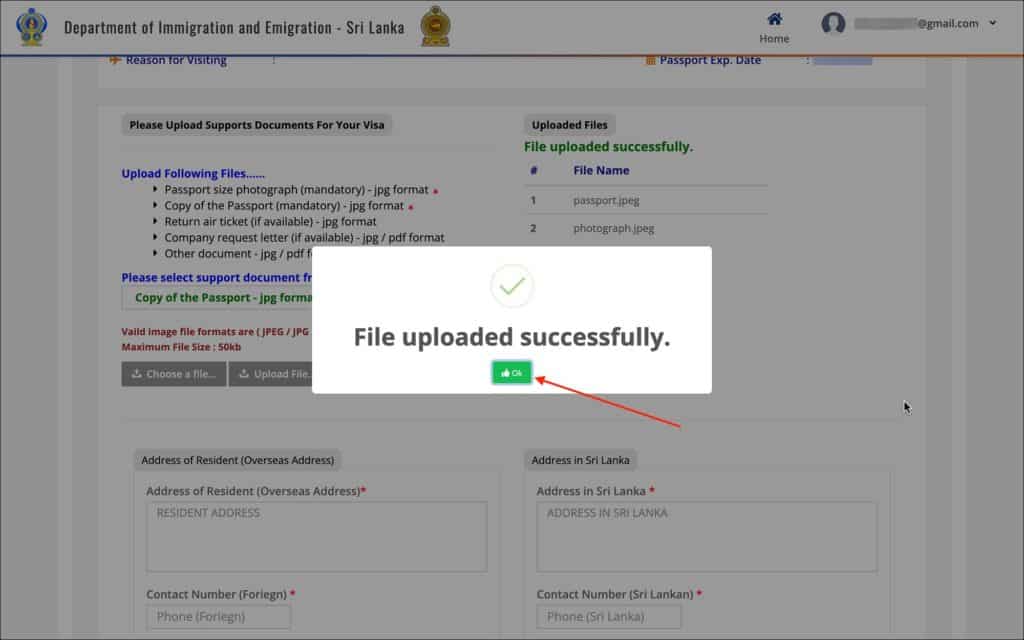
- You will see a “File uploaded successfully” popup
- Click on “OK” button to close the popup
- You should see your uploaded file renamed as “photograph.jpeg” under “Uploaded Files”
Follow the below steps to upload your passport ID page
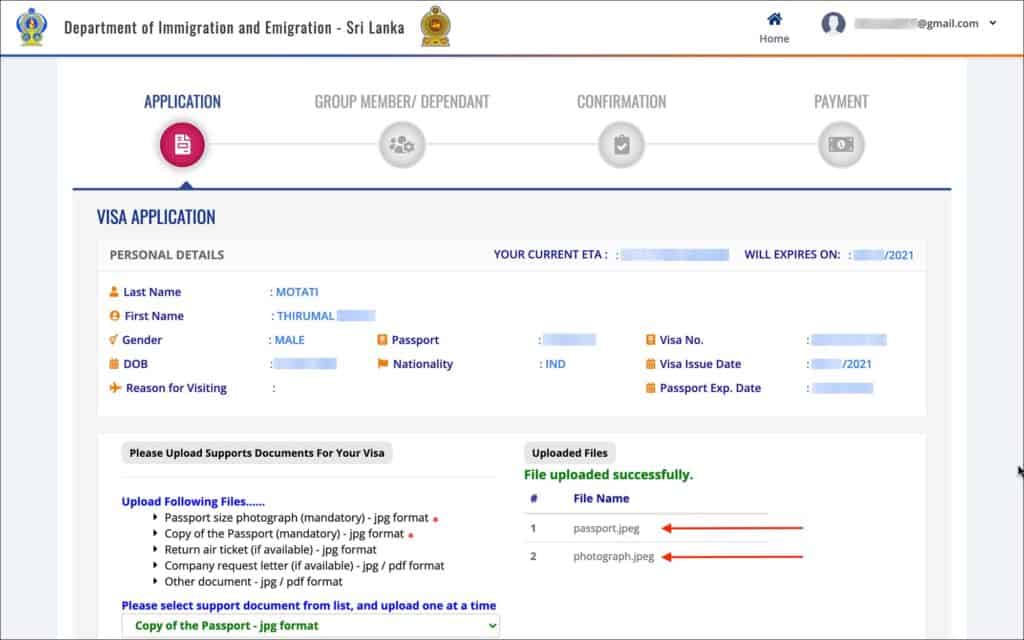
- From the dropdown, select “Copy of the Passport – jpg format”
- Click on “Choose a file” button
- Select the your 50kb or less passport ID page in JPG format
- Click on “Upload File”
- You will see a “File uploaded successfully” popup
- Click on “OK” button to close the popup
- You should see your uploaded file renamed as “passport.jpeg” under “Uploaded Files”
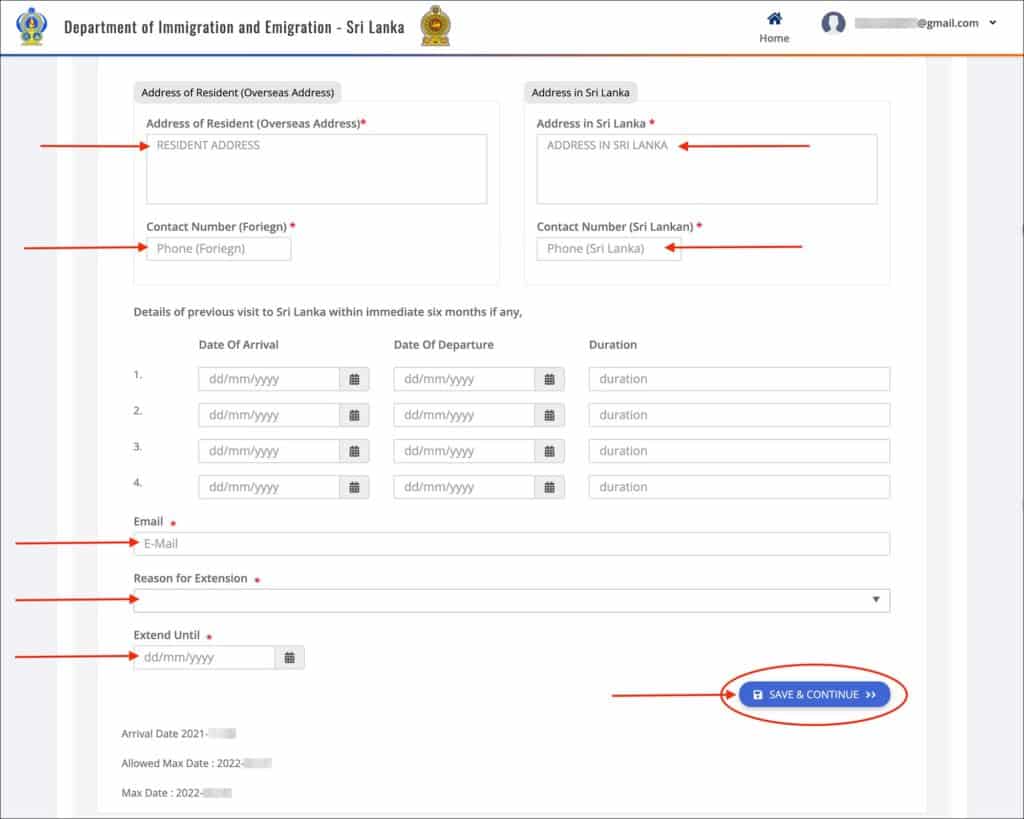
Enter the following in Address of Resident (Overseas Address)
- Address of Resident (Overseas Address) [Comment: Enter your current address in your country of residence or home country]
- Contact Number (Foreign) [Comment: Enter your mobile phone number in your country of residence]
Enter the following in Address in Sri Lanka
- Address in Sri Lanka [Comment: Enter your current hotel or apartment address in Sri Lanka]
- Contact Number (Sri Lankan) [Comment: Enter your Sri Lankan mobile phone number]
Enter the following information in the rest of the page.
- Details of previous visit to Sri Lanka within immediate six months if any [Comment: If you have visited Sri Lanka earlier in the last 6 months, enter the details here]
- Email [Comment: Enter the email where you would like to received your extension approval]
- Reason for Extension [Comment: Select “TOURIST” or “HOLIDAY”]
- Extend Until [Comment: You are allowed to extend until “Allowed Max Date”, so enter any date on or before “Allowed Max Date”]
The following dates will be displayed at the bottom of the form to give you an idea of when you’ve entered, how long you are allowed to extend and also the longest extension date possible.
Arrival Date
This is the date on which you arrived in Sri Lanka.
Allowed Max Date
This is the date until which you are allowed to extend your current visa.
Max Date
This is the date until which you are allowed to stay in Sri Lanka if a second extension is requested and approved.
Click on the “SAVE AND CONTINUE” button.
You will be taken to the “GROUP MEMBER / DEPENDENT” page.
—
2b. GROUP MEMBER / DEPENDENT
If you are extending the visa just for yourself, you can skip this section. If you are traveling as a couple, family or group, you can use this section to extend the visas for your group members as well.
Some travelers have expressed issues when extending visas as a group. I suggest extending each visa individually to avoid any troubles.
—
2c. CONFIRMATION
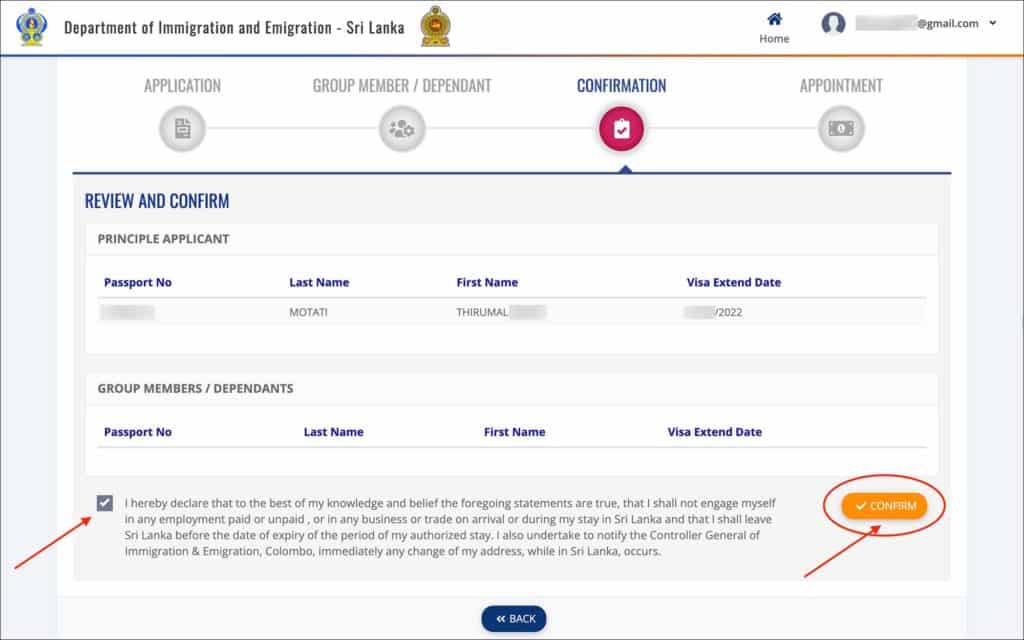
Review the information displayed on this page, especially your passport number and Visa Extend Date.
Check the box for declaration.
Click on the “CONFIRM” button.
You will be taken to the “SUCCESS” screen.
—
2d. SUCCESS
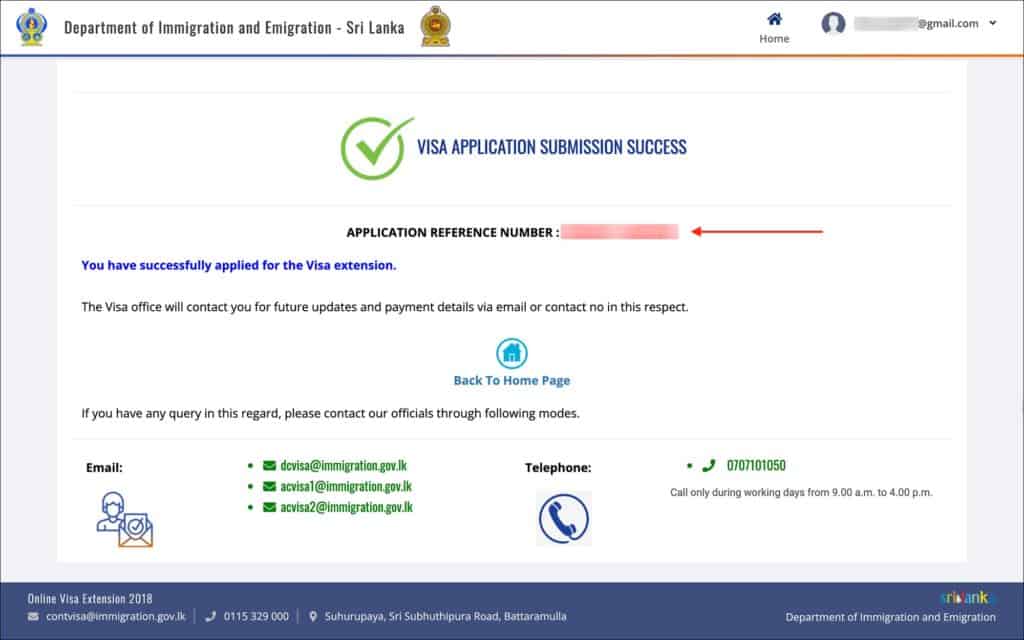
On this page, your application reference number will be displayed.
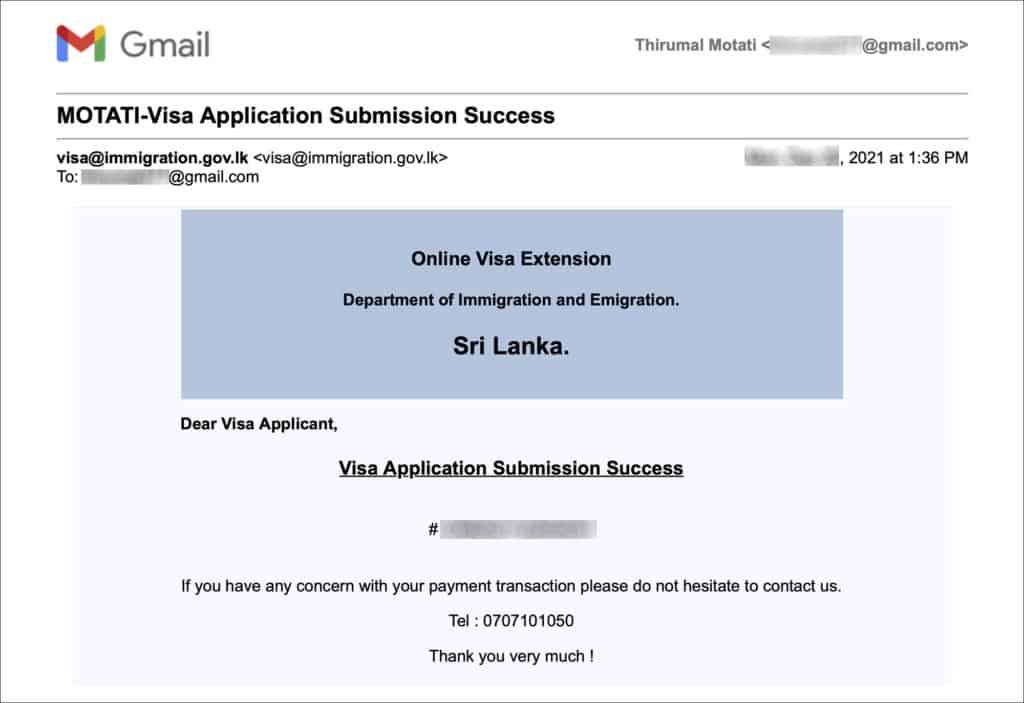
Check your email inbox, you will receive an email confirming the application submission.
***
STEP 3: VISA PAYMENT
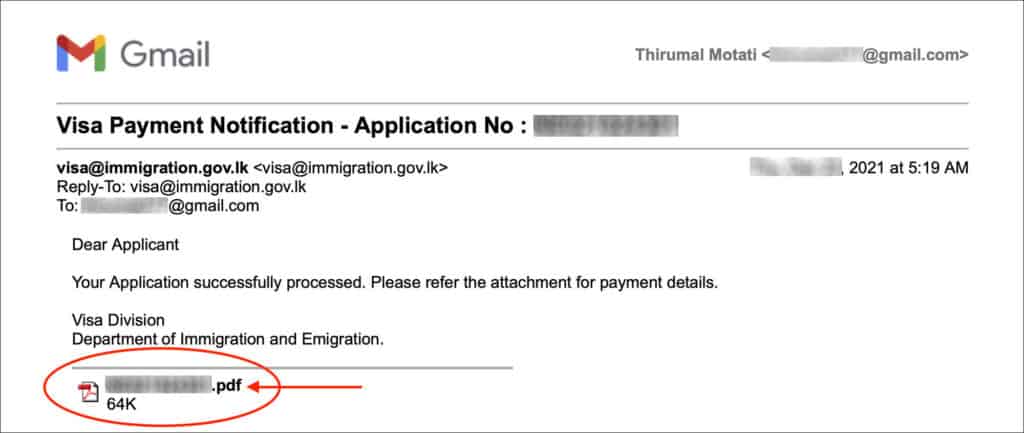
After about two working days, once your visa extension is approved, you will receive an email with payment instructions.
The email will contain a PDF attachment with payment instructions.
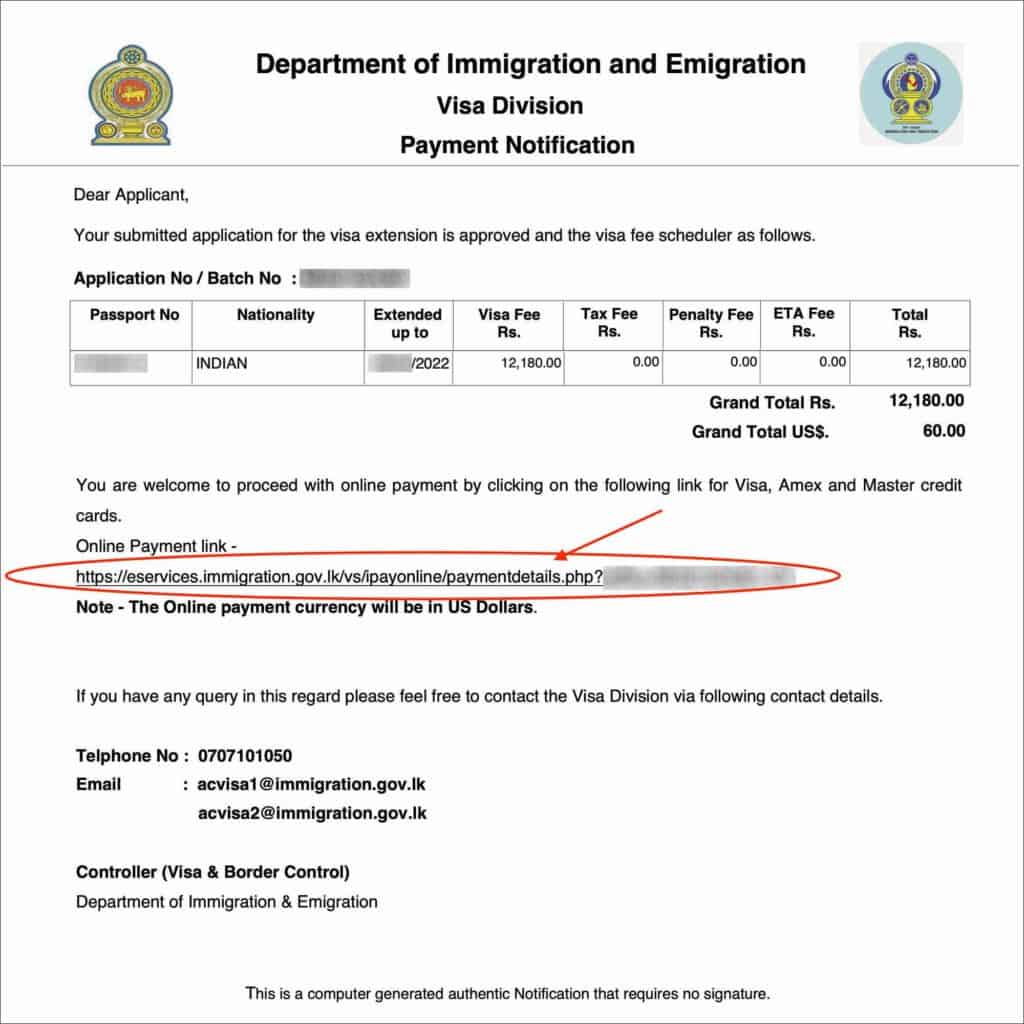
Open the PDF attachment.
The PDF attachment will have a link for online visa payment specific to your visa.
Click on the link.
You will be taken to the “PAYMENT DETAILS” page.
—
3a. PAYMENT DETAILS
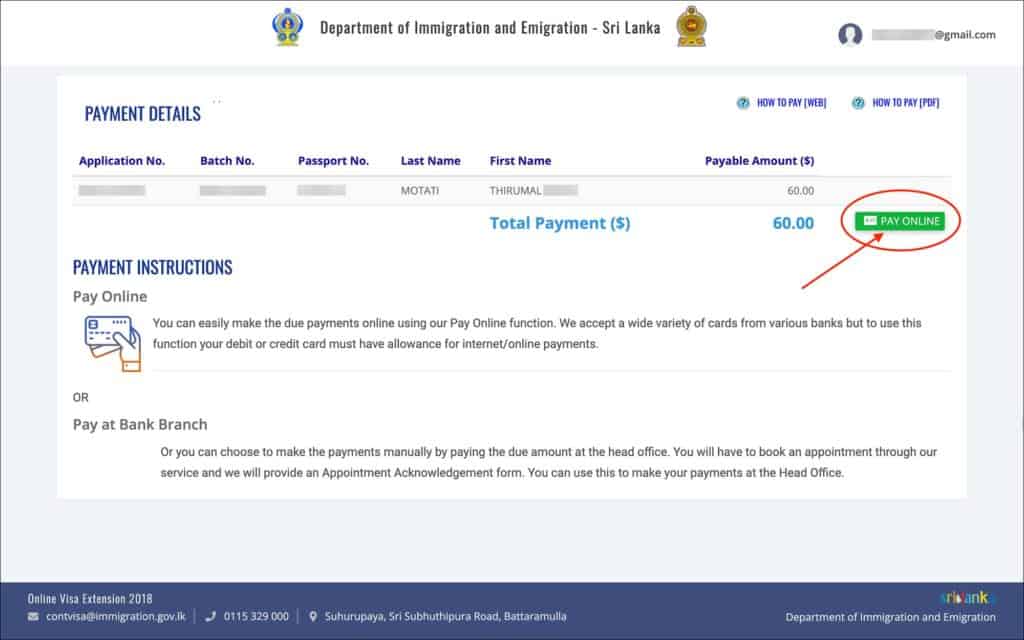
On the “PAYMENT DETAILS” page, you will see your visa extension details along with the green “PAY ONLINE” button.
Click on the green “PAY ONLINE” button.
You will be taken to the “PROCEED WITH THE PAYMENT” page.
—
3b. PROCEED WITH THE PAYMENT
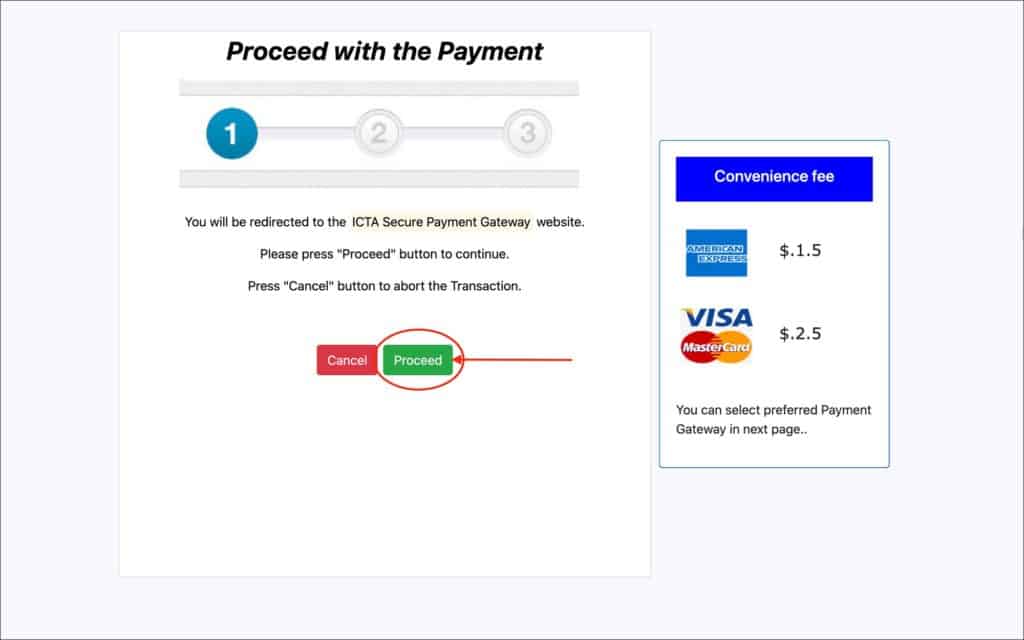
On this page, you will see the two payment options and the convenience fee for each option.
If you use an American Express card, you will be charged a convenience fee of $1.5 USD.
If you use a Visa or MasterCard, you will be charged a convenience fee of $2.5 USD.
Click on the green “Proceed” button.
You will be taken to the “Terms and Conditions” page.
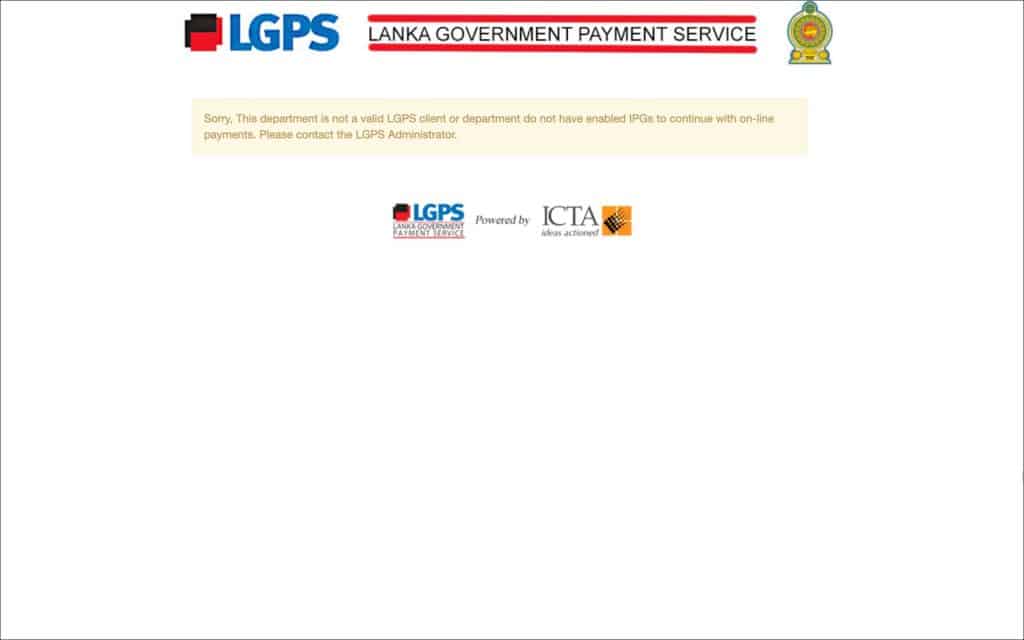
NOTE
Occasionally, you will see an error when you click on the “Proceed” button. In such a case, try clearing your cookies or use the Chrome Incognito browser.
—
3c. TERMS AND CONDITIONS
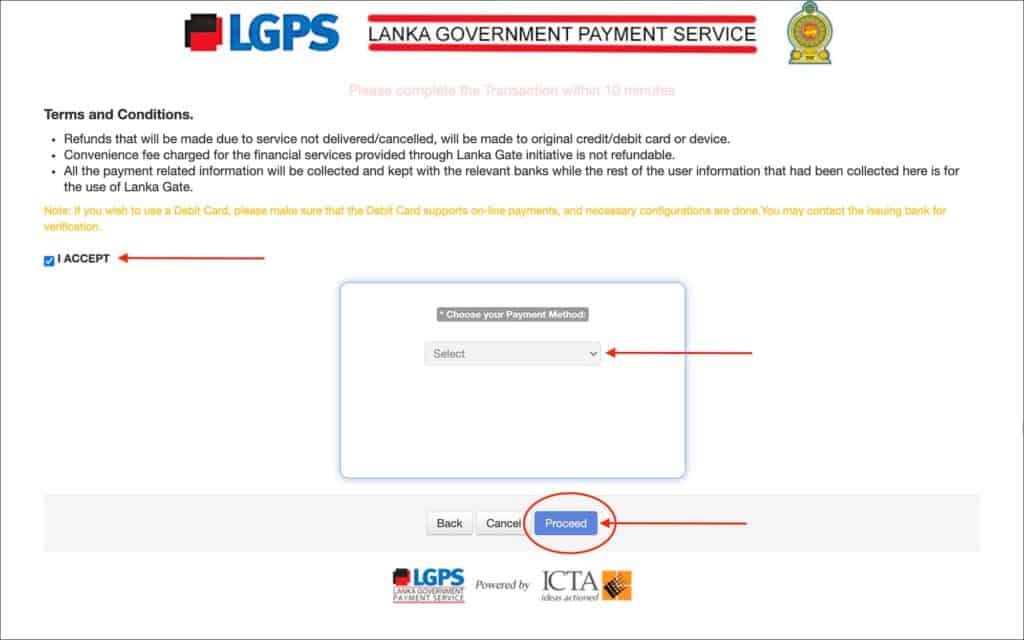
Enter the following details on the “TERMS AND CONDITIONS” page.
- I Accept [Comment: Read through the terms and conditions and check this box]
- Choose your Payment Method: [Comment: Select your payment method from the options]
- AMEX/Diners
- Any Visa/MasterCard (Paycorp/AutoSettle – USD)
Click on the blue “Proceed” button.
You will be taken to the “CONFIRM PAYMENT DETAILS” page.
NOTE
From this step onwards, you will have only 10 minutes to complete the payment. Else, it will time out and you will have to start over from step “3a. PAYMENT DETAILS”.
—
3d. CONFIRM PAYMENT DETAILS
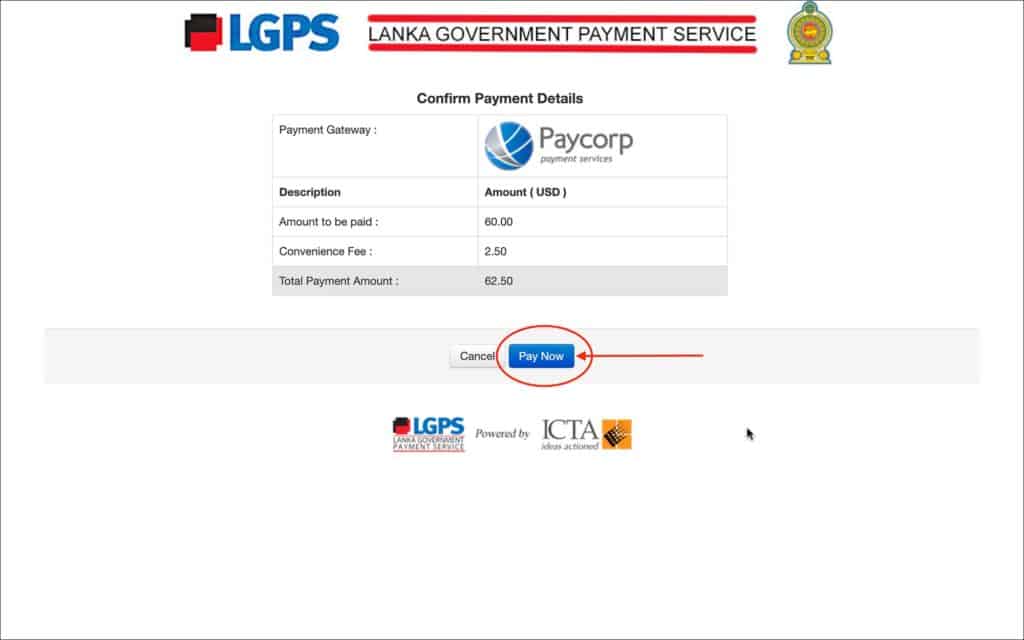
On this screen, you will see the total amount you need to pay including the convenience fee.
Click on the blue “Pay Now” button.
You will be taken to the credit card form.
—
3e. CARD DETAILS
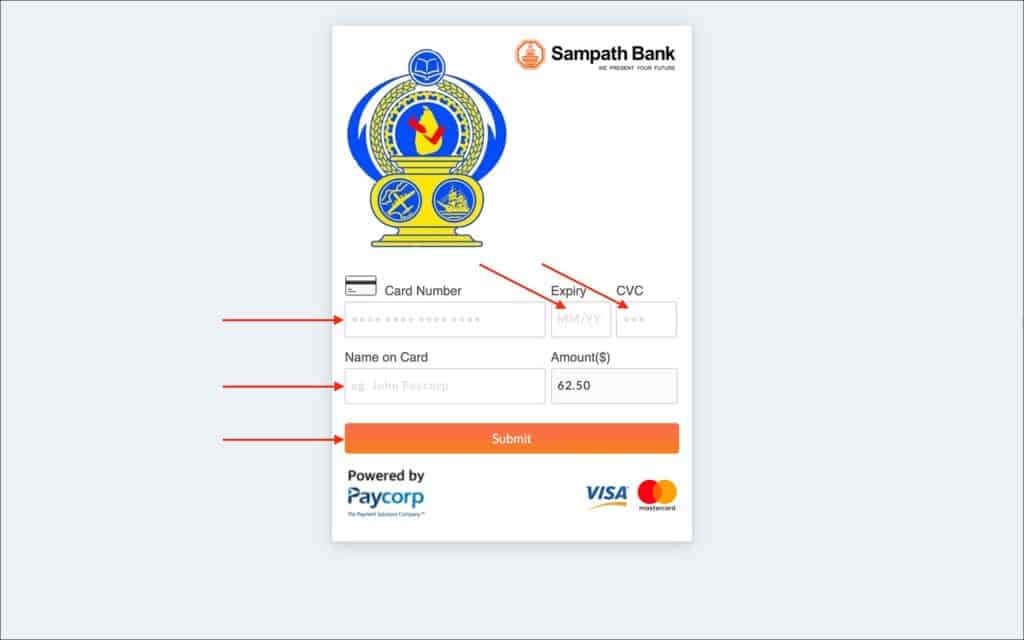
Enter the following information in the credit card form.
- Card Number [Comment: Enter your credit or debit card number]
- Expiry [Comment: Enter the expiry date as it appears on your card]
- CVC [Comment: Enter the CVC number as it appears on your card]
- Name on Card [Comment: Enter your name as it appears on your card]
- Amount($) [Comment: No need to enter anything here as the total amount will be shown here by default]
Click on the orange “Submit” button.
Your payment will be processed and then you will be taken to the “THANK YOU FOR YOUR PAYMENT” page.
—
3f. THANK YOU FOR YOUR PAYMENT
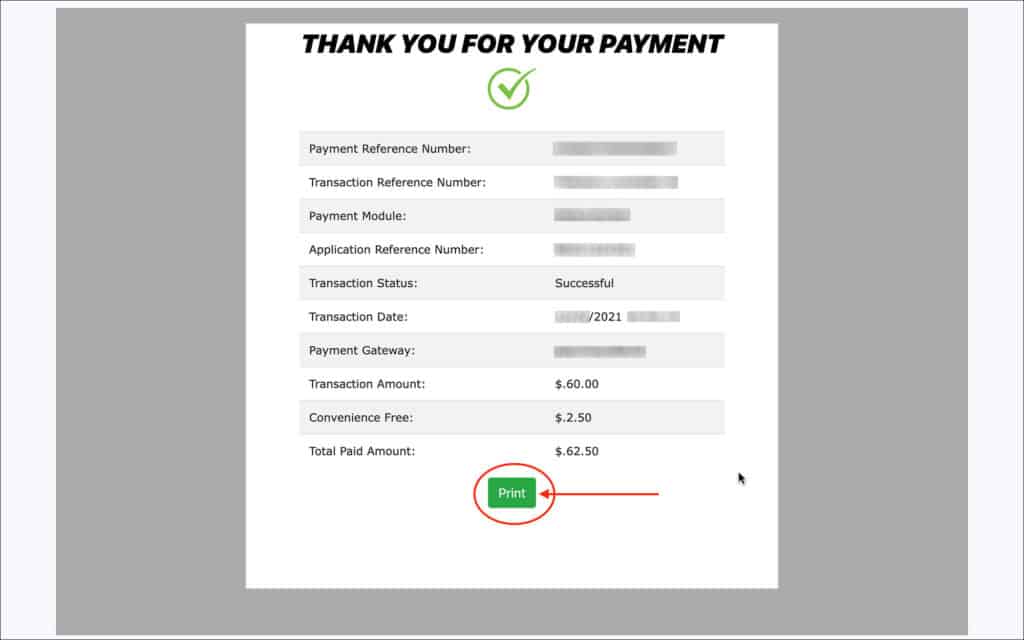
On this page, a payment receipt will be displayed with details such as your payment result, reference number, amount, etc.
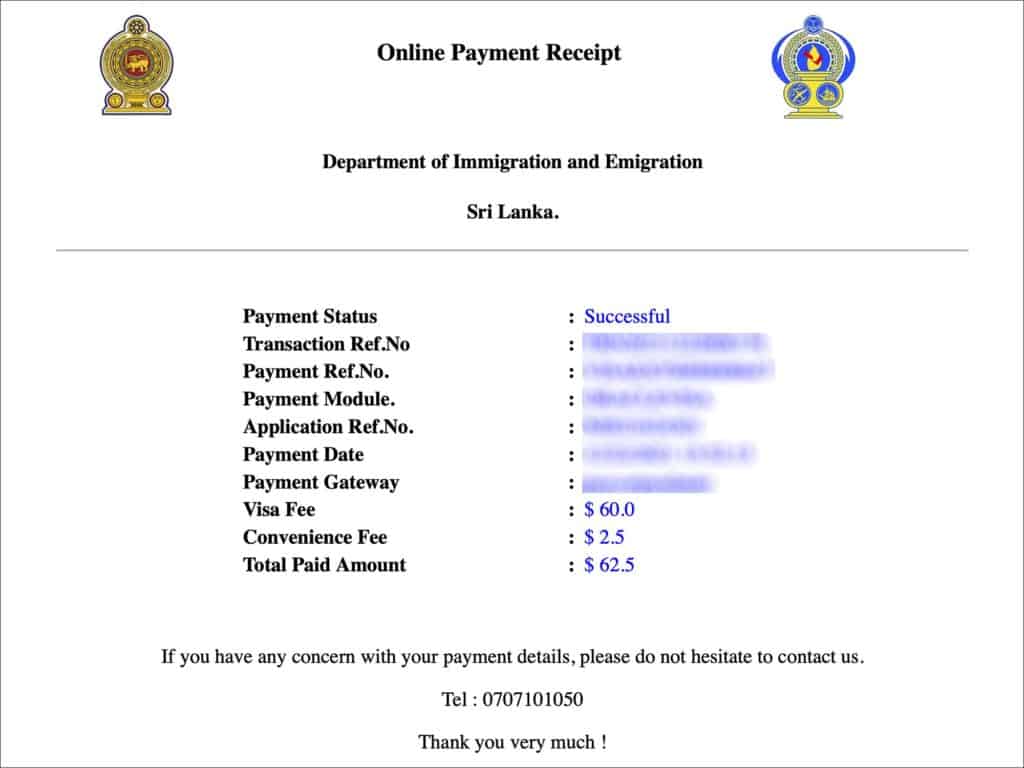
You can print your payment receipt by clicking on the green “Print” button.
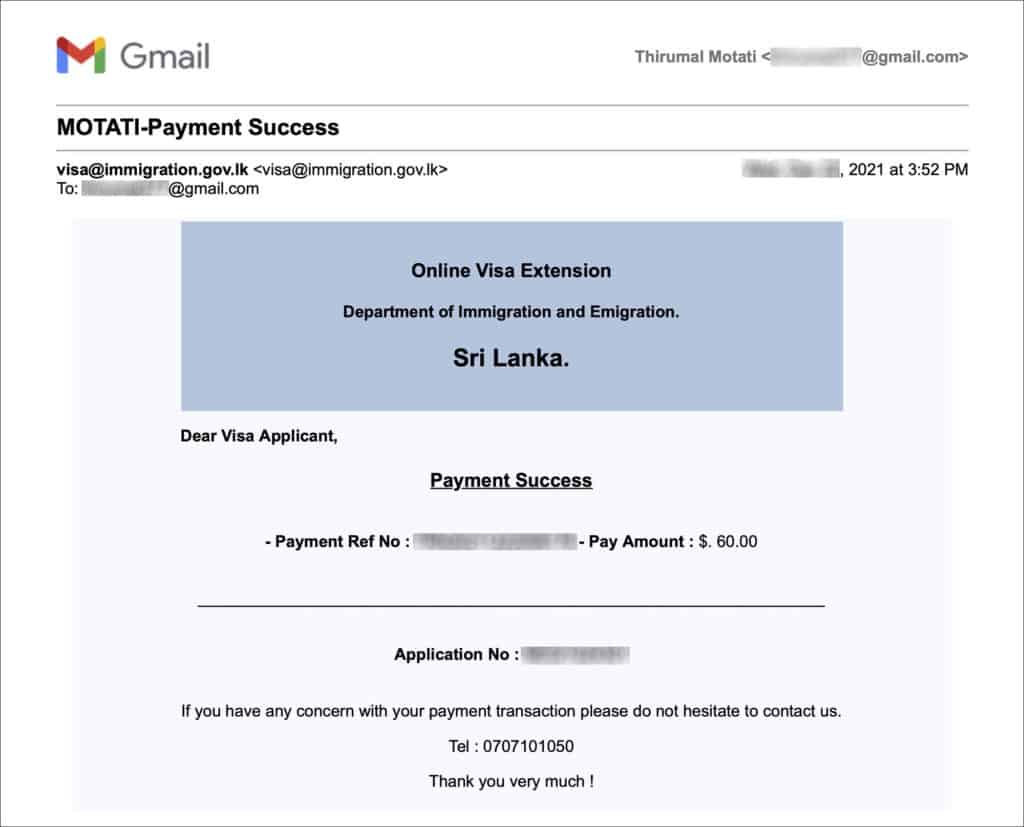
Check your email inbox. You will also receive an email confirmation of your payment.
—
3g. PAYMENT SUCCESS
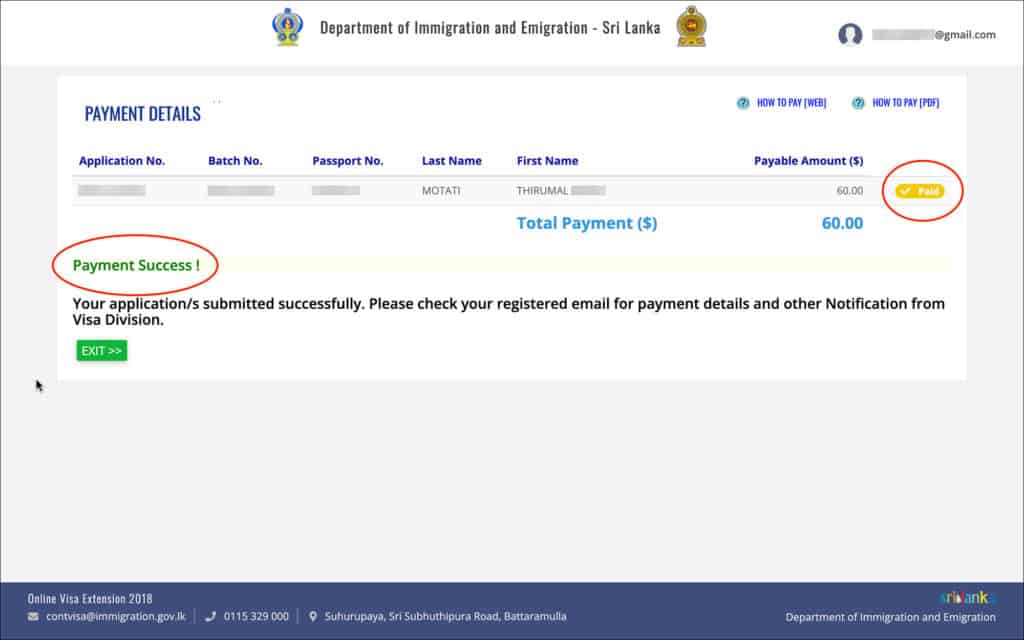
Now you can go back to the “PAYMENT DETAILS” page and refresh it to see if your payment status is updated.
Usually, it takes a few hours for the payment status to get updated.
Once your payment status is updated, the green “PAY ONLINE” button will be replaced with a yellow “✓Paid” status.
Also, you will see a statement at the bottom of the page indicating your payment was successful.
***
STEP 4: VISA ENDORSEMENT
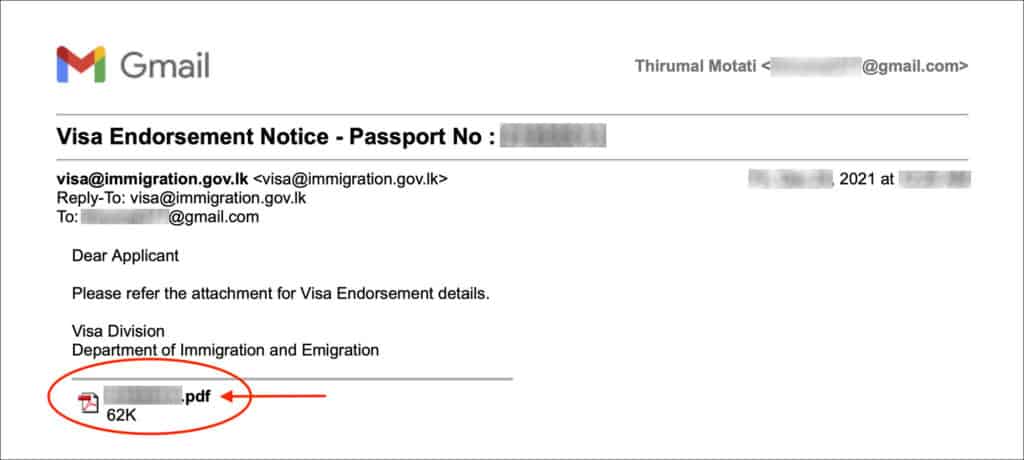
After one working day, you will receive a visa endorsement email notifying you that your visa has been successfully extended.
The email contains a PDF attachment of your visa endorsement.
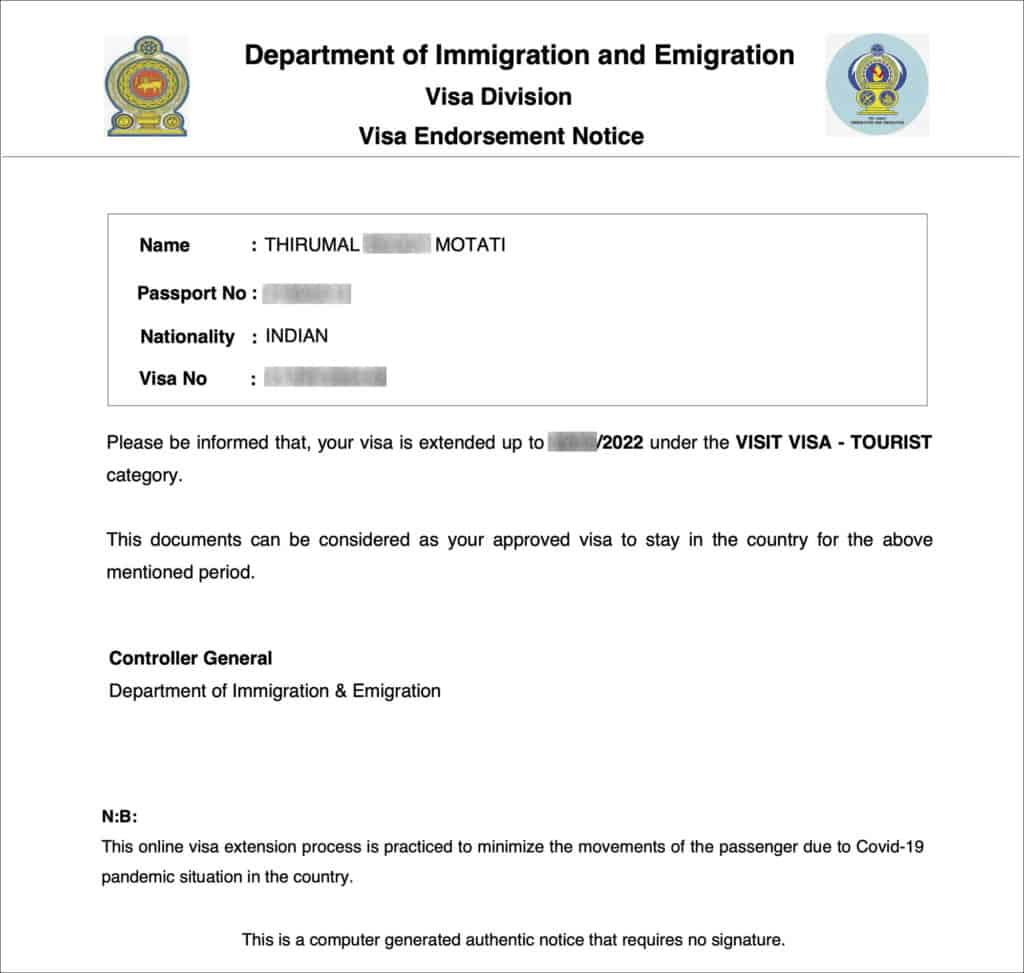
Open the PDF attachment and check the details. Make sure your full name, passport number, visa number and extension date are all correct.
Print or save this visa endorsement PDF as you may need it to present at the passport control when leaving Sri Lanka.
***
APPENDIX 1: How to reduce the file size to 50kb or less?
Follow the below steps to reduce your file size to 50kb or less.
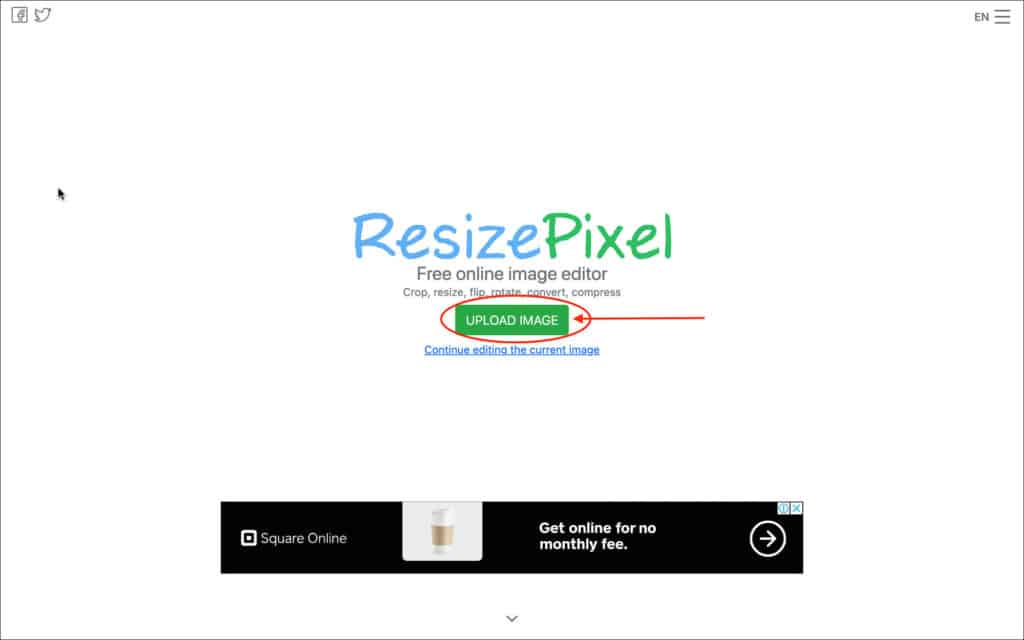
- Go to resizepixel.com
- Click on “UPLOAD IMAGE”
—
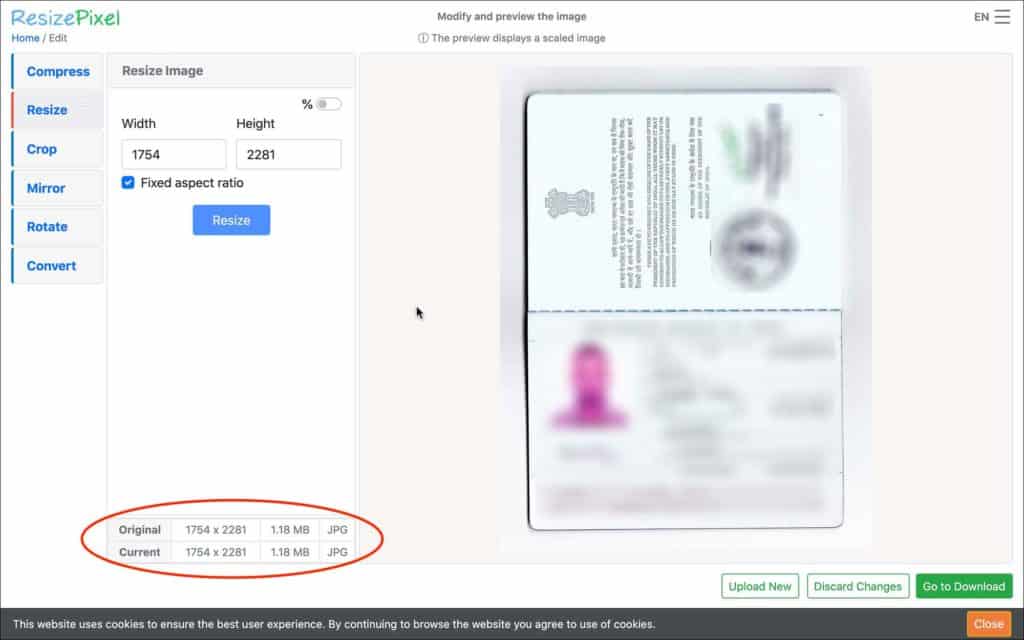
- Once the image is uploaded, at the bottom of the screen, you will see the original and current dimensions and the file size of the image uploaded
—
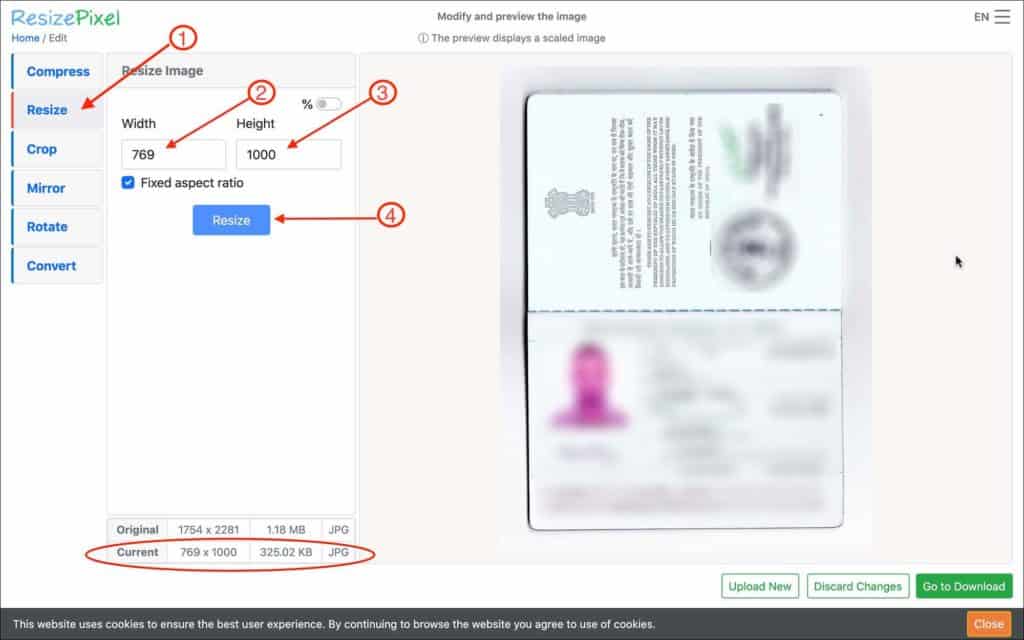
- From the left side menu options, click on the “Resize” option
- Change the longest dimension to 1000px. Keep the “Fixed aspect ratio” checked
- Click on the “Resize” button
- Once the image is resized, at the bottom of the screen, you will see the new dimensions and new file size of the image uploaded
—
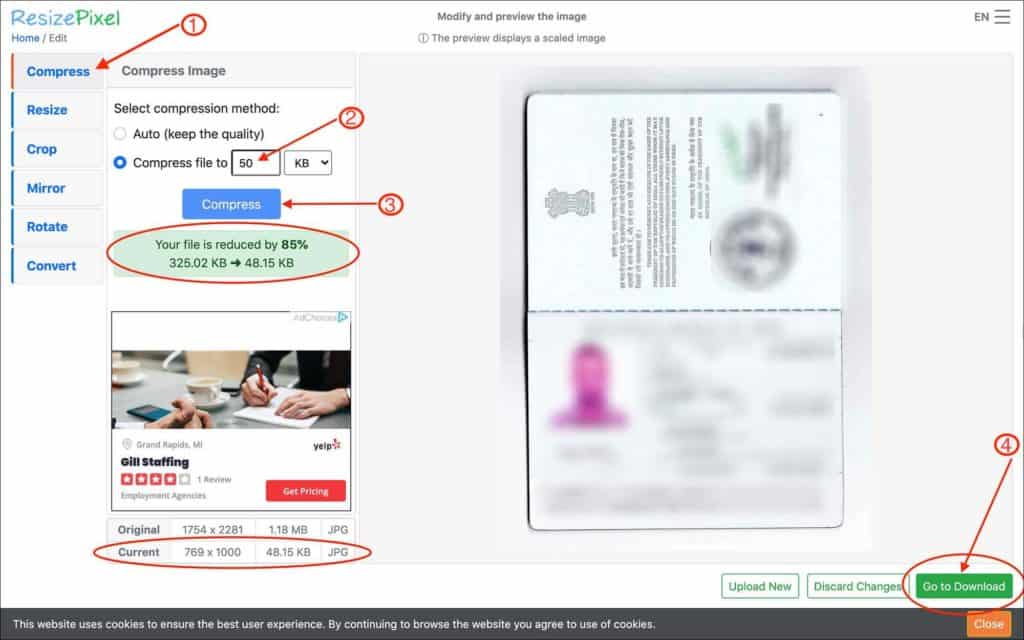
- From the left side menu options, click on the “Compress” option
- Enter 50 kb for the compression
- Click on the “Compress” button
- Once the image is compressed, at the bottom of the screen, you will see the new file size of the image
- Click on the “Go to Download” button to download your new image.
Check the quality and size of the image. If necessary, repeat the above steps.
***
CONCLUSION
That’s it, guys! Make sure to carry a print of your Sri Lanka visa extension PDF with you when leaving Sri Lanka.
If you are having any troubles with your Sri Lanka visa extension application, let me know in the comments below.

 How to get Sri Lanka ETA – An easy step-by-step guide
 How to Get a Trip Summary from Qatar Airways for Visa Application: A Step-by-Step Guide
 48 VISA-FREE Countries for US Green Card Holders [2024 Edition]