India e-Visa application is quite simple and easy to navigate. It only takes about 15 minutes to apply for India e-Visa online. Keep the necessary documents ready before you start the application. If you are missing something, it’s not a big deal as you can save the application and come back later to complete it.
There can be occasional hiccups with the visa fee payment. But nothing major. These payment issues can be fixed easily. I have provided all the details you need to know in this article.
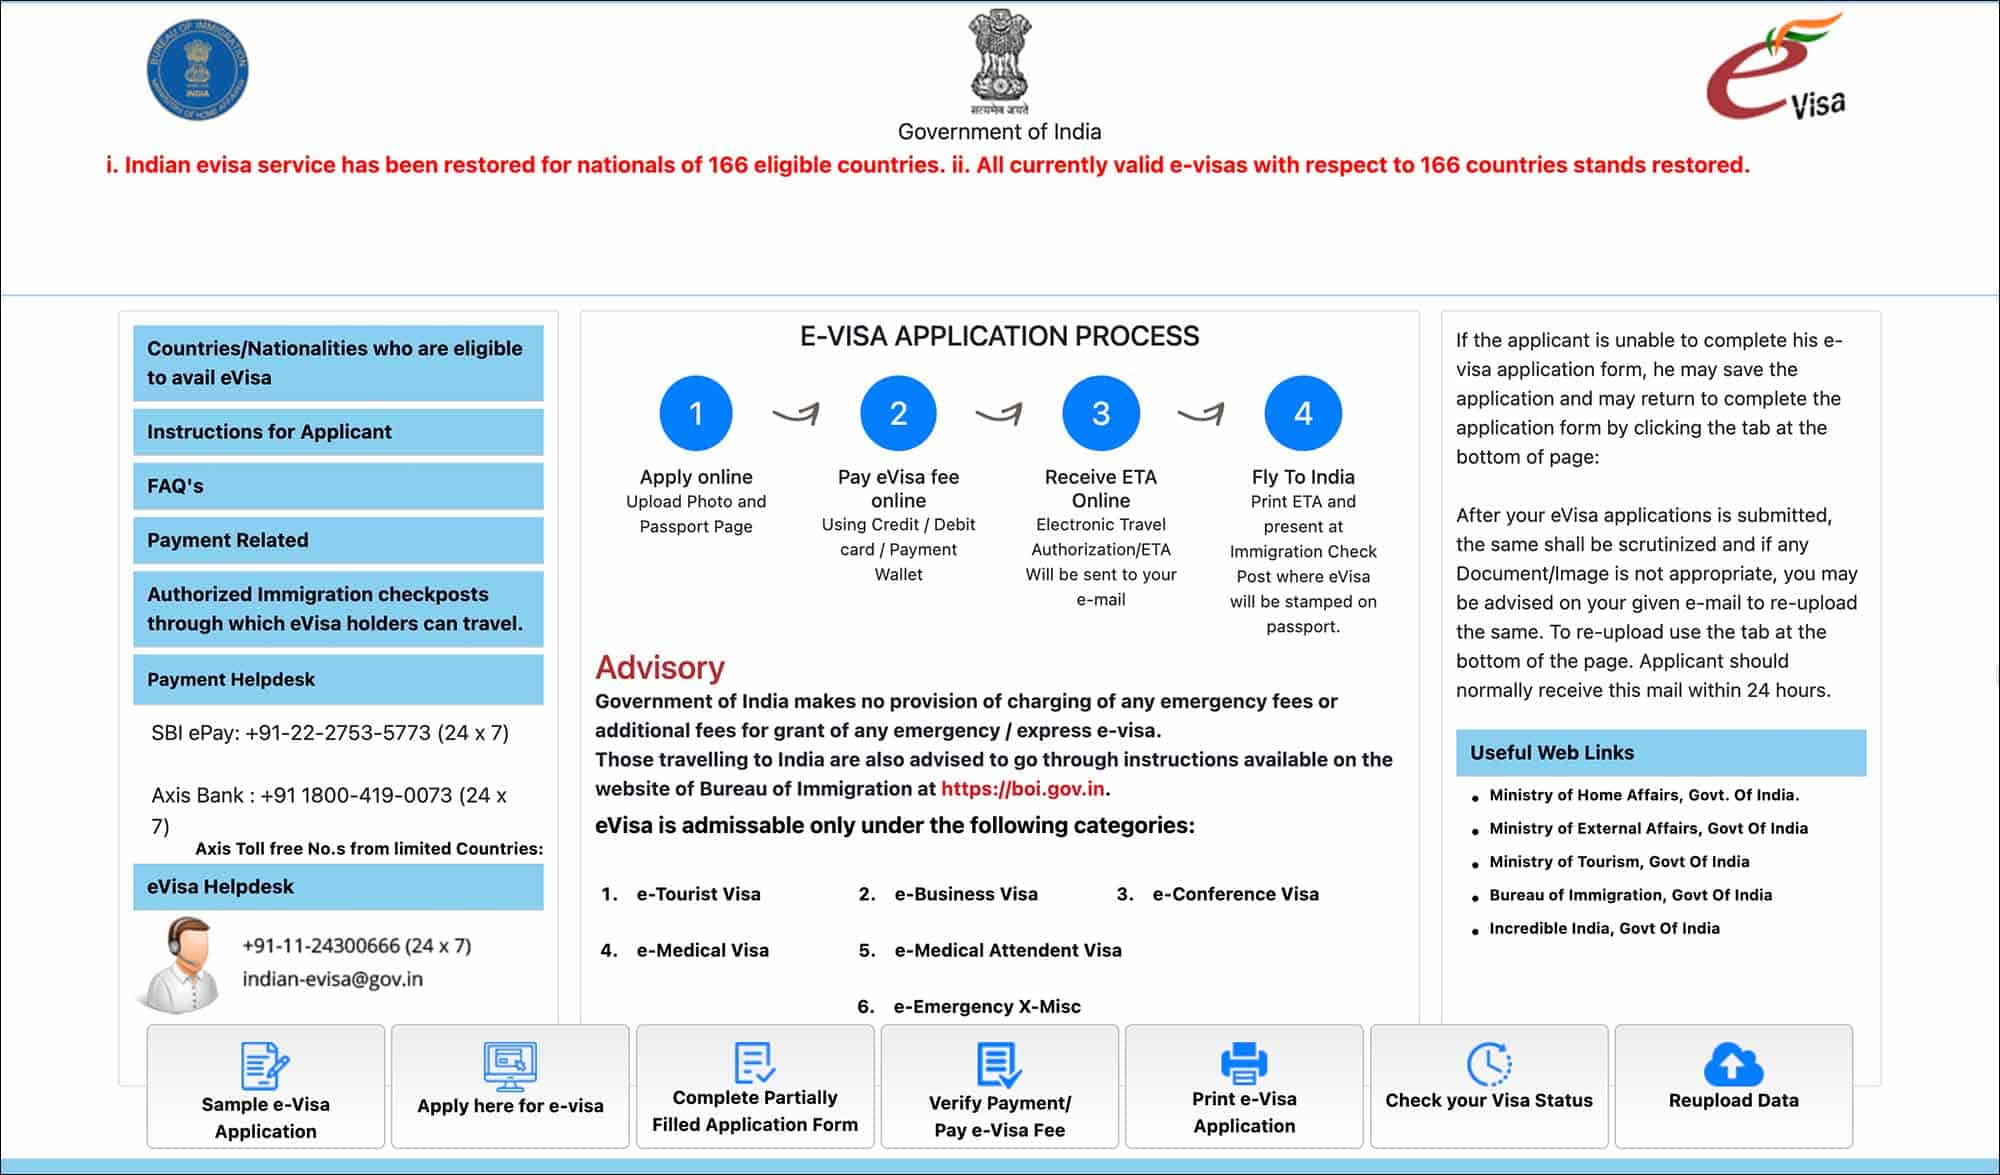
If you haven’t already, check out the complete guide to India e-Visa for details on different tourist e-Visa types, eligible nationalities, fees, processing time, application status, etc.
Table of Contents
***
Documents needed to apply for India e-Visa
Before starting your India e-Visa online application, have these documents ready.
- Original passport
- Passport must be valid for at least 6 months from your anticipated date of arrival in India
- Digital passport-size photo with the following specifications
- Photo must be in JPG/JPEG format only
- Photo must be 2inch x 2inch in dimensions
- Photo must be less than 1MB in size
- Head must be centered with light background and no glasses
- Scan of your passport data/ID page
- Scan must be in PDF format only
- Scan must be larger than 10KB and smaller than 300KB
- Credit or debit for visa fee payment
- Your credit or debit card must support international transactions in non-home currency
***
Steps for filling out the India e-Visa application
01. Start
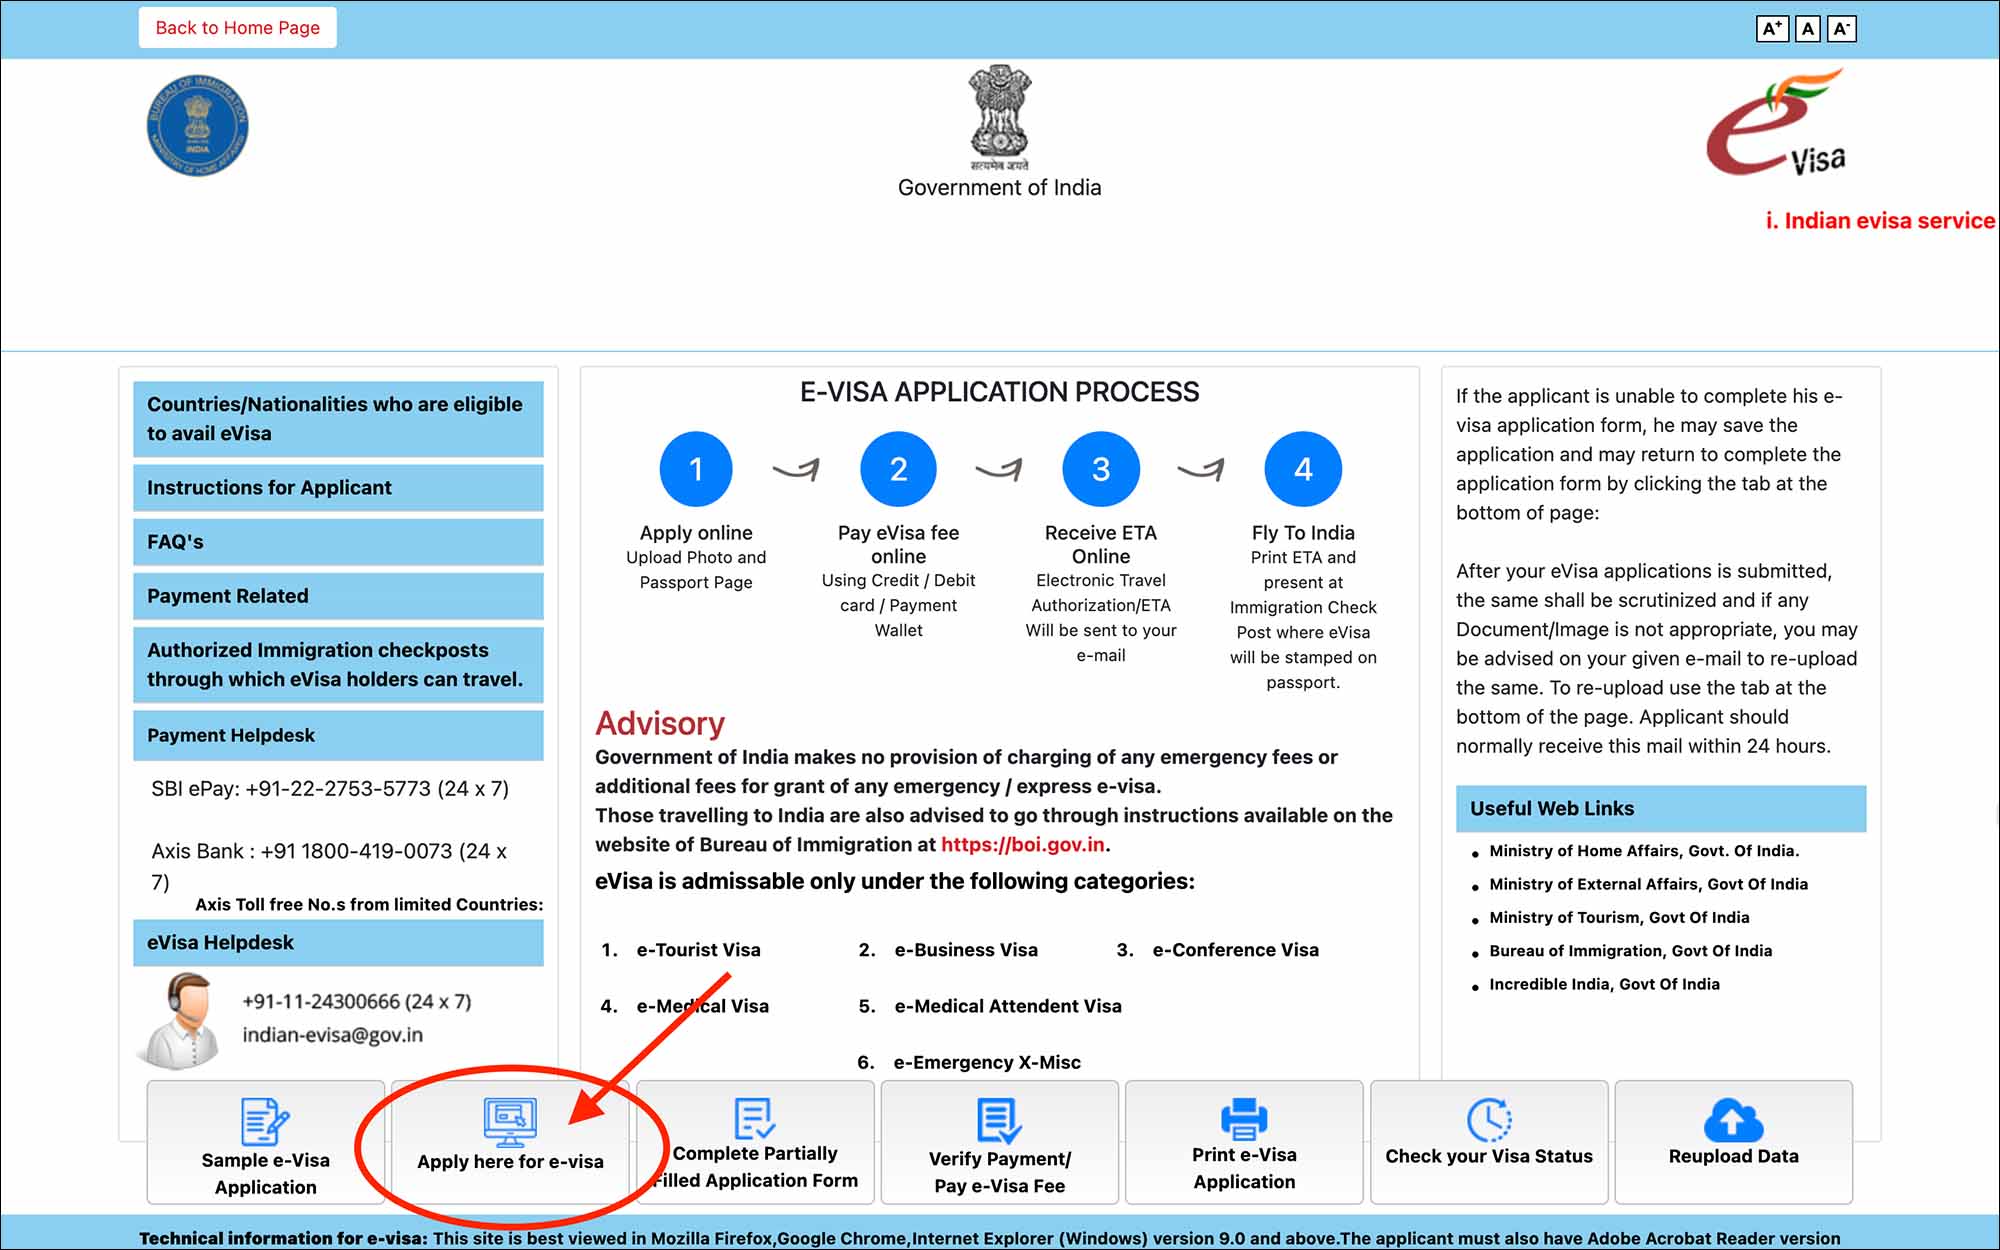
- Go to India e-Visa Portal
- Click on the Apply here for e-Visa button
You will be taken to the e-Visa application page.
—
02. e-Visa application
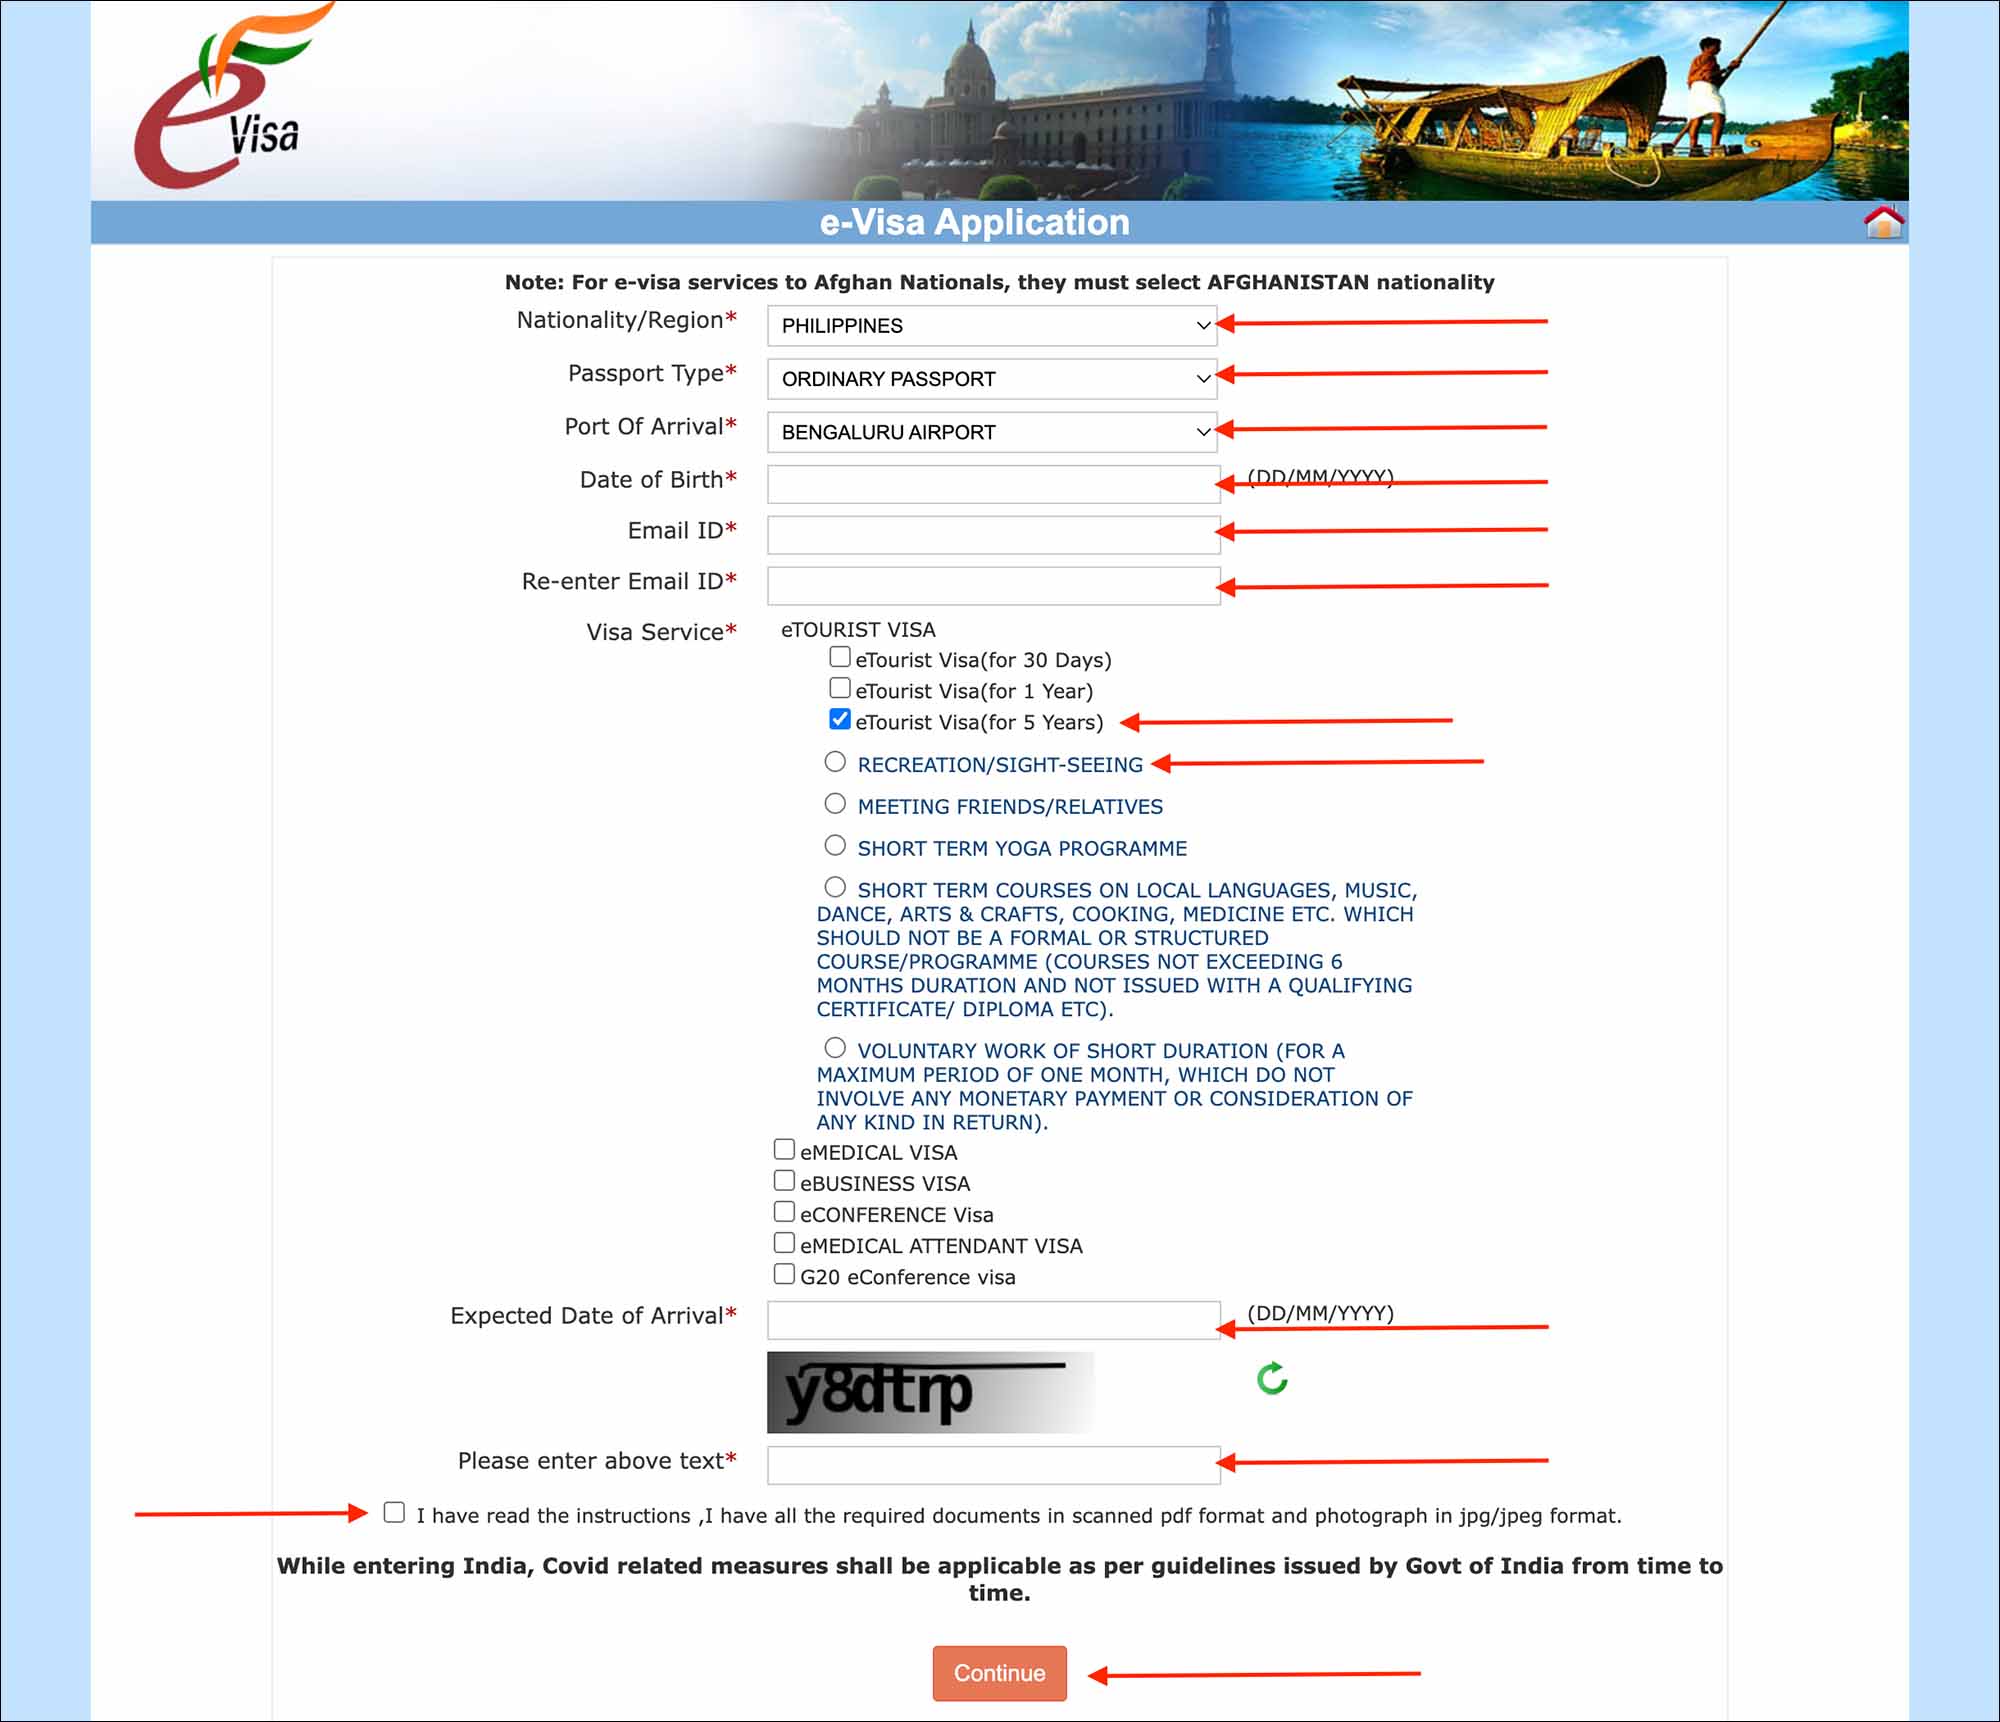
Enter the following details on the e-Visa application page.
- Nationality/Region [Comment: Enter your country of passport]
- Passport Type [Comment: Select “ORDINARY PASSPORT” from the options]
- Port of Arrival [Comment: Select the airport where you will be arriving]
- Date of Birth [Comment: Enter your date of birth as it appears in your passport in DD/MM/YYYY format]
- Email ID [Comment: Enter your email ID where you would like to receive your approved e-Visa]
- Re-enter Email ID [Comment: Re-enter your email ID]
- Visa Service [Comment: Select “e-TOURIST VISA”. If there is a 5-year option, select the 5-year option and then select “RECREATION/SIGHT-SEEING”. If you are not a tourist and applying for the e-Visa for some other purpose, select the appropriate purpose]
- Expected Date of Arrival [Comment: Enter your anticipated date of arrival in India in DD/MM/YYYY format]
- Please enter above text [Comment: Enter the captcha]
Check the box for “I have read the instructions I have all the required documents in scanned pdf format and photograph in jpg/jpeg format”.
Click on the orange Continue button.
A small popup appears prompting you to make sure you have a colored digital photo and a scan of your passport ID page.
Click on the Ok button on the popup.
You will be taken to the Applicant Details Form.
—
03. Applicant Details Form (part 1)
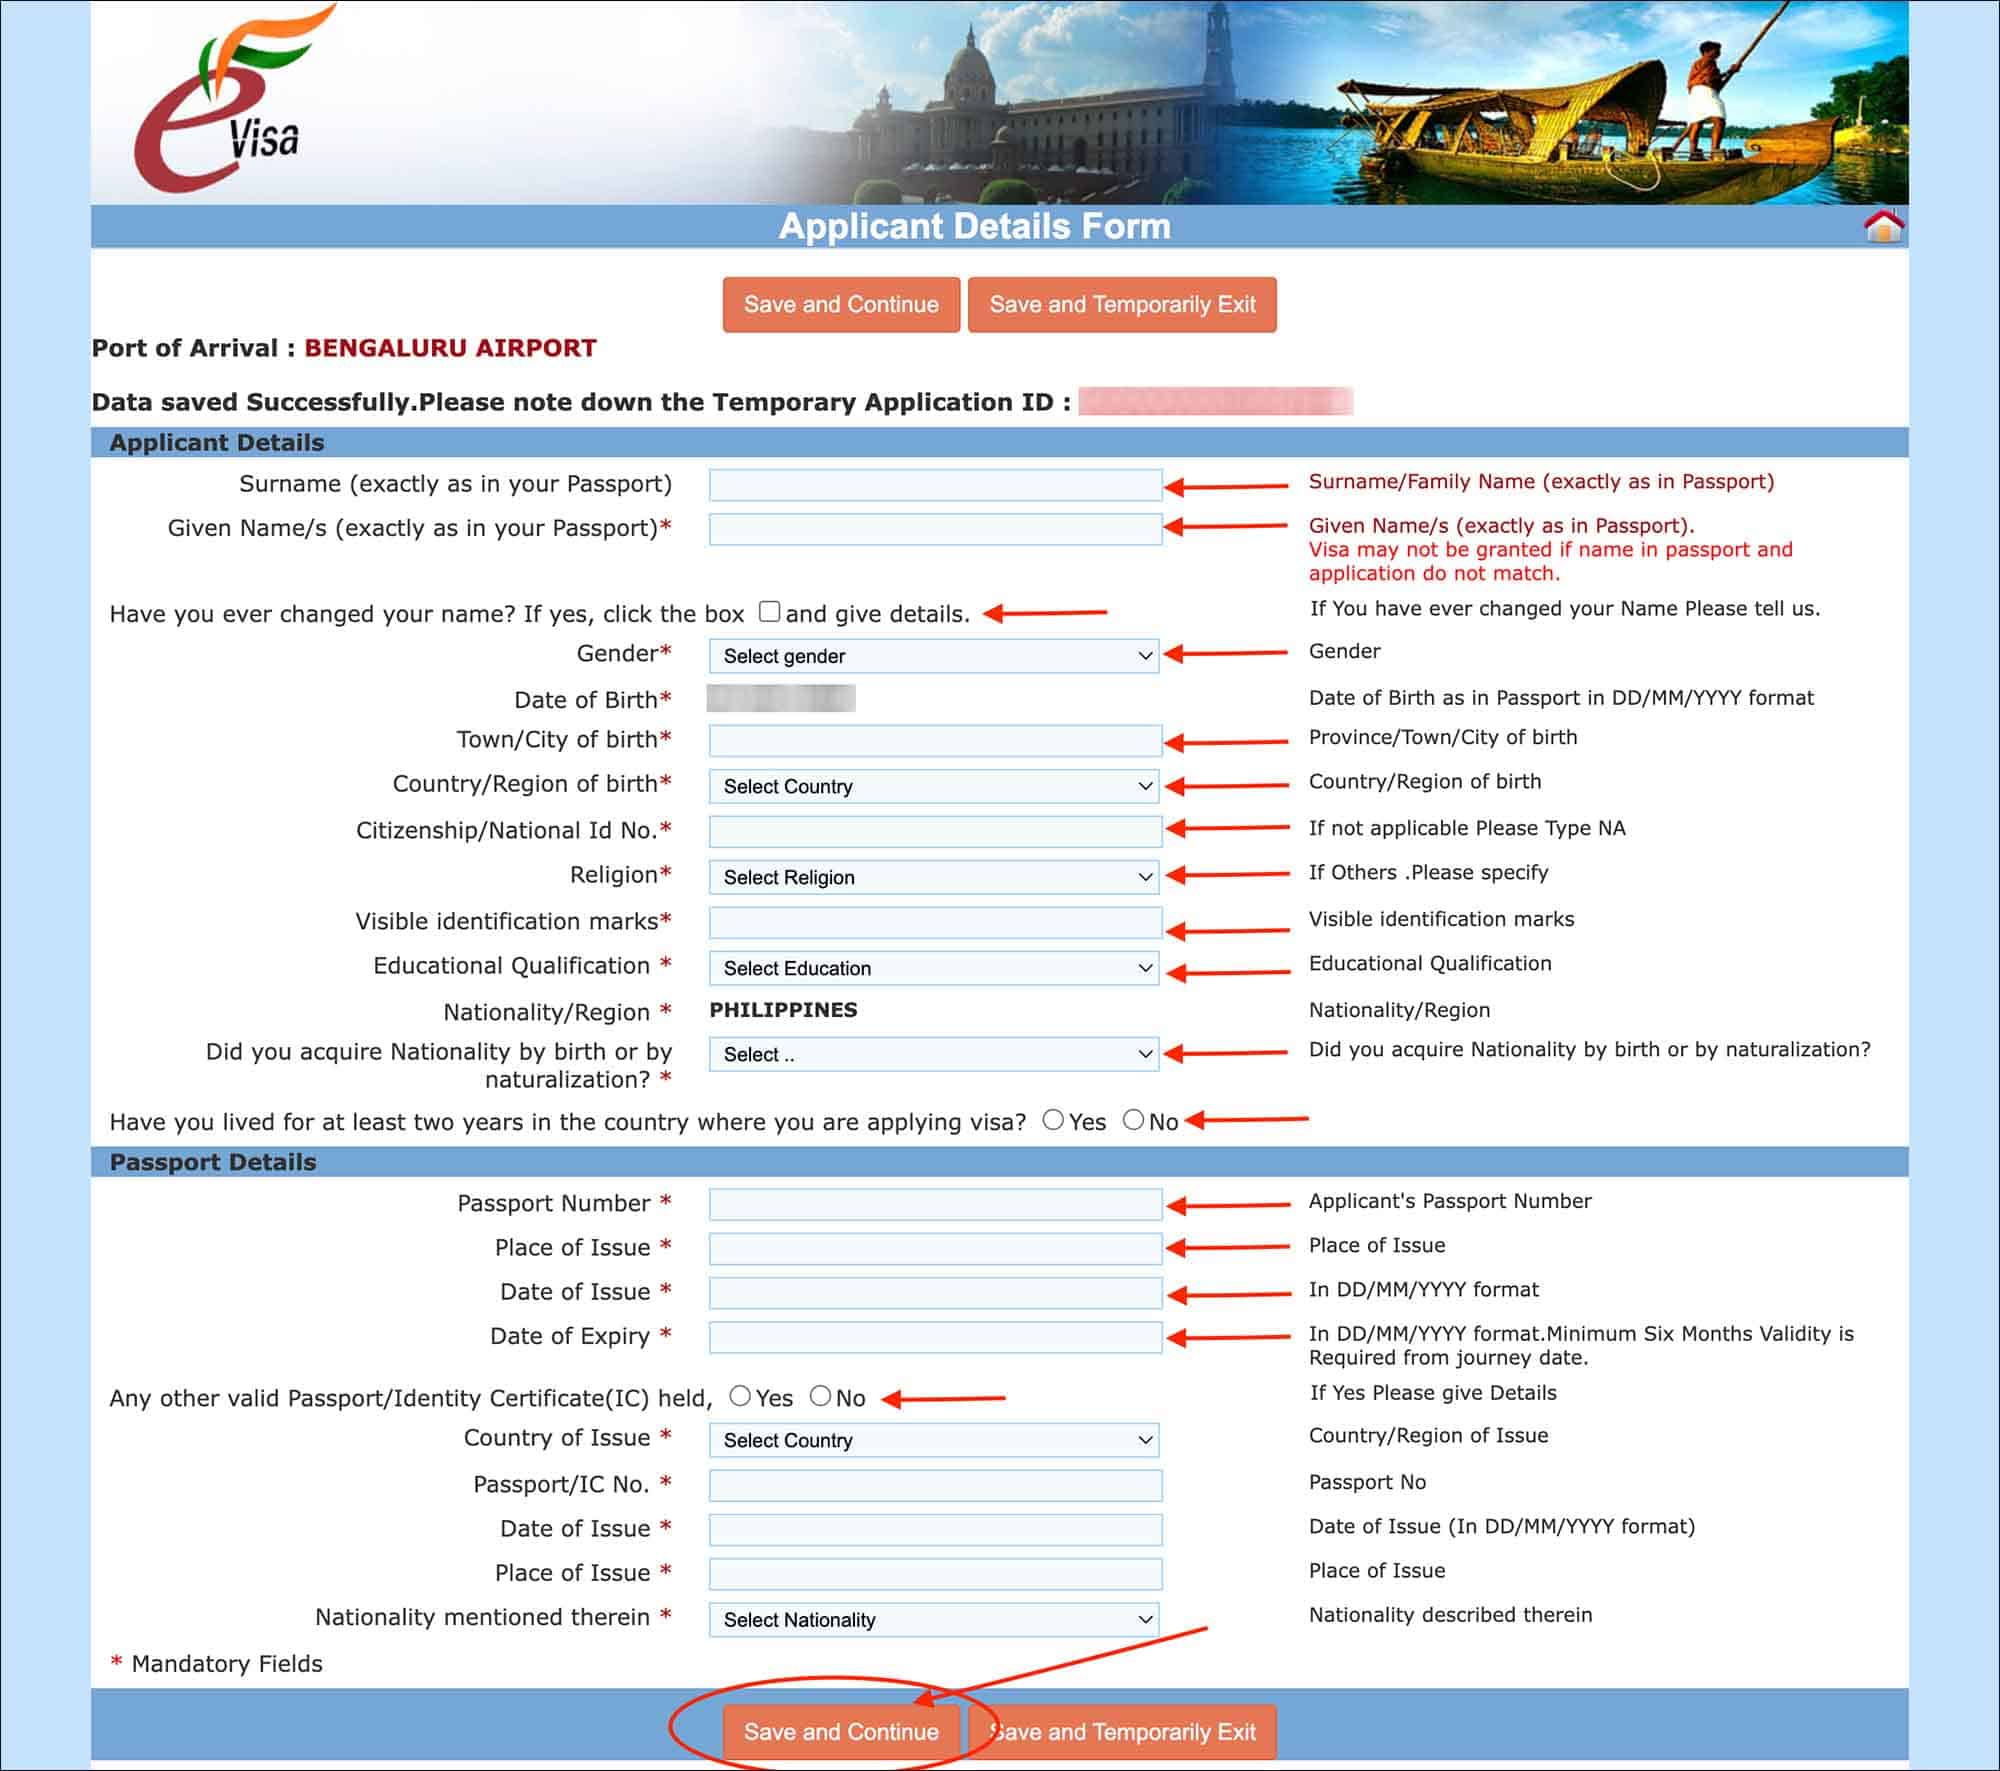
Enter the following information in the Applicant Details section.
- Surname (exactly as in your passport) [Comment: Enter your surname as it appears in your passport]
- Given Name/s (exactly as in your passport) [Comment: Enter your given name as it appears in your passport. If you have a middle name, enter your middle name followed by your first name in this field]
- Have your ever changed your name? [Comment: If you have legally changed your name in the past, check this box and enter the details. Ex: changed your surname after marriage]
- Gender [Comment: Select your gender from the options]
- Date of birth [Comment: Nothing to enter here as your date of birth is populated automatically from the previous screen]
- Town/City of birth [Comment: Enter your place of birth as it appears in your passport]
- Country/Region of birth [Comment: Enter your country of birth]
- Citizenship/National Id No. [Comment: If you have a national Id, enter here. But do not enter SSN or something similar that’s confidential. In that case, just enter NA]
- Religion [Comment: Select your religion from the list]
- BAHAI
- BUDDHISM
- CHRISTIAN
- HINDU
- ISLAM
- JAINISM
- JUDAISM
- OTHERS
- PARSI
- SIKH
- ZOROASTRIAN
- Visible identification marks [Comment: Enter any visible identification marks such as permanent moles or scars preferably on the face]
- Educational Qualification [Comment: Select your highest education qualification from the list]
- BELOW MATRICULATION
- GRADUATE
- HIGHER SECONDARY
- ILLITERATE
- MATRICULATION
- NA BEING MINOR
- OTHERS
- POSTGRADUATE
- PROFESSIONAL
- Nationality/Region [Comment: Nothing to enter here as your nationality is populated automatically from the previous screen]
- Did you acquire nationality by birth or by naturalization? [Comment: Select “By Birth”. If you have acquired the nationality by naturalization, select “Naturalization“]
- By Birth
- Naturalization
- Have you lived for at least two years in the country where you are applying visa? [Comment: Select “Yes”. If you haven’t lived more than two years in the country you are applying from, select “No”]
Enter the following information in the Passport Details section.
- Passport Number [Comment: Enter your current passport number that you will use for entering India]
- Place of Issue [Comment: Enter the place of issue as it appears in your passport]
- Date of Issue [Comment: Enter the date of issue as it appears in your passport]
- Date of Expiry [Comment: Enter the expiry date as it appears in your passport. Passport must have at least 6 months of validity from the anticipated date of entry]
- Any other valid Passport/Identity Certificate(IC) held [Comment: Select No. If you also hold a passport from another country, select Yes and enter the details]
Click on the orange Save and Continue button.
You will be taken to the Applicant Details Form second part.
How to save the application and come back later to complete
If you plan to continue filling out the application later, you can click on Save and Temporarily Exit button.
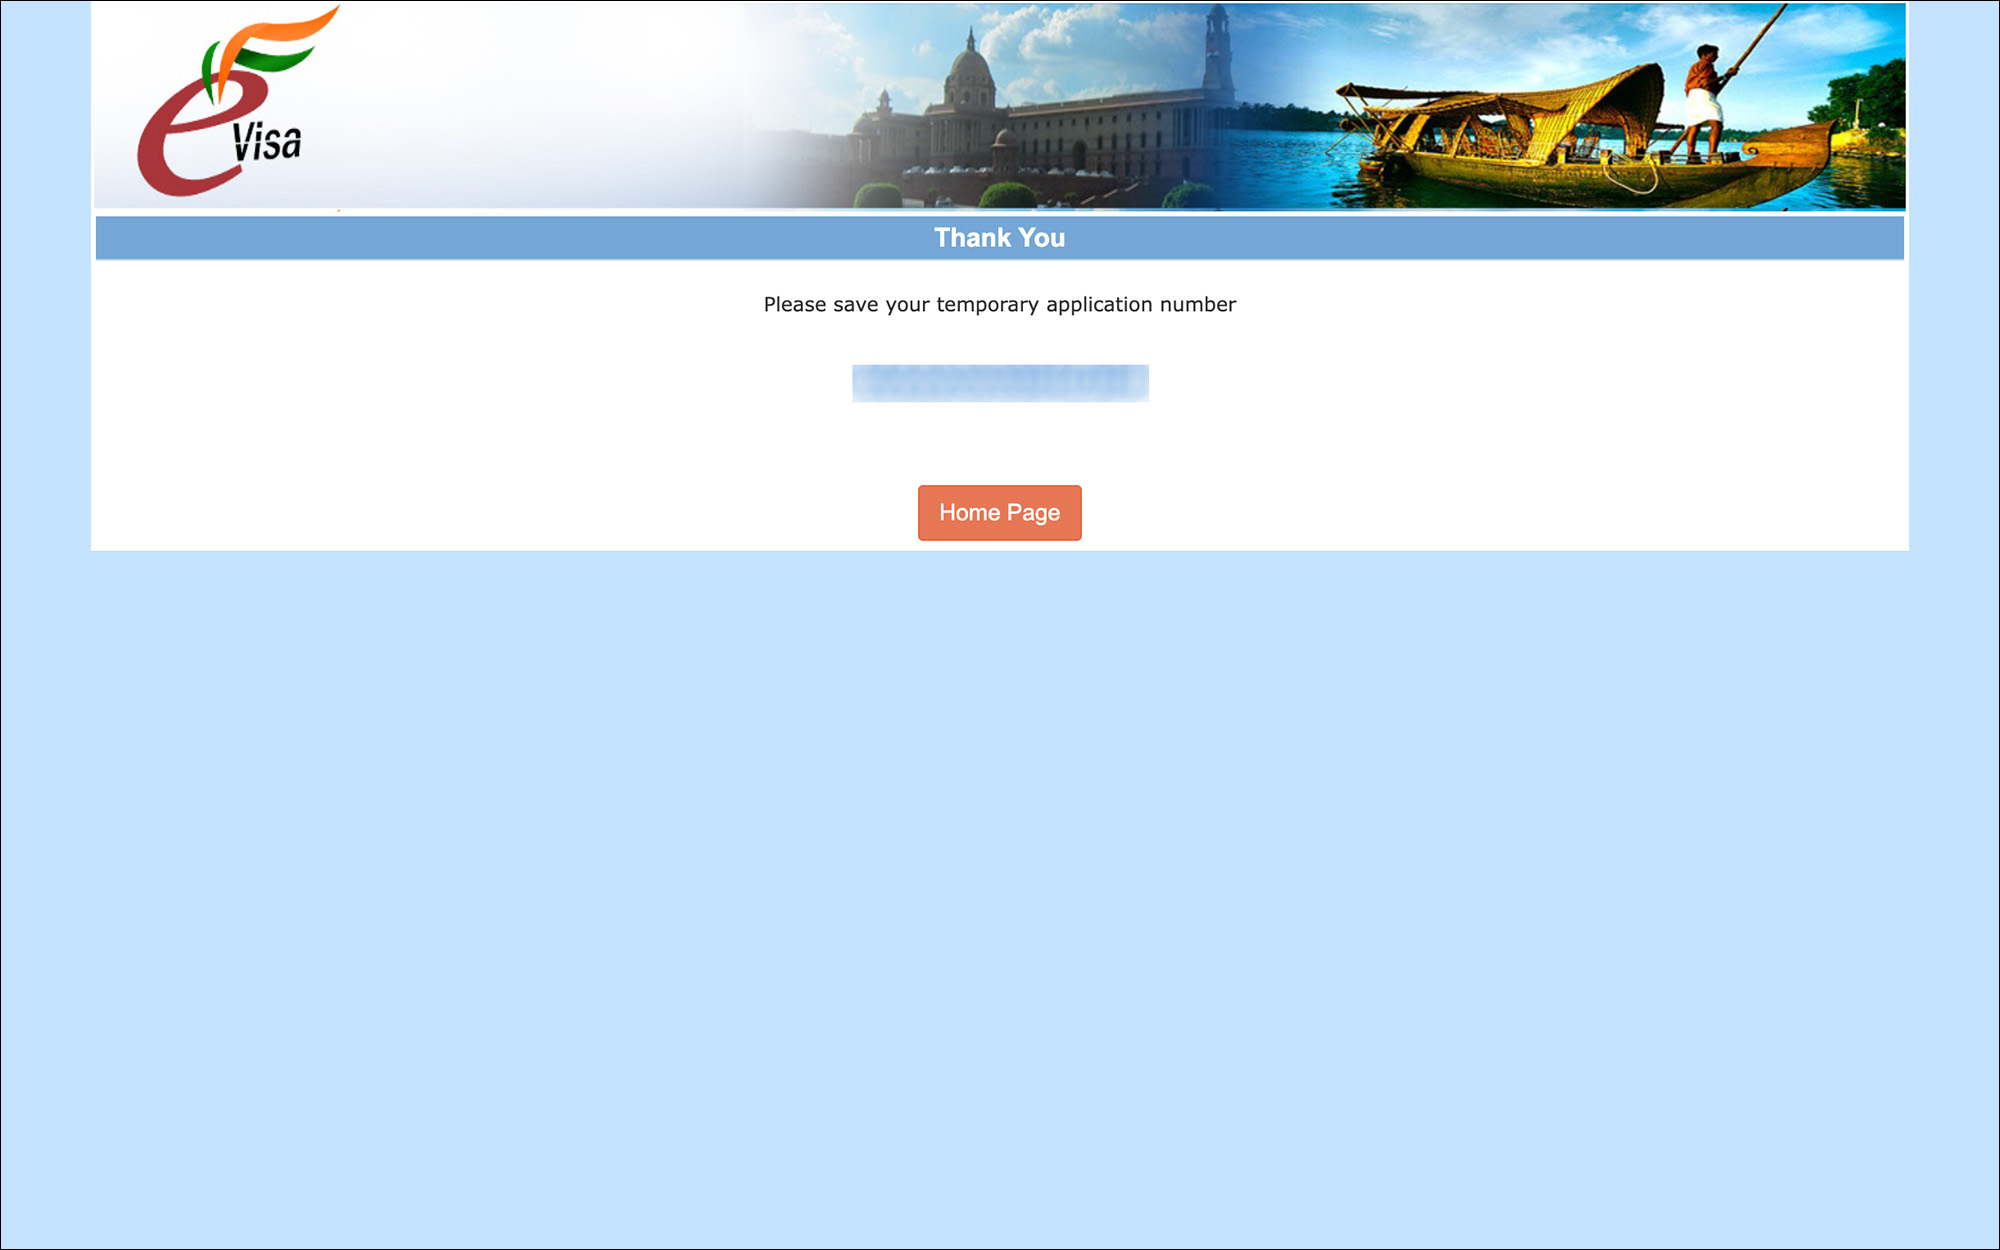
This will save your progress and exit the application. You will be asked to make a note of your application ID.

You will also receive an email with your application ID. You will have 7 days to complete the application. Otherwise, the application will be deleted from the system and you will have to start over again.

Follow these steps to complete the partially saved application.
- Go to India e-Visa Portal
- Click on the Complete Partially Filled Application Form button
You will be taken to the Complete Partially Filled Form.
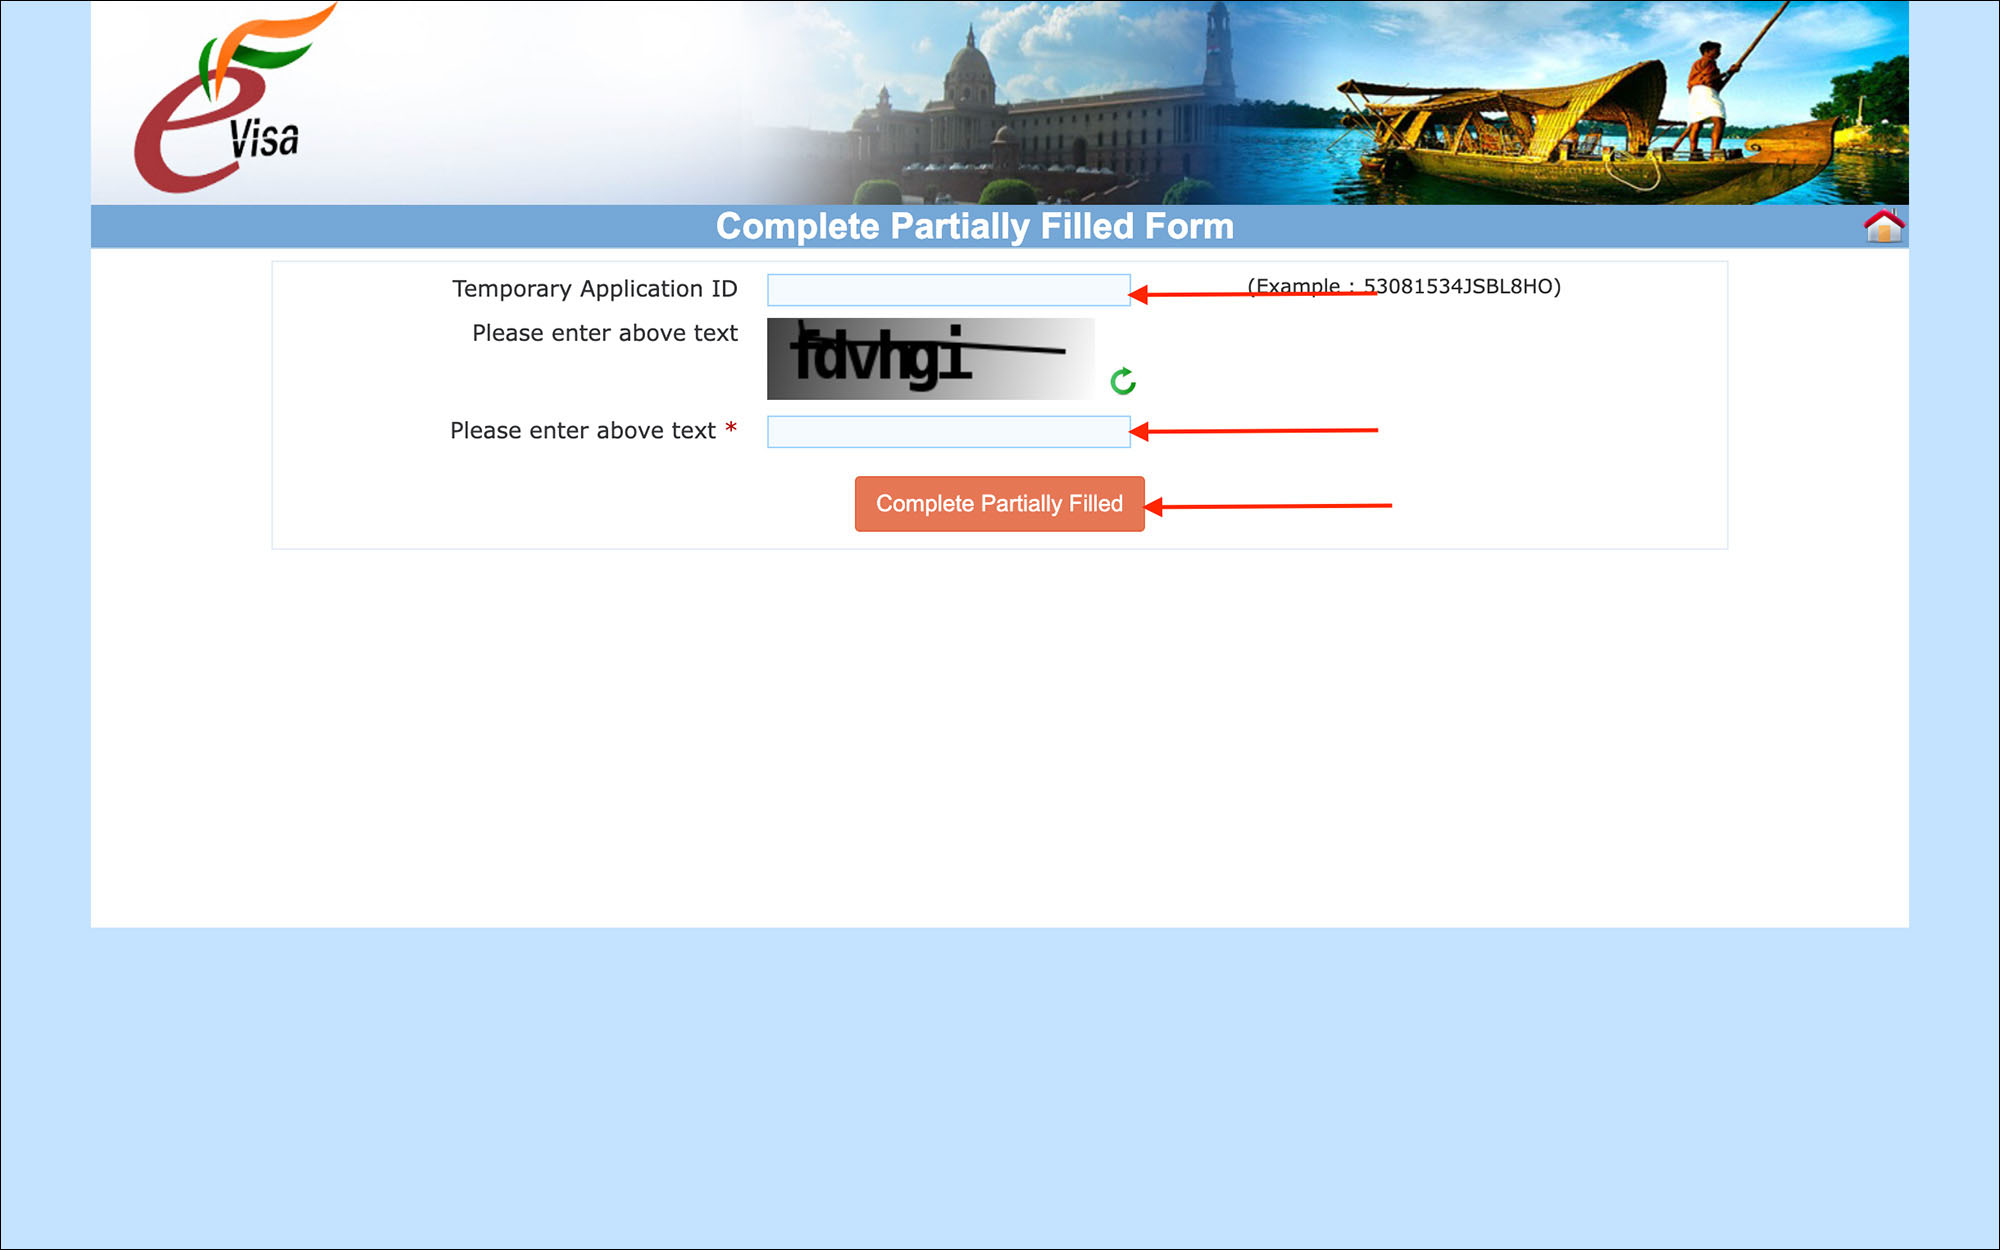
Enter the following information in the Complete Partially Filled Form.
- Temporary Application ID [Comment: Enter your saved application ID. If you don’t remember, look in your email inbox]
- Please enter above text [Comment: Enter the captcha]
Click on the orange Complete Partially Filled button.
You will be taken to the last saved point of your e-Visa application. You can continue filling in from there.
—
04. Applicant Details Form (part 2)
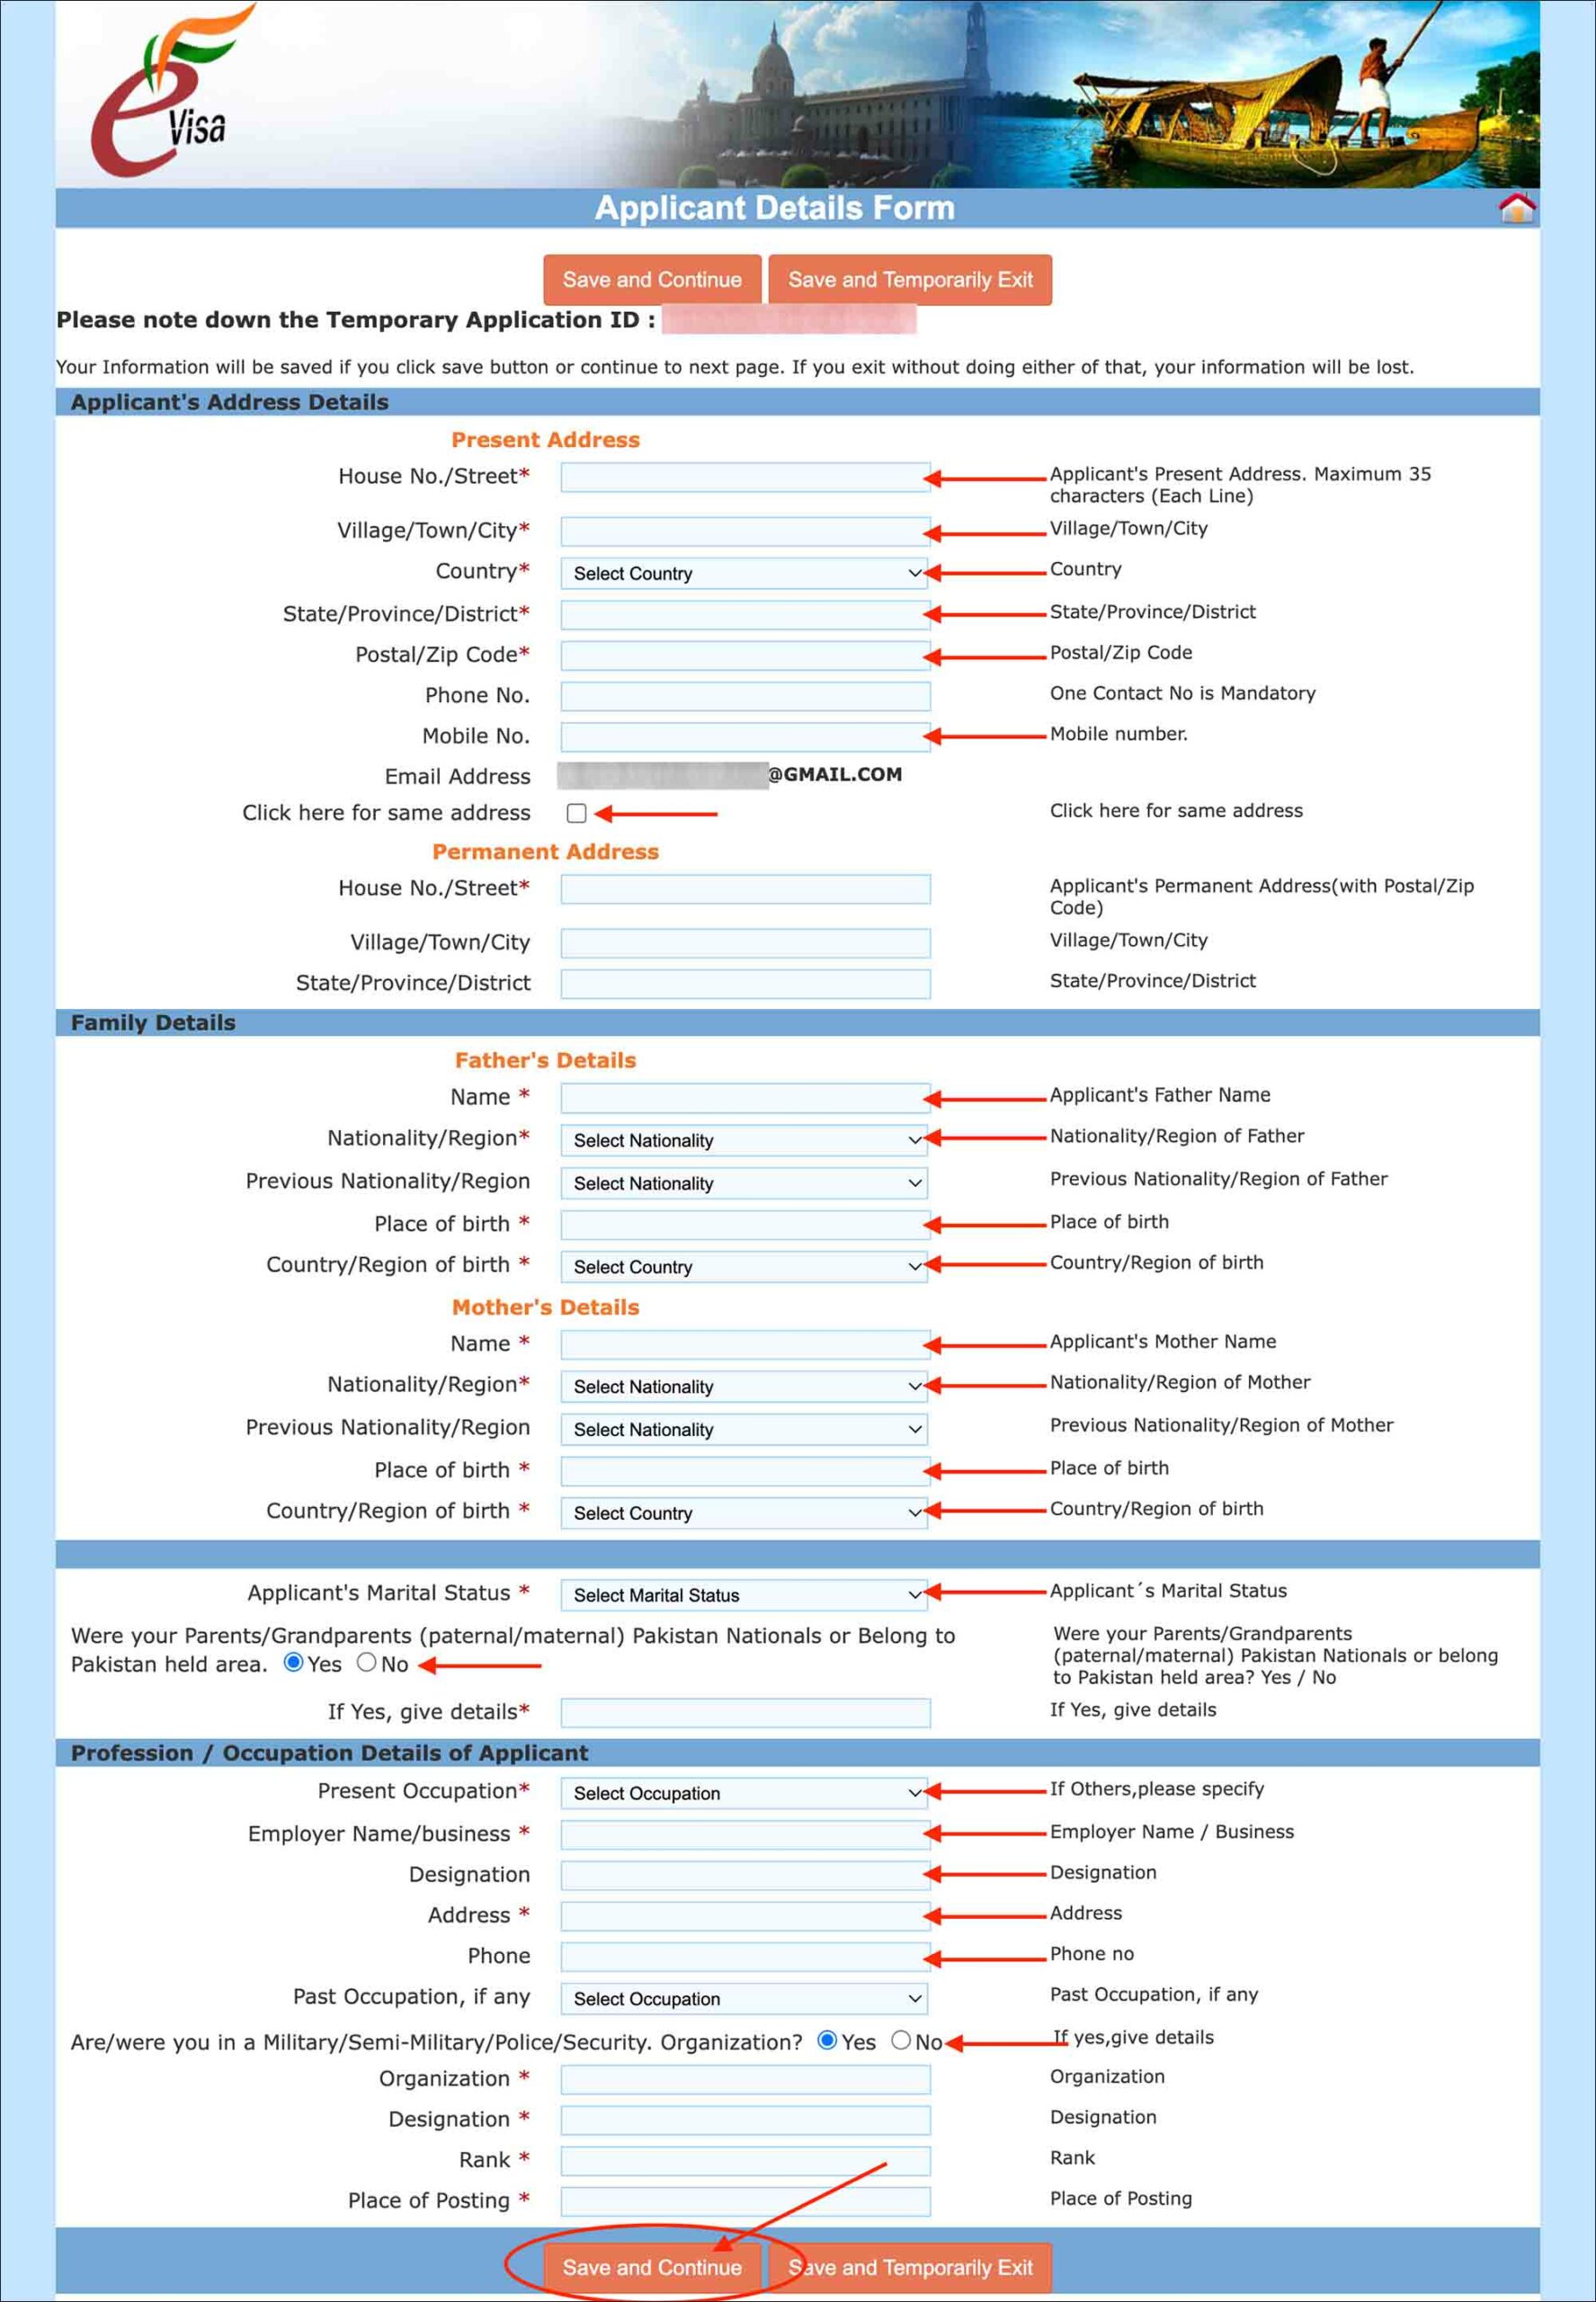
Enter the following information in the Applicant Address Details section.
Present Address
- House No./Street [Comment: Enter your house number or street address where you live]
- Village/Town/City [Comment: Enter the city where you live]
- Country [Comment: Enter the country where you live]
- State/Province/District [Comment: Enter the state or province where you live]
- Postal/Zip Code [Comment: Enter your current address postal or zip code]
- Phone No. [Comment: Enter your current fixed-line phone number]
- Mobile No. [Comment: Enter your current mobile or cellphone number]
- Email Address [Comment: Nothing to enter here as your email is populated automatically from the previous pages]
- Click here for same address [Comment: Check this box if your permanent address is the same as your current address. If not, enter your permanent address below]
NOTE
Enter your permanent address below if it’s different from your present address.
Permanent Address
- House No./Street [Comment: Enter your permanent address house number]
- Village/Town/City [Comment: Enter your permanent address city]
- State/Province/District [Comment: Enter your permanent address state or province]
Enter the following information in the Family Details section.
Father’s Details
- Name [Comment: Enter your father’s full name including first, middle and last names]
- Nationality/Region [Comment: Enter your father’s nationality]
- Previous Nationality/Region [Comment: This is not a mandatory field, so leave it unselected. But if your father held any previous nationality, select the country from the list]
- Place of birth [Comment: Enter your father’s place of birth]
- Country/Region of birth [Comment: Select your father’s country of birth from the list]
Mother’s Details
- Name [Comment: Enter your mother’s full name including first, middle and last names]
- Nationality/Region [Comment: Enter your mother’s nationality]
- Previous Nationality/Region [Comment: This is not a mandatory field, so leave it unselected. But if your mother held any previous nationality, select the country from the list]
- Place of birth [Comment: Enter your mother’s place of birth]
- Country/Region of birth [Comment: Select your mother’s country of birth from the list]
Enter the following information in the next (Marital Status) section.
- Applicant’s marital status [Comment: Select your marital status from the options. If you are married, then select MARRIED and enter your spouse’s details below]
- DIVORCEE
- MARRIED
- SINGLE
Spouse’s Details
- Name [Comment: Enter your spouse’s full name including first, middle and last names]
- Nationality/Region [Comment: Enter your spouse’s nationality]
- Previous Nationality/Region [Comment: This is not a mandatory field, so leave it unselected. But if your spouse held any previous nationality, select the country from the list]
- Place of birth [Comment: Enter your spouse’s place of birth]
- Country/Region of birth [Comment: Select your spouse’s country of birth from the list]
- Were your Parents/Grandparents (paternal/maternal) Pakistan Nationals or Belong to Pakistan held area? [Comment: Select No. If you select Yes for any reason, give the details on your ancestory]
Enter the following information in the Profession/Occupation Details of Application section.
- Present Occupation [Comment: Select your current occupation/profession from the list. If you can’t find your occupation/profession in the list, such as NURSE, select OTHERS and enter your occupation/profession in the box that appears below]
- Employer Name/business [Comment: Enter your current employer/business name]
- Designation [Comment: Enter your current designation or title]
- Address [Comment: Enter your current employer/business address]
- Phone [Comment: Enter your current employer/business phone number]
- Past Occupation, if any [Comment: If you had any other occupations or professions in the past, select from the list]
- Are/were you in a Military/Semi-Military/Police/Security Organization? [Comment: Select No. If you are/were in defense, select Yes and enter the details]
Click on the orange Save and Continue button.
You will be taken to the Visa Details Form.
—
05. Visa Details Form
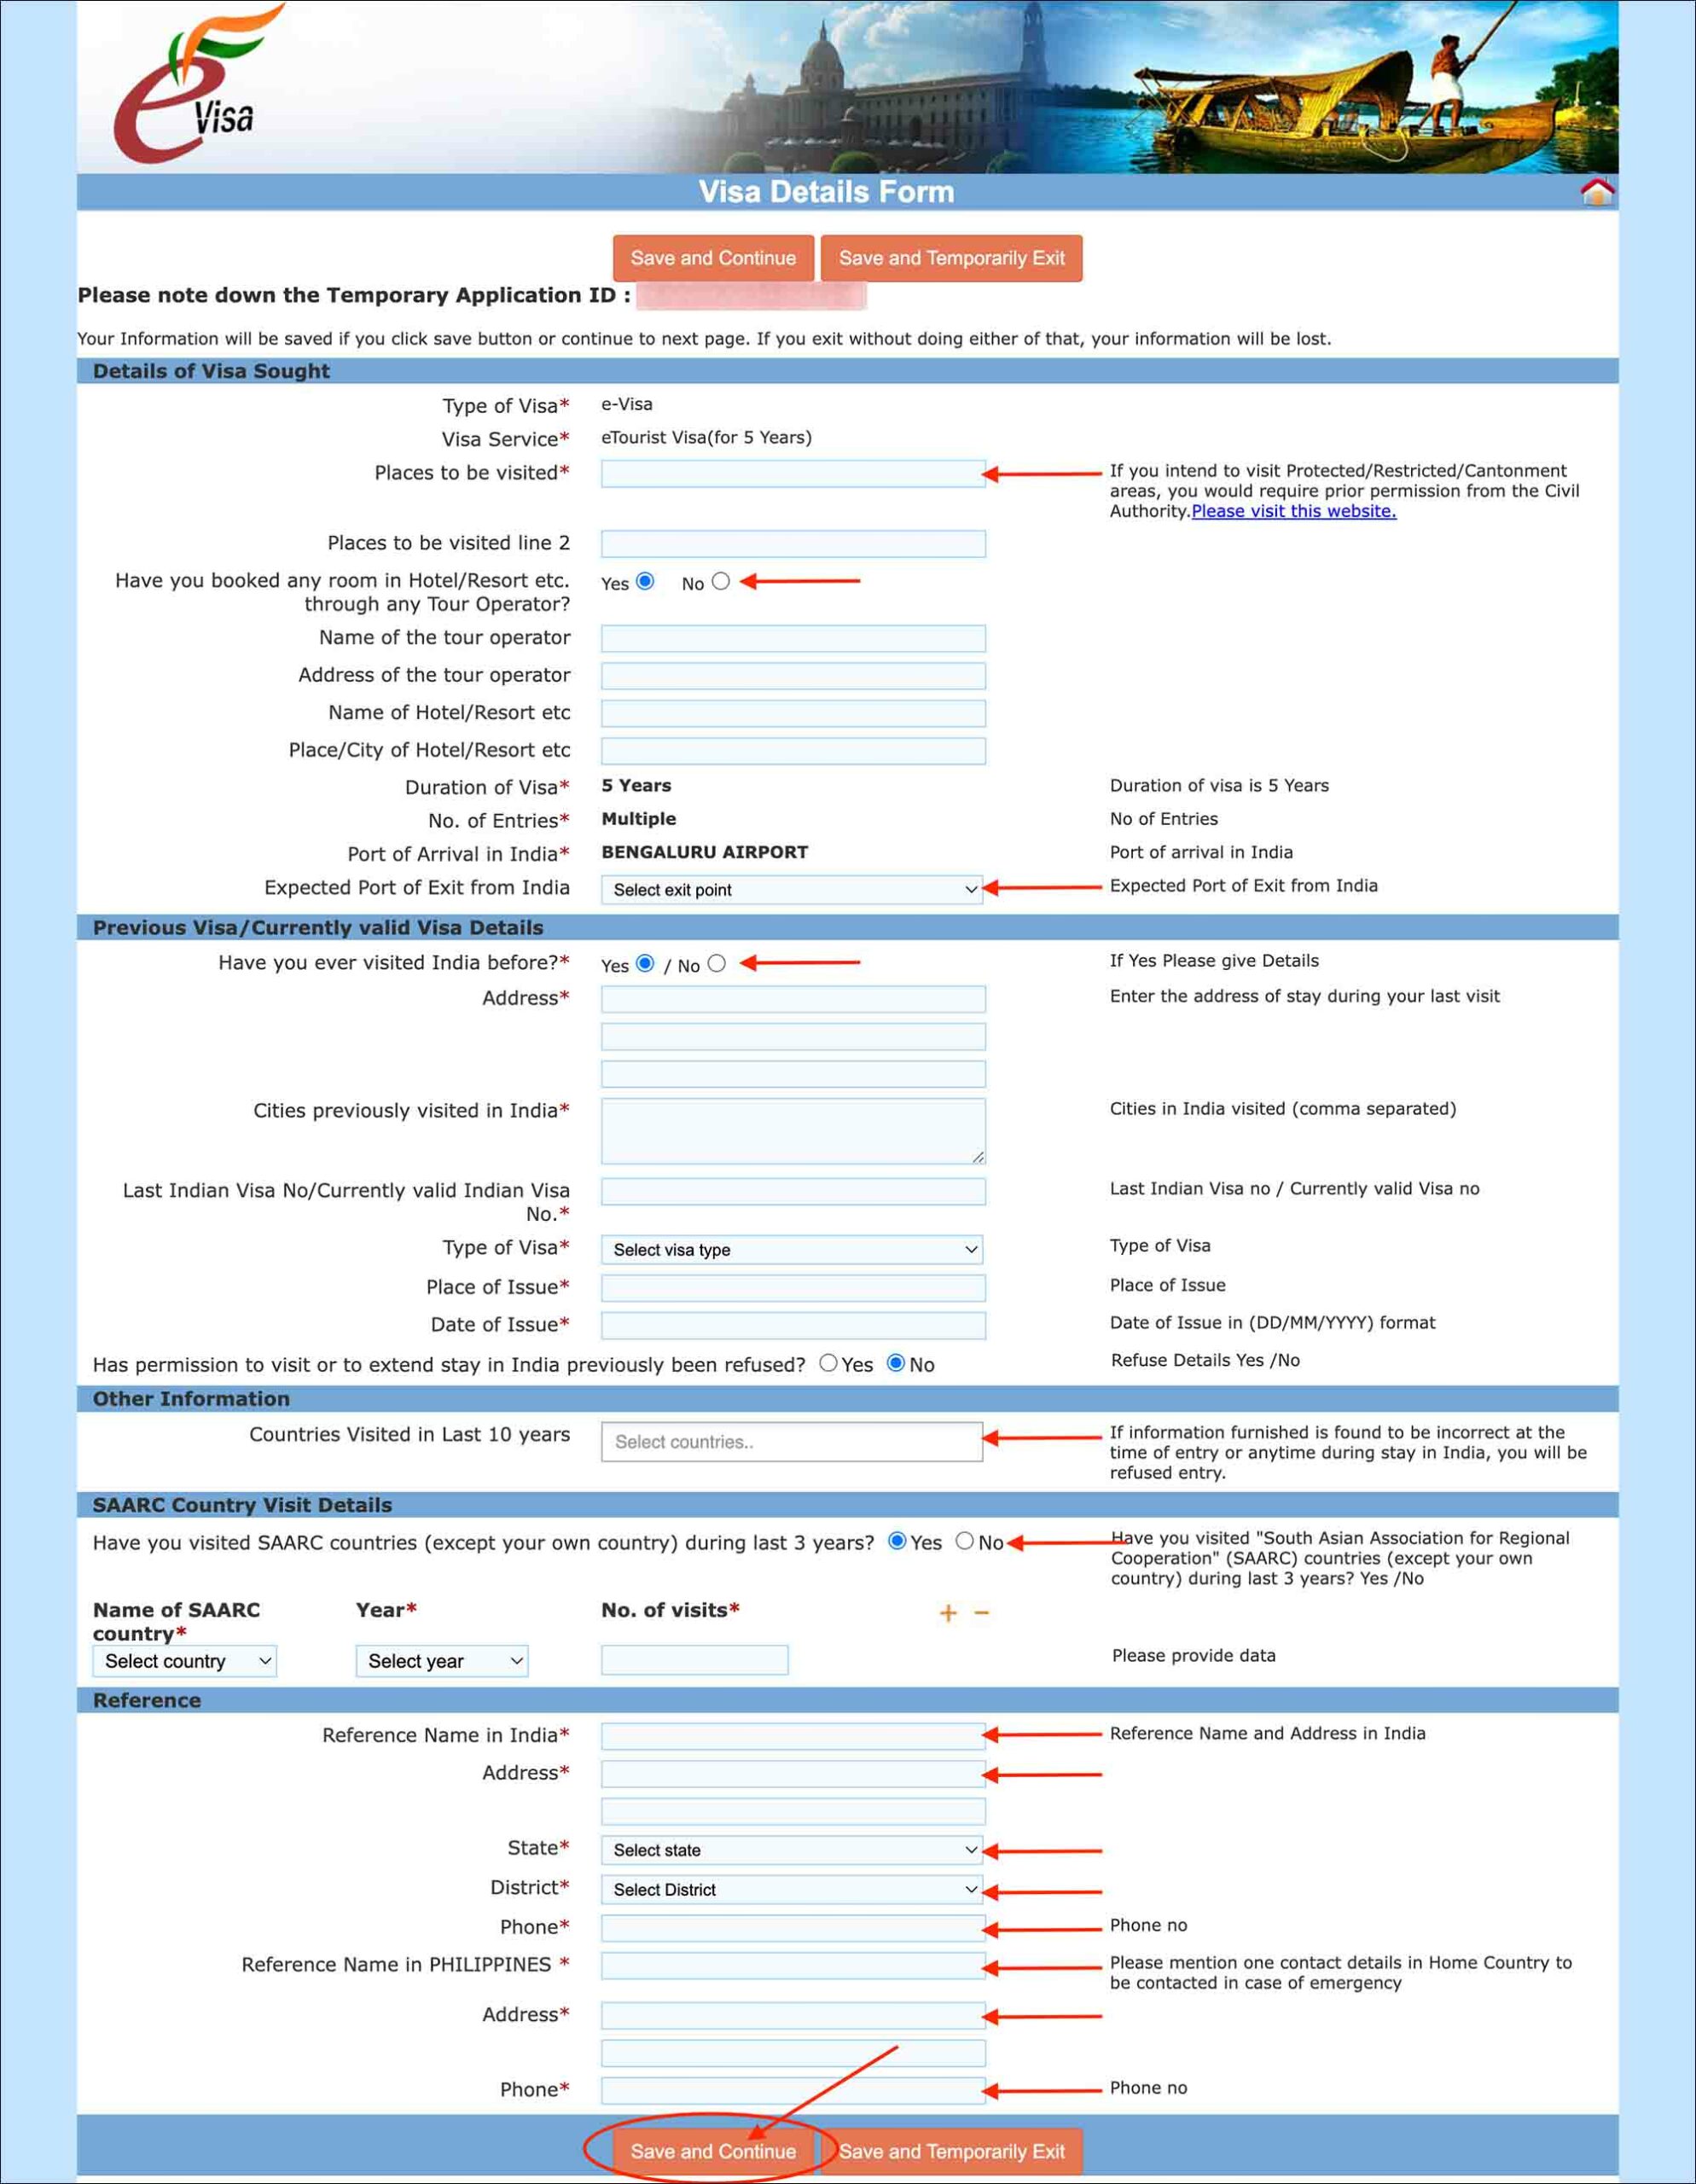
Enter the following information in the Details of the visa sought section.
- Type of visa [Comment: Nothing to enter here as your visa type (e-Visa) will be automatically populated here]
- Visa service [Comment: Nothing to enter here too as the e-Tourist Visa option that you have selected earlier will be automatically populated]
- Places to be visited [Comment: List all the places that you will visit in India on this trip]
- Places to be visited line 2 [Comment: If the above text box is not enough, you can enter more places that you plan to visit in India here]
- Have you booked any room in Hotel/Resort etc. through any Tour Operator? [Comment: If you have already booked a hotel or tour, select Yes and enter the details here]
- Duration of visa [Comment: Nothing to enter here as the visa length that you have selected earlier will be automatically populated here]
- No, of Entries [Comment: This will also be auto-populated based on your selection in the previous pages]
- Port of Arrival in India [Comment: This will also be auto-populated based on your selection in the previous pages]
- Expected Port of Exit from India [Comment: Select the airport or seaport from which you plan to leave the country after your trip]
IMPORTANT
Your port of arrival and exit do not matter much. After your e-Visa is approved, you can enter from any airport/seaport and exit from any airport/seaport.
Enter the following information in the Previous Visa/Currently valid Visa Details section.
- Have you ever visited India before? [Comment: If you have been to India before, select Yes and enter the details below. If this is your first time visiting India, select No and skip to the next section]
- Address [Comment: Enter the address of the house or hotel where you stayed during your last visit to India]
- Cities previously visited in India [Comment: List all the cities you have visited on your last visit to India]
- Last Indian Visa No/Currently valid Indian Visa No. [Comment: Enter your previous India visa number]
- Type of Visa [Comment: Select the type of your previous visa from the list]
- Place of Issue [Comment: Enter the place your previous India visa was issued. If it was e-Visa, then it would be your first port of entry in India. If it were a consular visa, then it would be the city abroad where it was issued]
- Date of Issue [Comment: Enter the date on which your previous India visa was issued]
- Has permission to visit or to extend stay in India previously been refused? [Comment: Select No. If you were denied entry into India before select Yes and enter the details]
Enter the following in the Other Information section.
- Countries Visited in Last 10 years [Comment: Enter the list of countries that you have visited in the last 10 years]
Enter the following in the SAARC Country Visit Details section.
- Have you visited SAARC countries (except your own country) during last 3 years? [Comment: If you have visited any SAARC (South Asian Association for Regional Cooperation) countries in the last 3 years, enter them here]
SAARC Countries
SAARC (South Asian Association for Regional Cooperation) comprises Afghanistan, Bangladesh, Bhutan, India, Maldives, Nepal, Pakistan and Sri Lanka. If you have visited any of these countries in the last 3 years, you must enter them for the above question.
Enter the following in the Reference section.
- Reference Name in India [Comment: Enter the name of a contact person in India. This can be a family, relative or friend who lives in India. If you do not know anyone, you can enter the hotel where you plan to stay]
- Address [Comment: Enter your India contact person’s address or hotel address]
- State [Comment: Select the state where your India contact person resides or your hotel is]
- District [Comment: Select the district where your India contact person resides or your hotel is]
- Phone [Comment: Enter an Indian phone number of your India contact person or hotel]
- Reference Name in <your country> [Comment: Enter the name of someone from your country as an emergency contact. This can be a family, relative or friend who lives in your country]
- Address [Comment: Enter your emergency contact person’s address]
- Phone [Comment: Enter your emergency contact person’s phone number]
Click on the orange Save and Continue button.
—
06. Additional Question Details
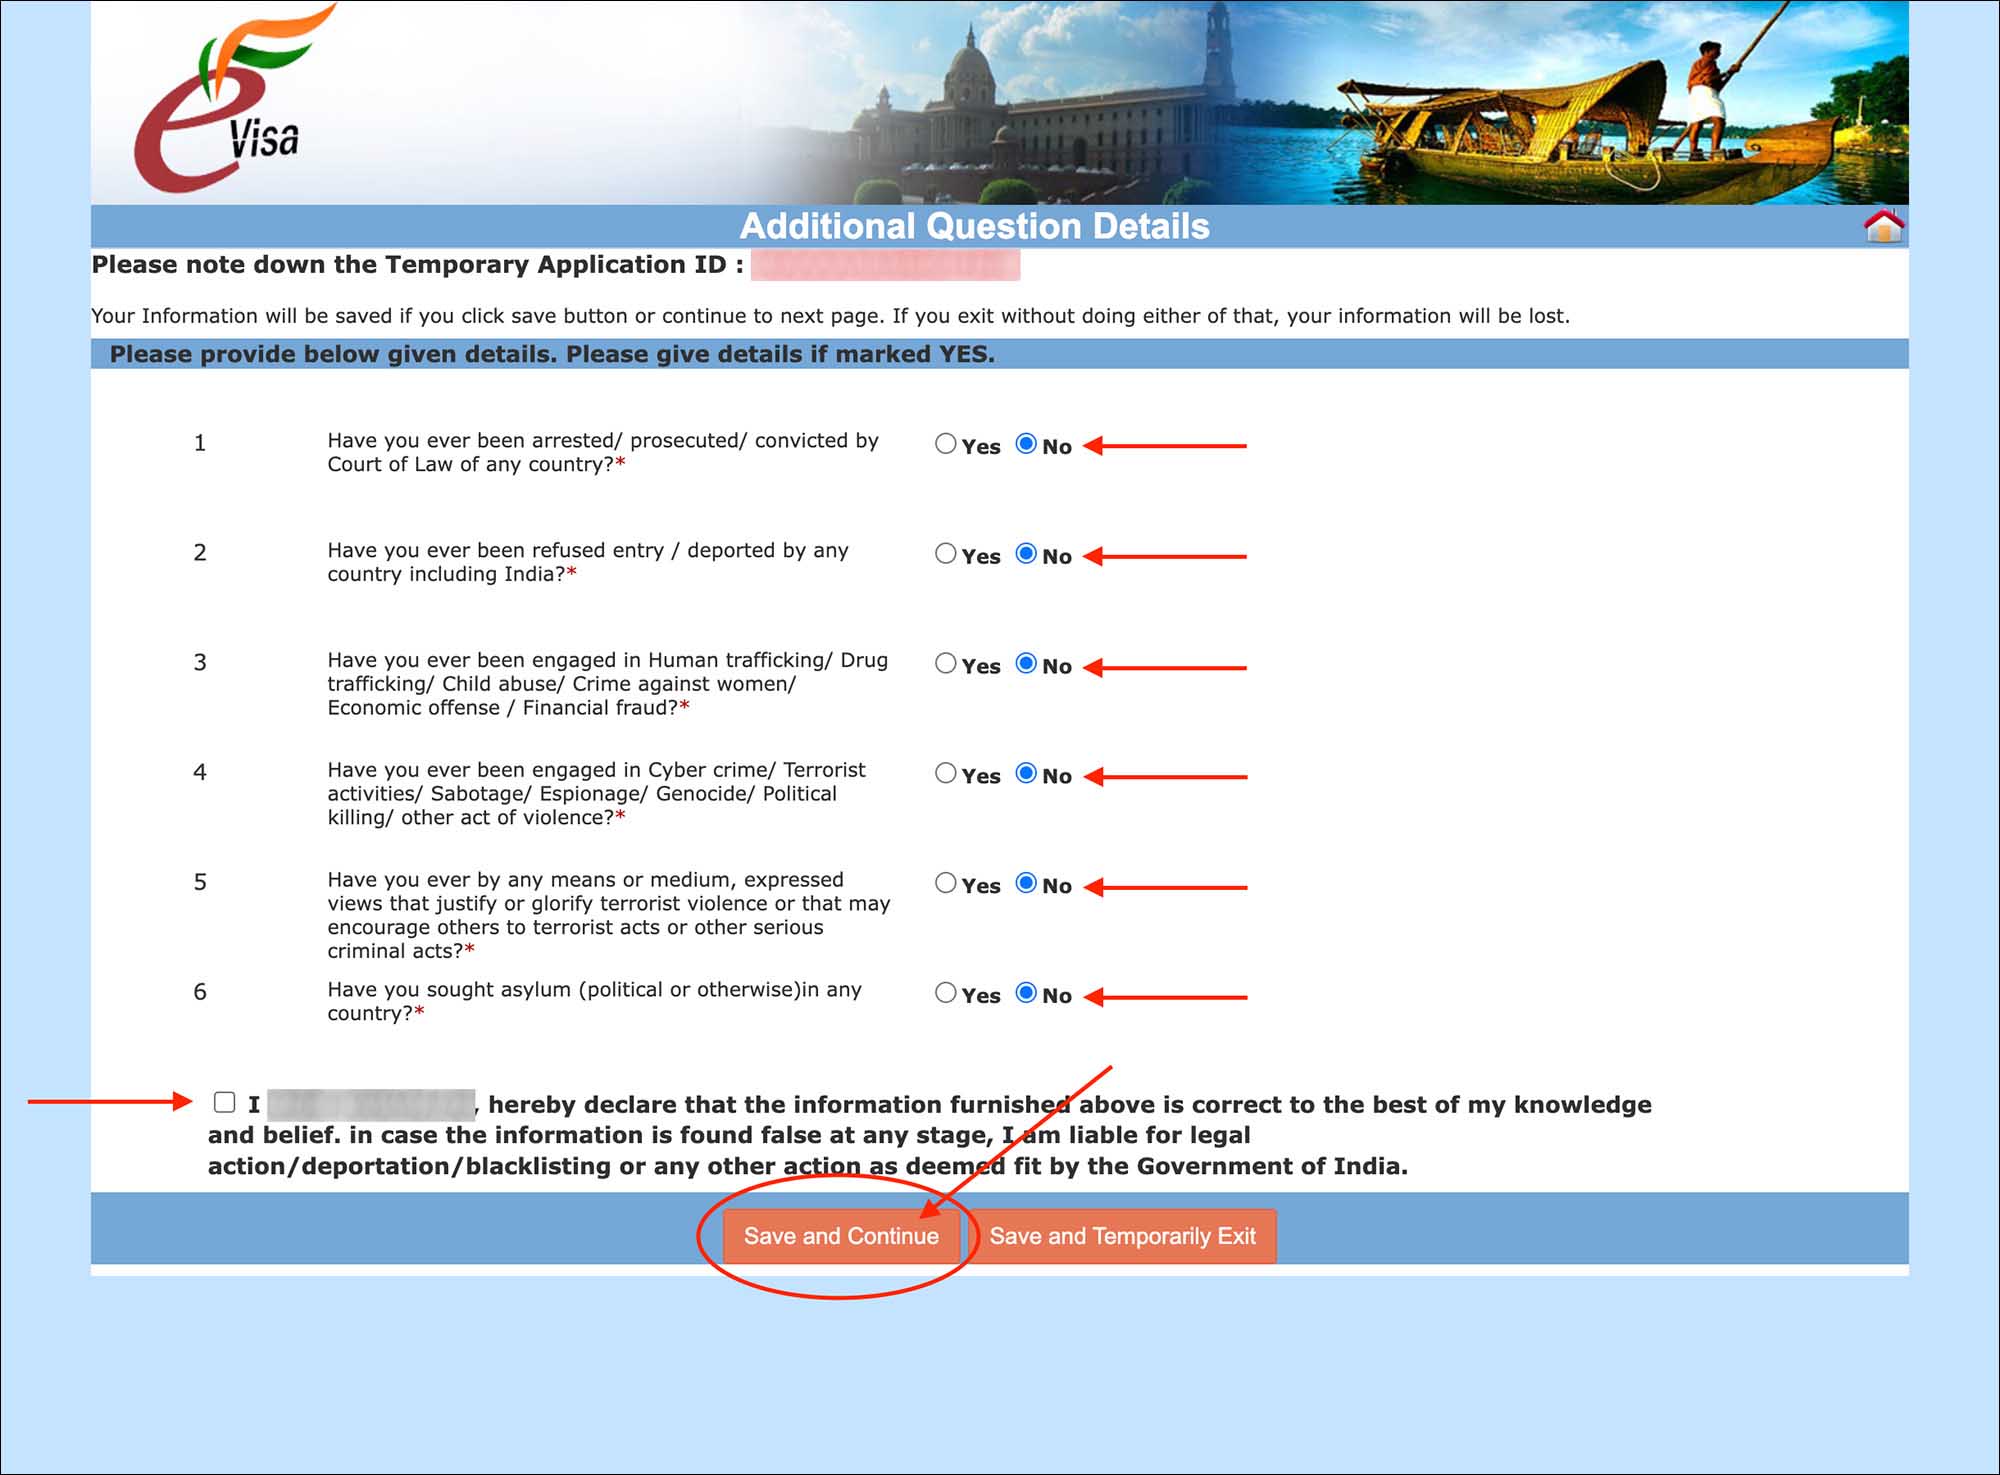
Answer the following question on this page.
- Have you ever been arrested/ prosecuted/ convicted by Court of Law of any country? [Comment: Select No unless you have been arrested or prosecuted]
- Have you ever been refused entry / deported by any country including India? [Comment: Select No unless you have been refused entry or deported from any country in the past]
- Have you ever been engaged in Human trafficking/ Drug trafficking/ Child abuse/ Crime against women/ Economic offense / Financial fraud? [Comment: Select No]
- Have you ever been engaged in Cyber crime/ Terrorist activities/ Sabotage/ Espionage/ Genocide/ Political killing/ other act of violence? [Comment: Select No]
- Have you ever by any means or medium, expressed views that justify or glorify terrorist violence or that may encourage others to terrorist acts or other serious criminal acts? [Comment: Select No]
- Have you sought asylum (political or otherwise)in any country? [Comment: Select No, unless you have sought asylum]
Check the box for the self-declaration that all the above information is correct.
Then, click on the orange Save and Continue button.
You will be taken to the Upload Photograph page.
—
07. Upload Photograph
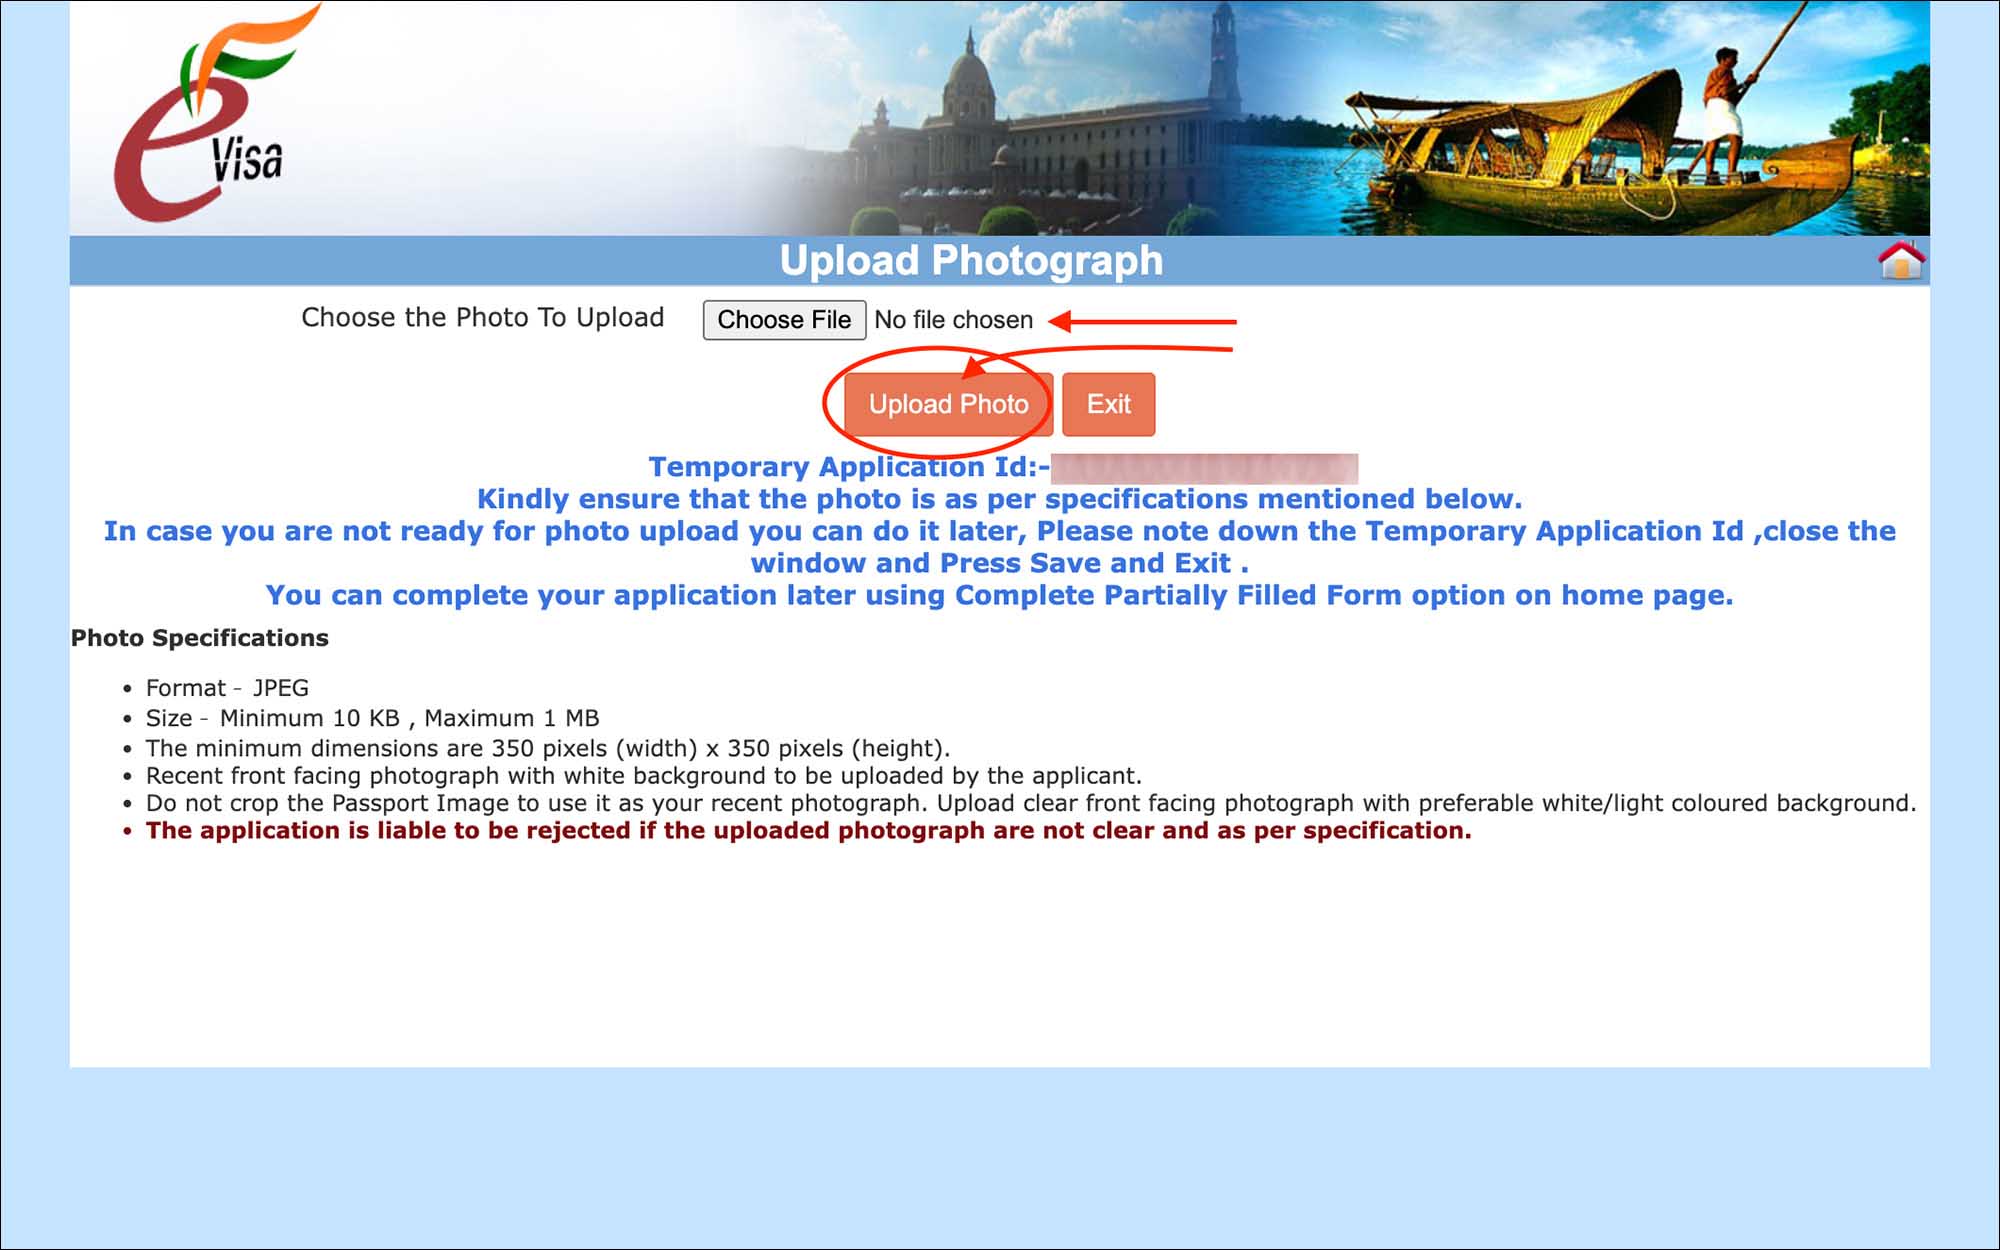
Click on the Choose File button to select the JPG/JPEG file of your photo.
After selecting the file, click on the orange Upload Photo button.
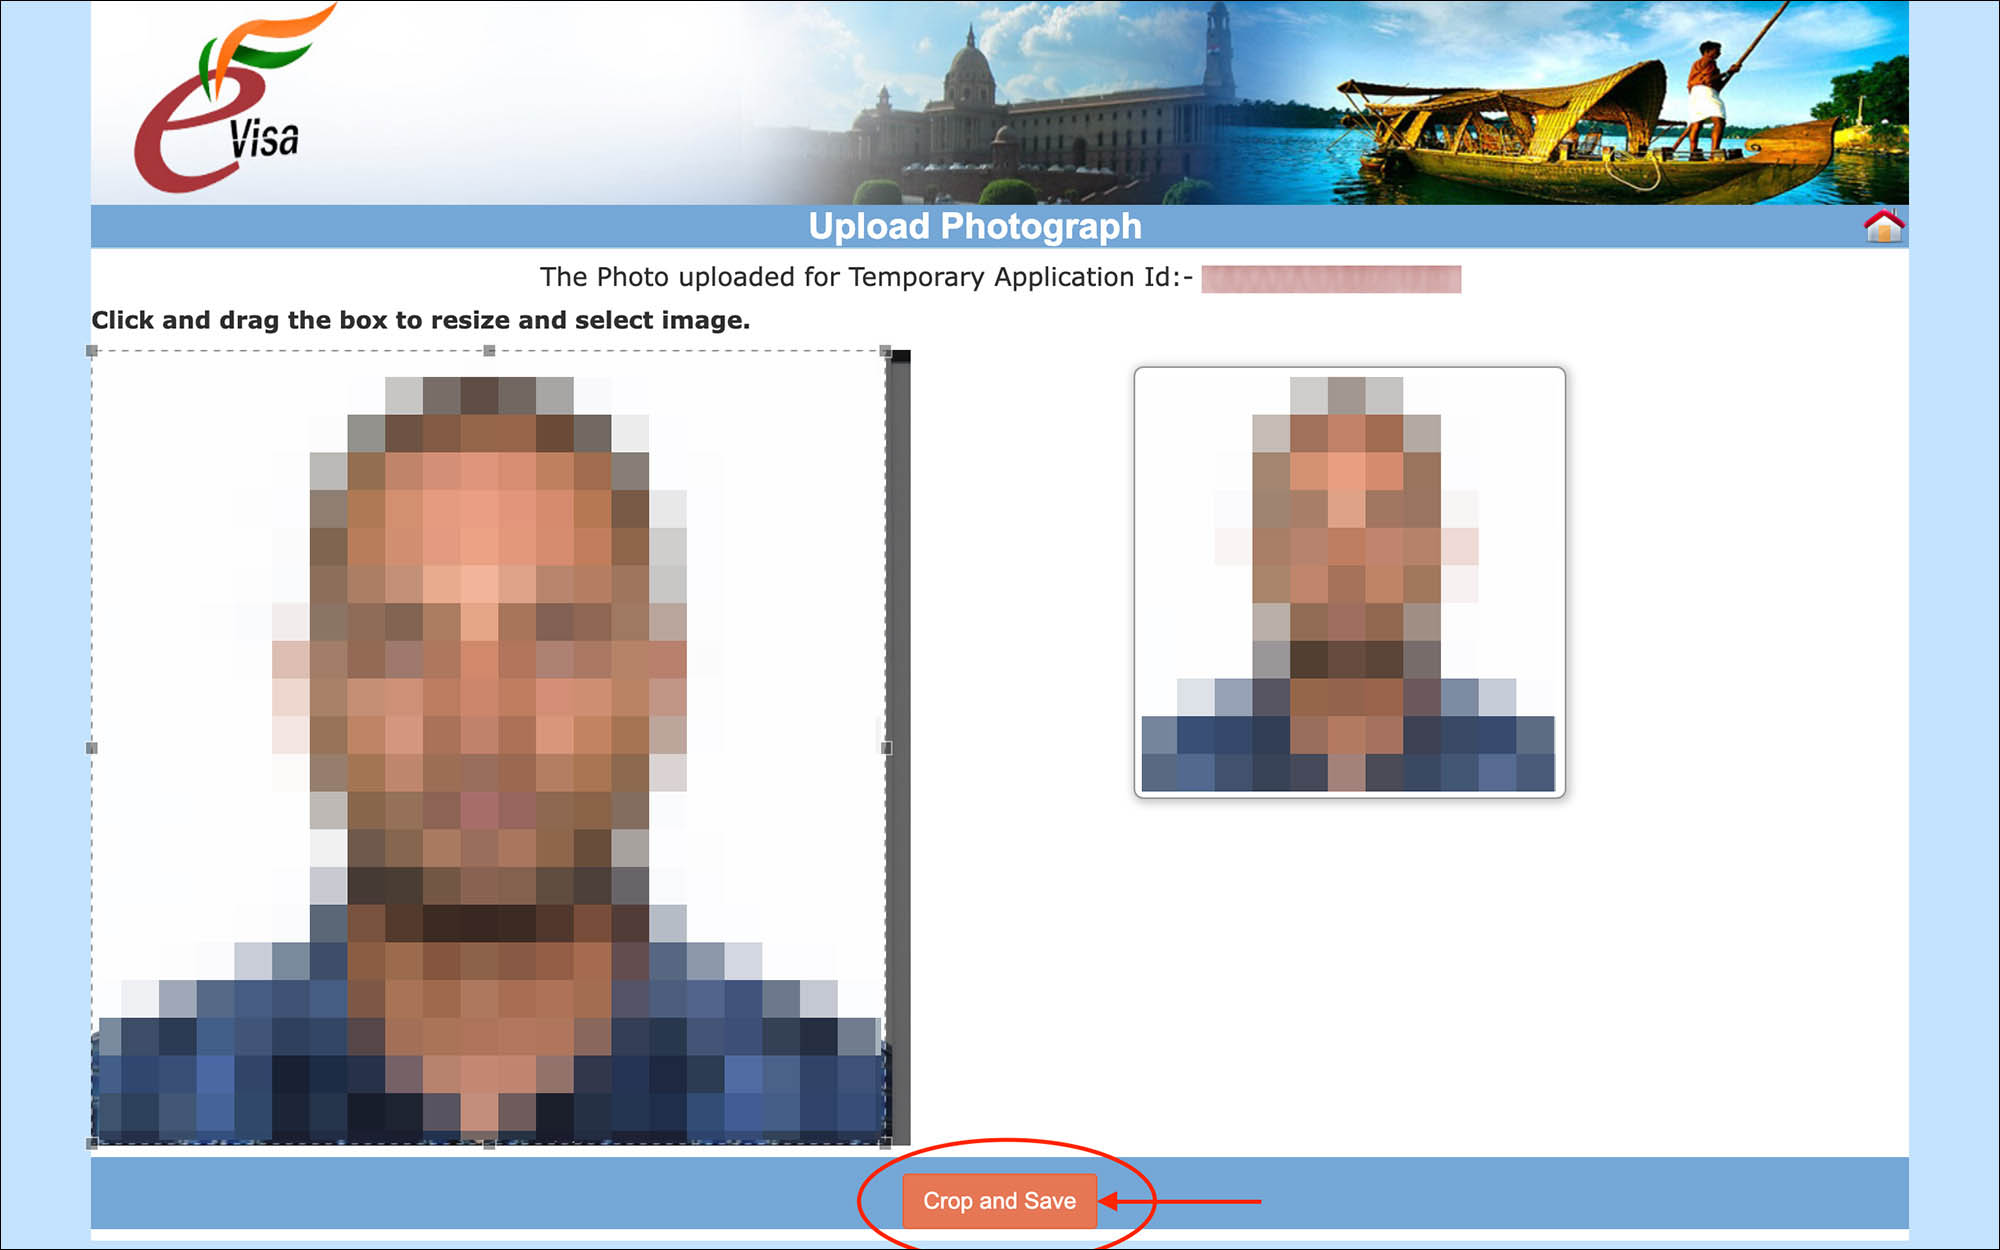
When the photo is uploaded, you will be asked to crop the photo. If necessary, you can crop the photo. If not, simply drag the outer edge of the crop highlight to select the entire photo.
Then, click on the orange Crop and Save button.
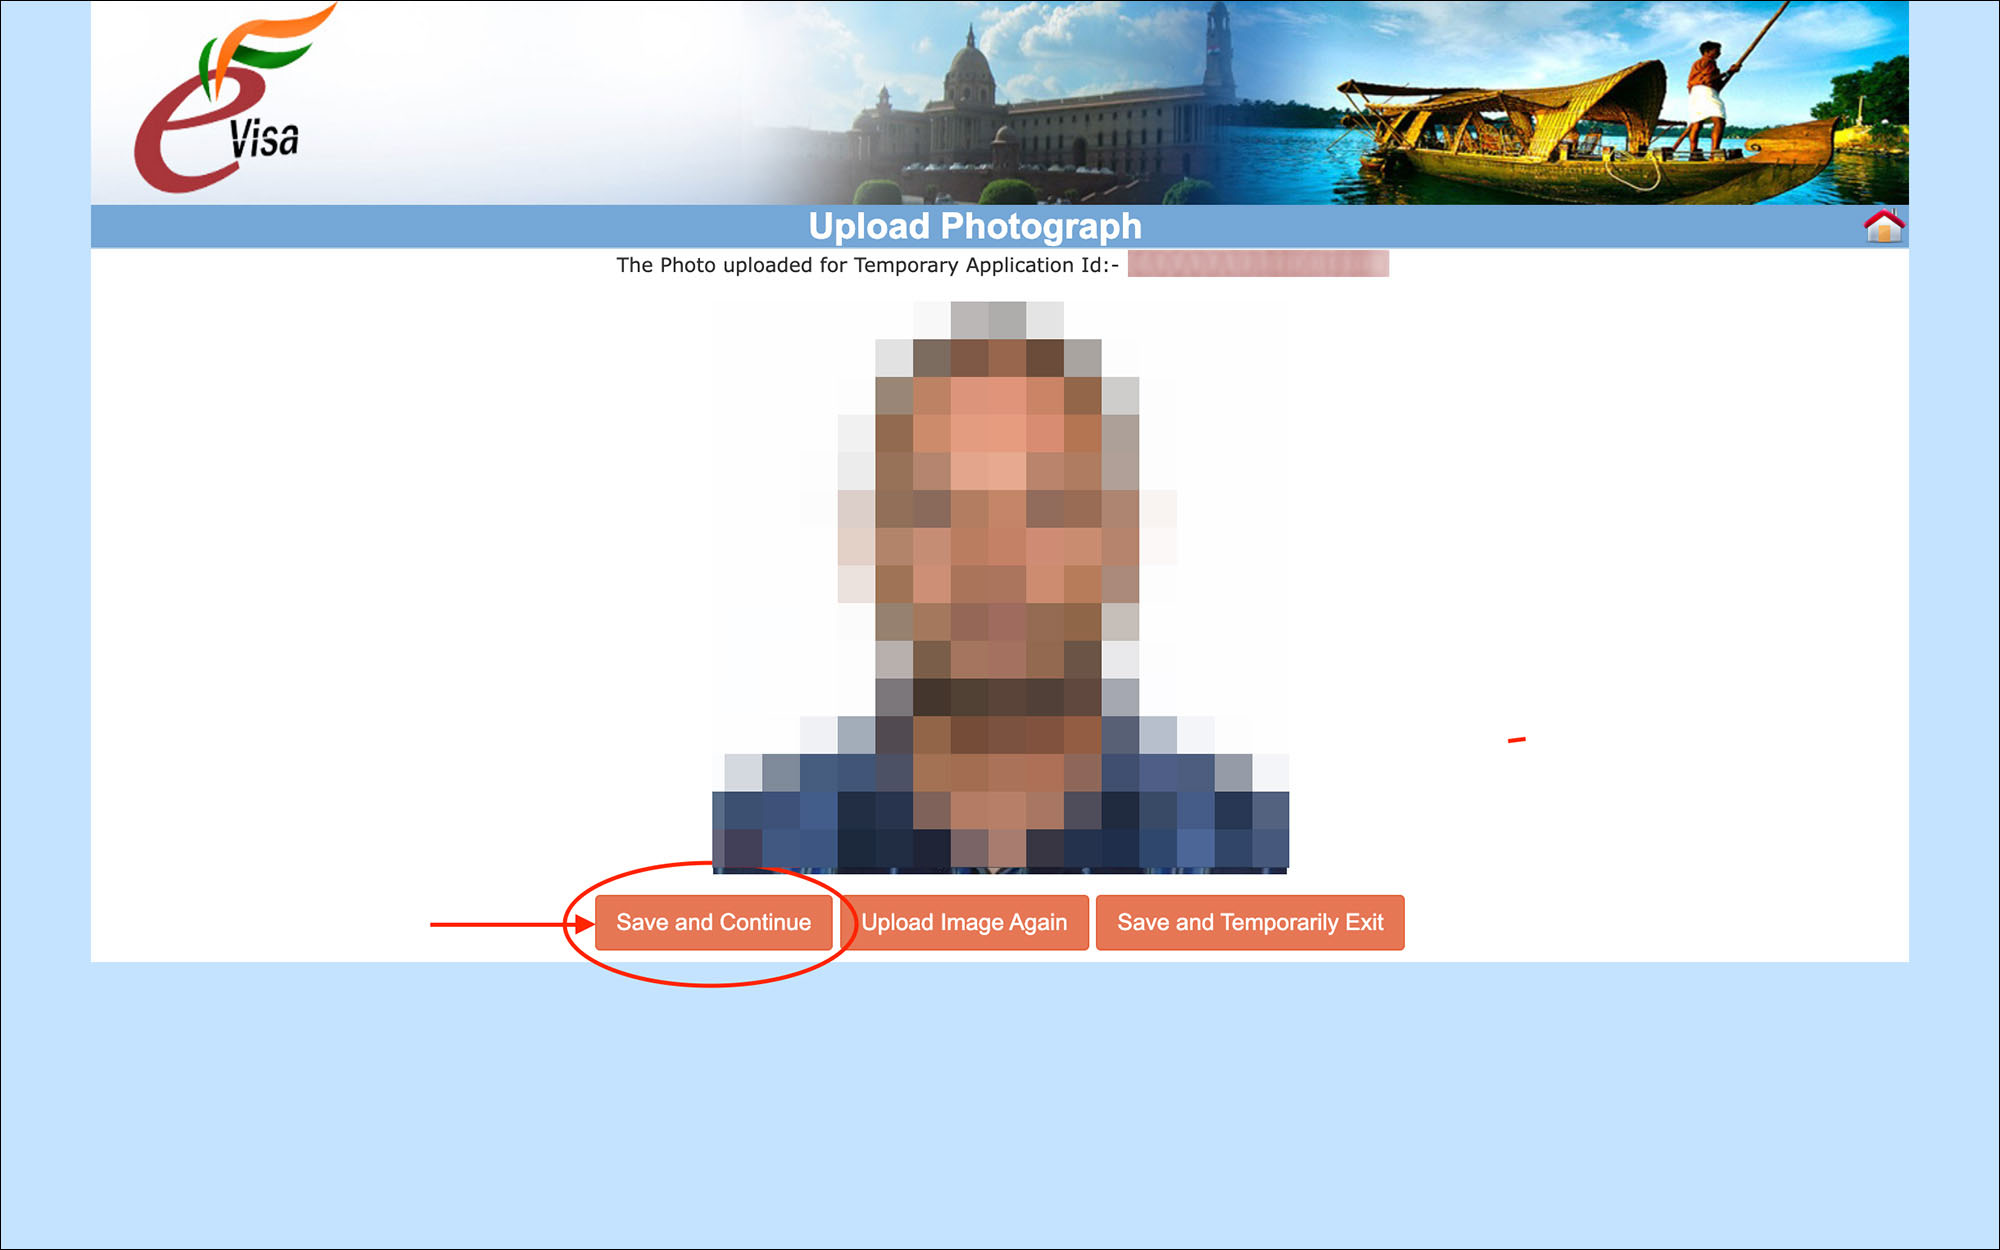
Now, click on the orange Save and Continue button.
You will be taken to the Upload Document page.
—
08. Upload Document
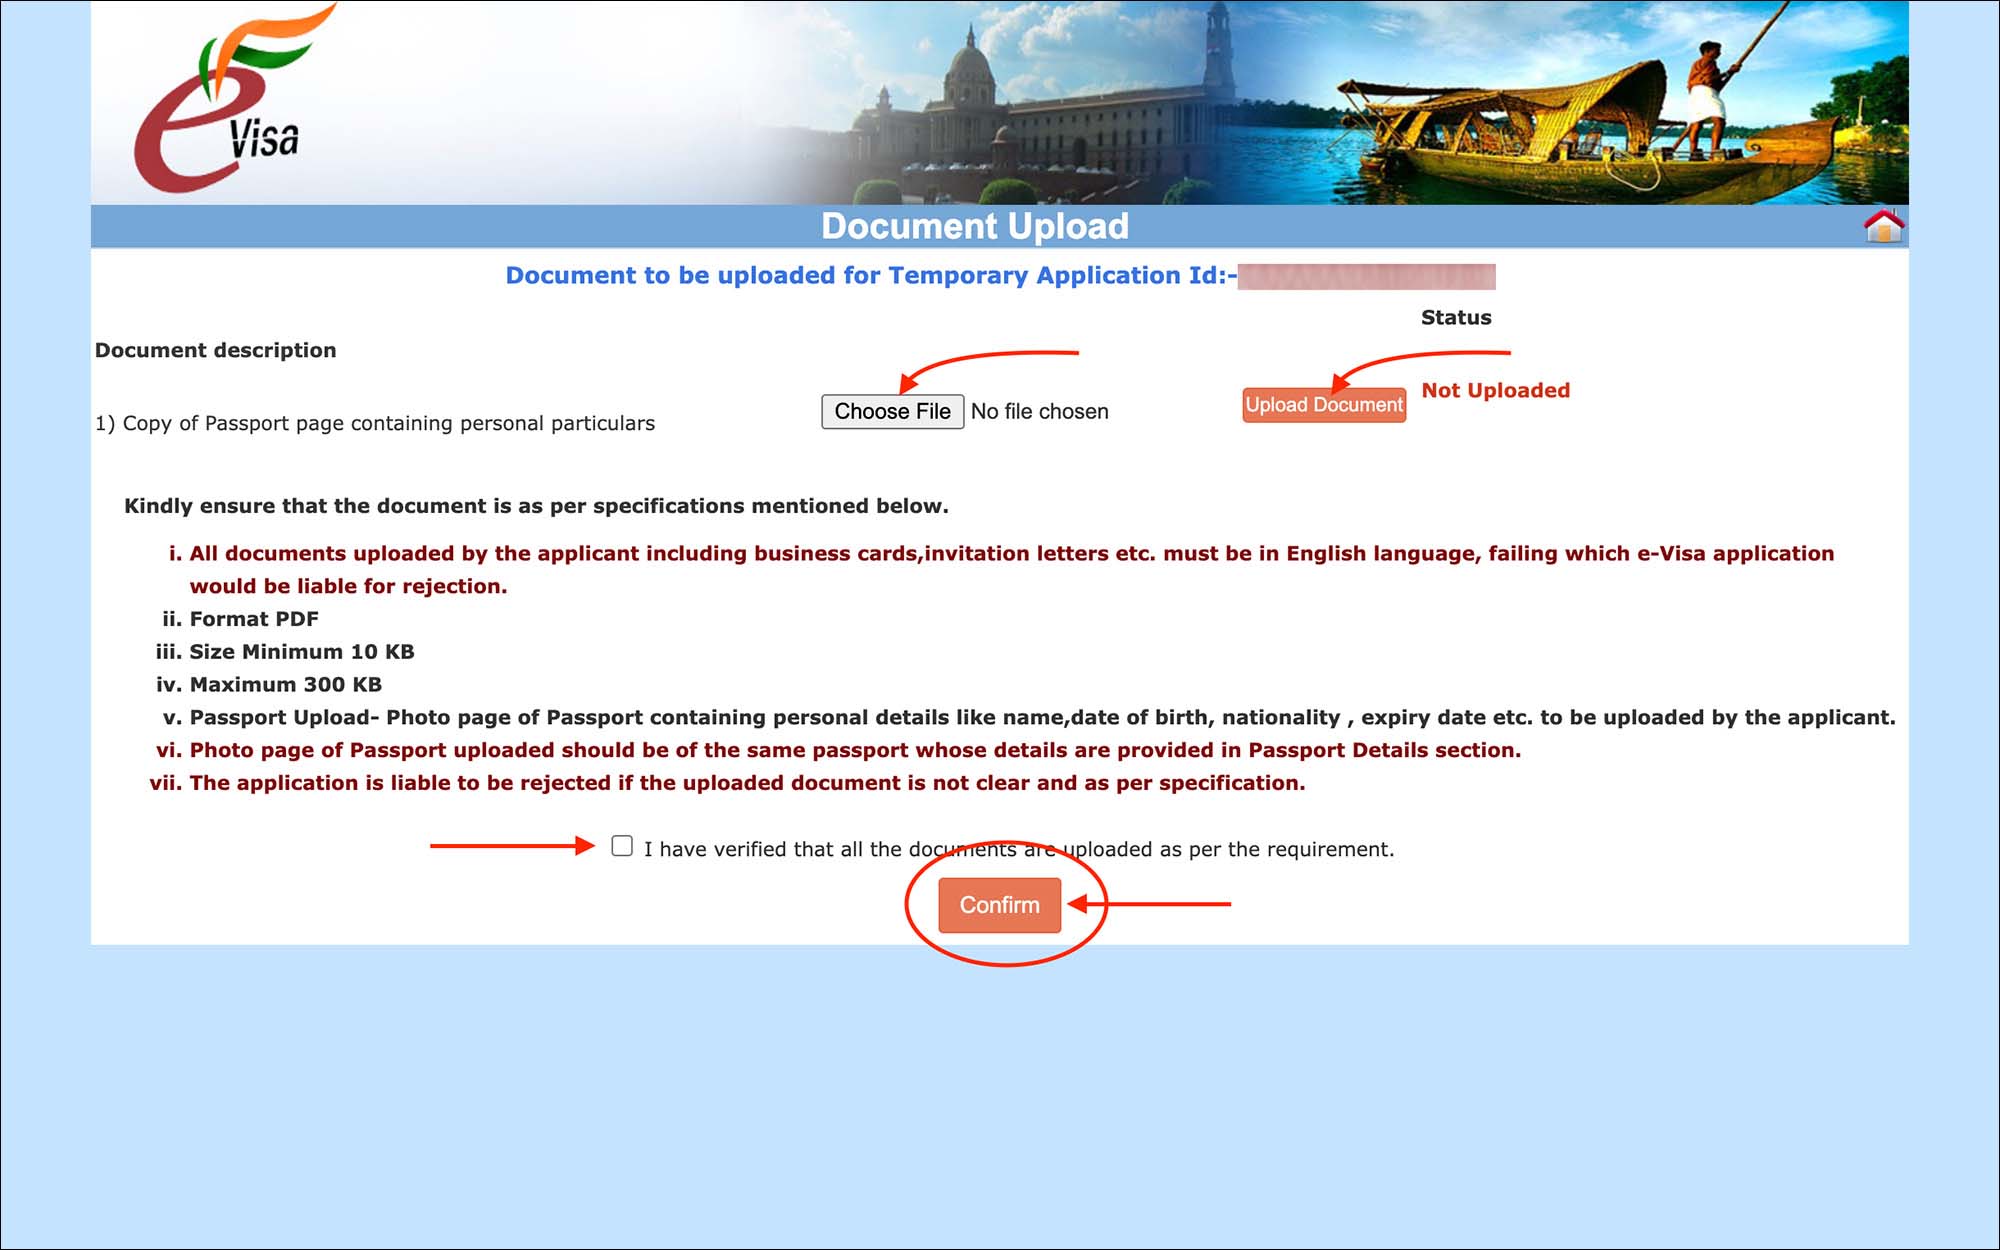
Click on the Choose File button to select the PDF of your scanned passport ID page.
Once you select your PDF file, click on the orange Upload Document button.
Then, check the box for “I have verified that all the documents are uploaded as per the requirement”.
Click on the orange Confirm button.
You will be taken to the Confirm Details page.
—
09. Confirm Details

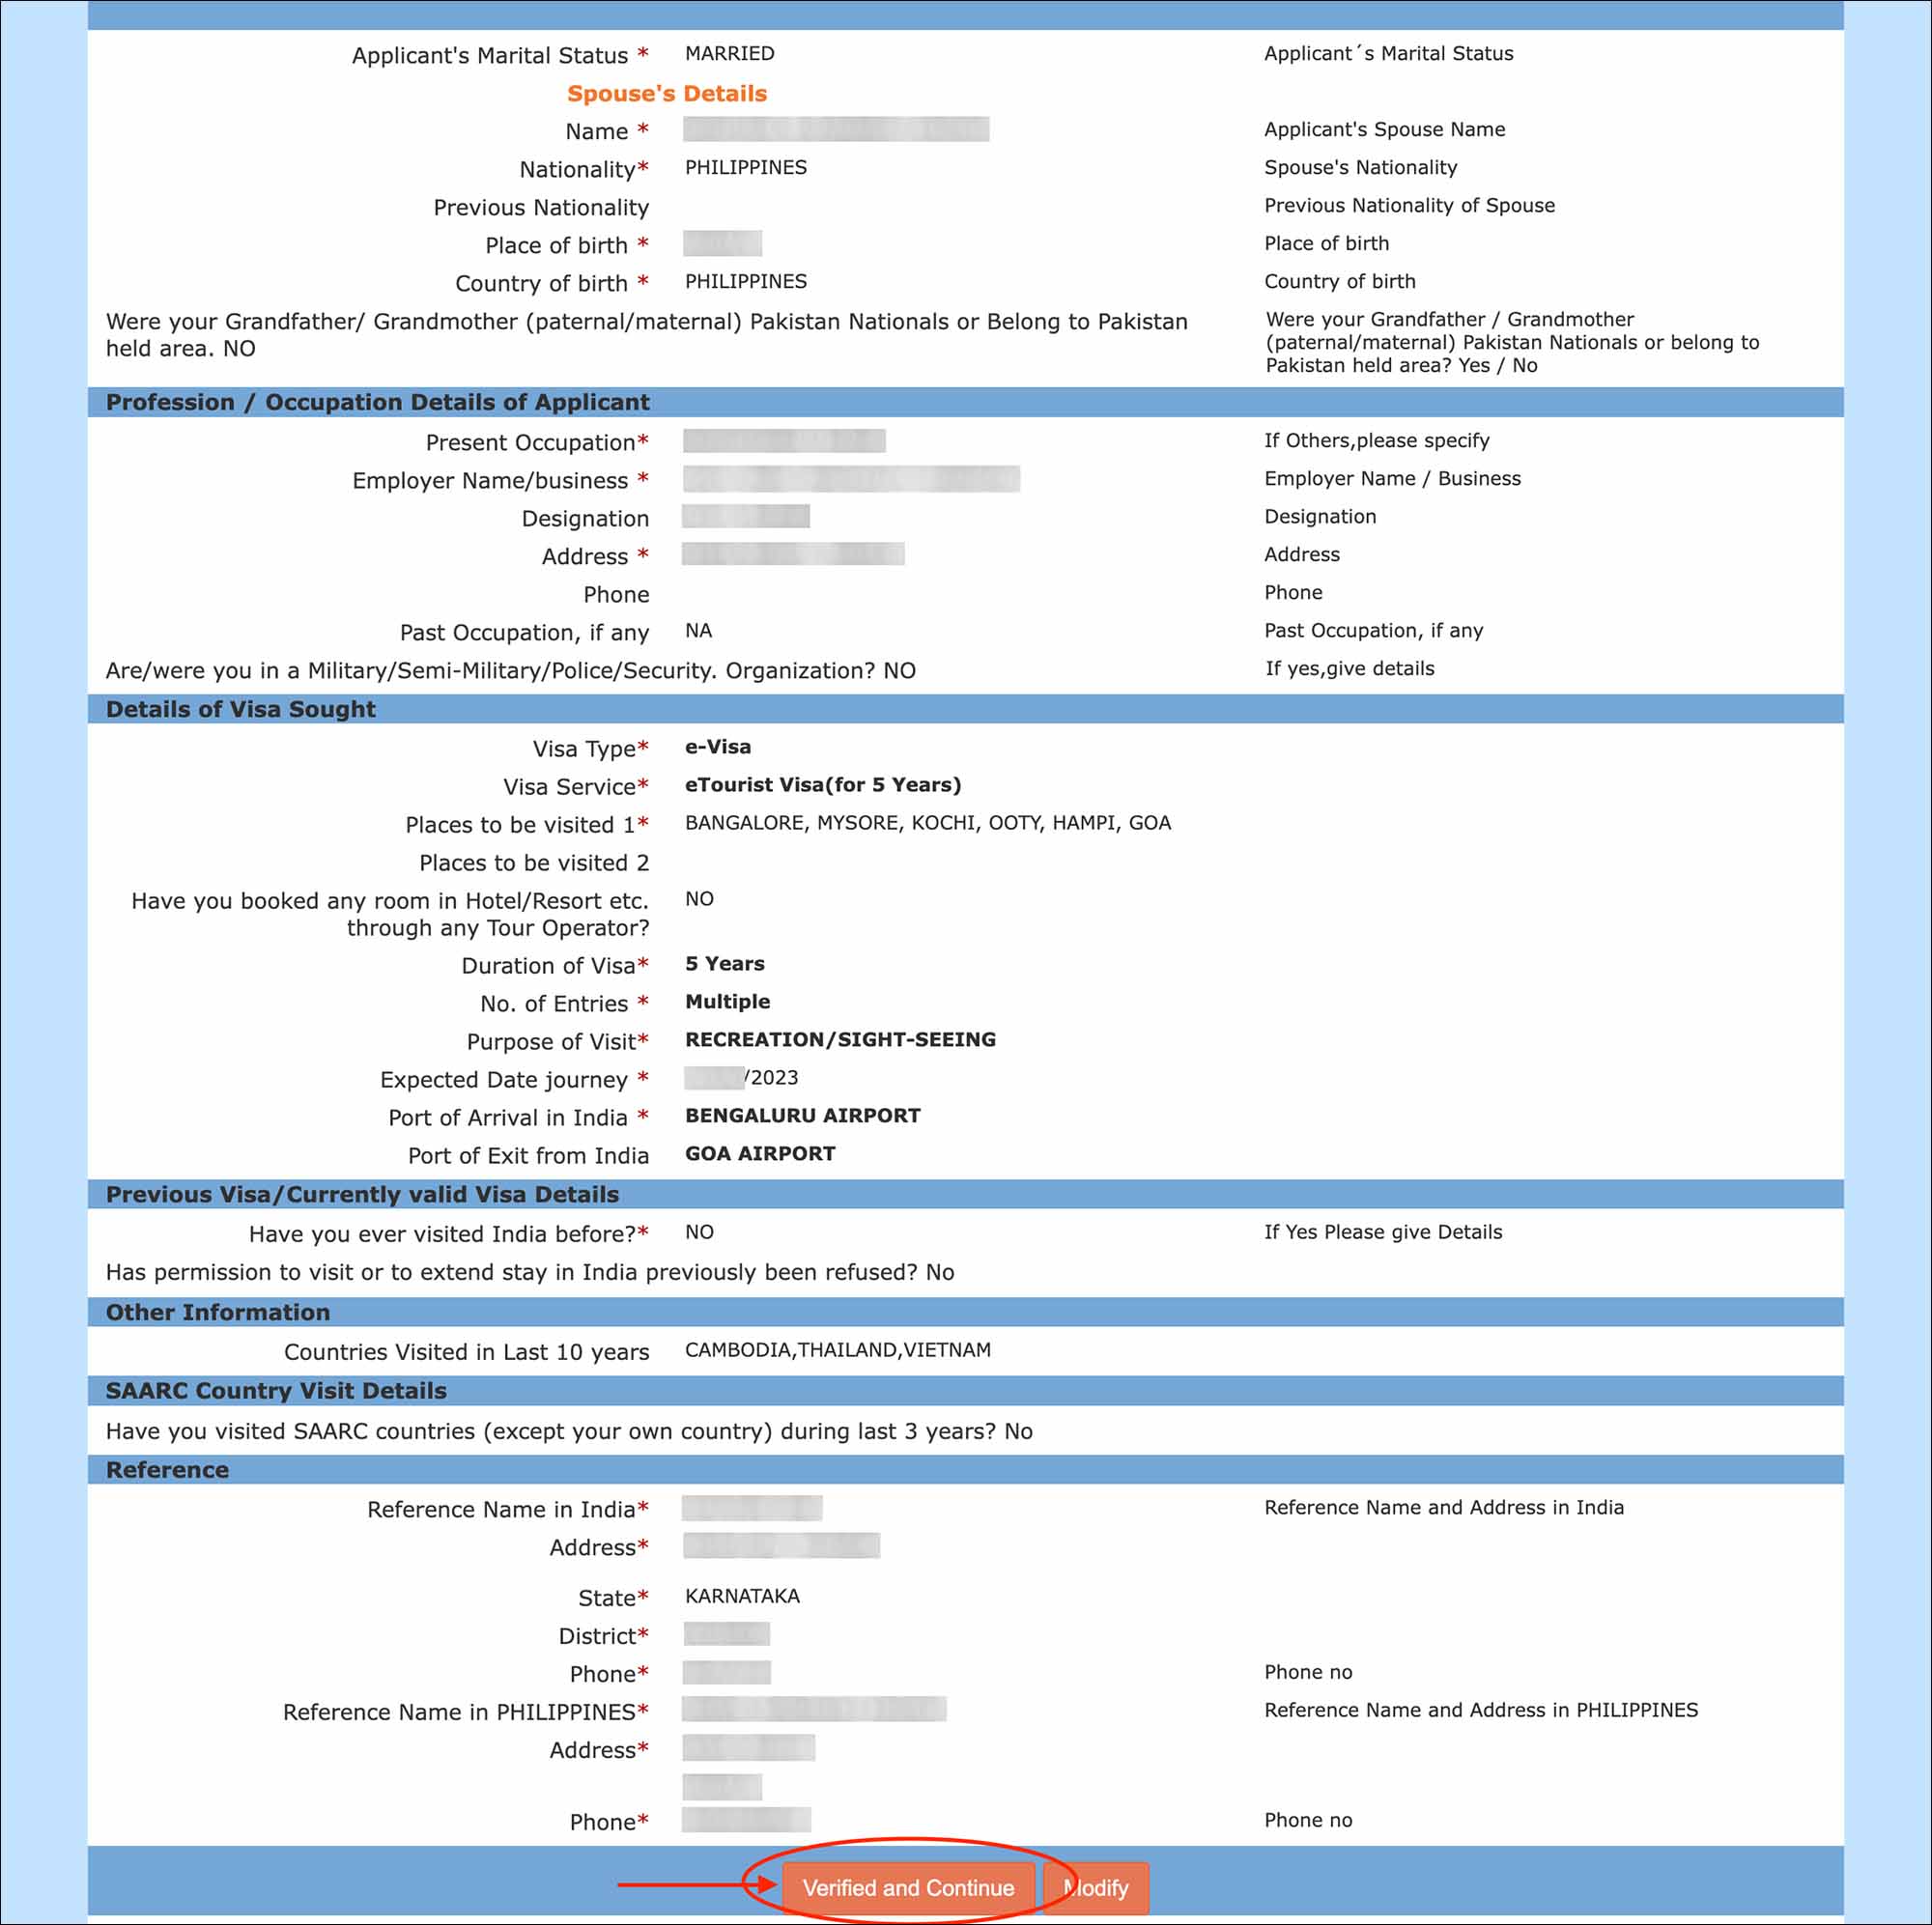
Review all the details you have entered so far. If you need to make any corrections, click on the Modify button.
If everything is looking good, click on the Verified and Continue button.
You will be taken to the Online VISA Fee Payment page.
—
10. Online VISA Fee Payment
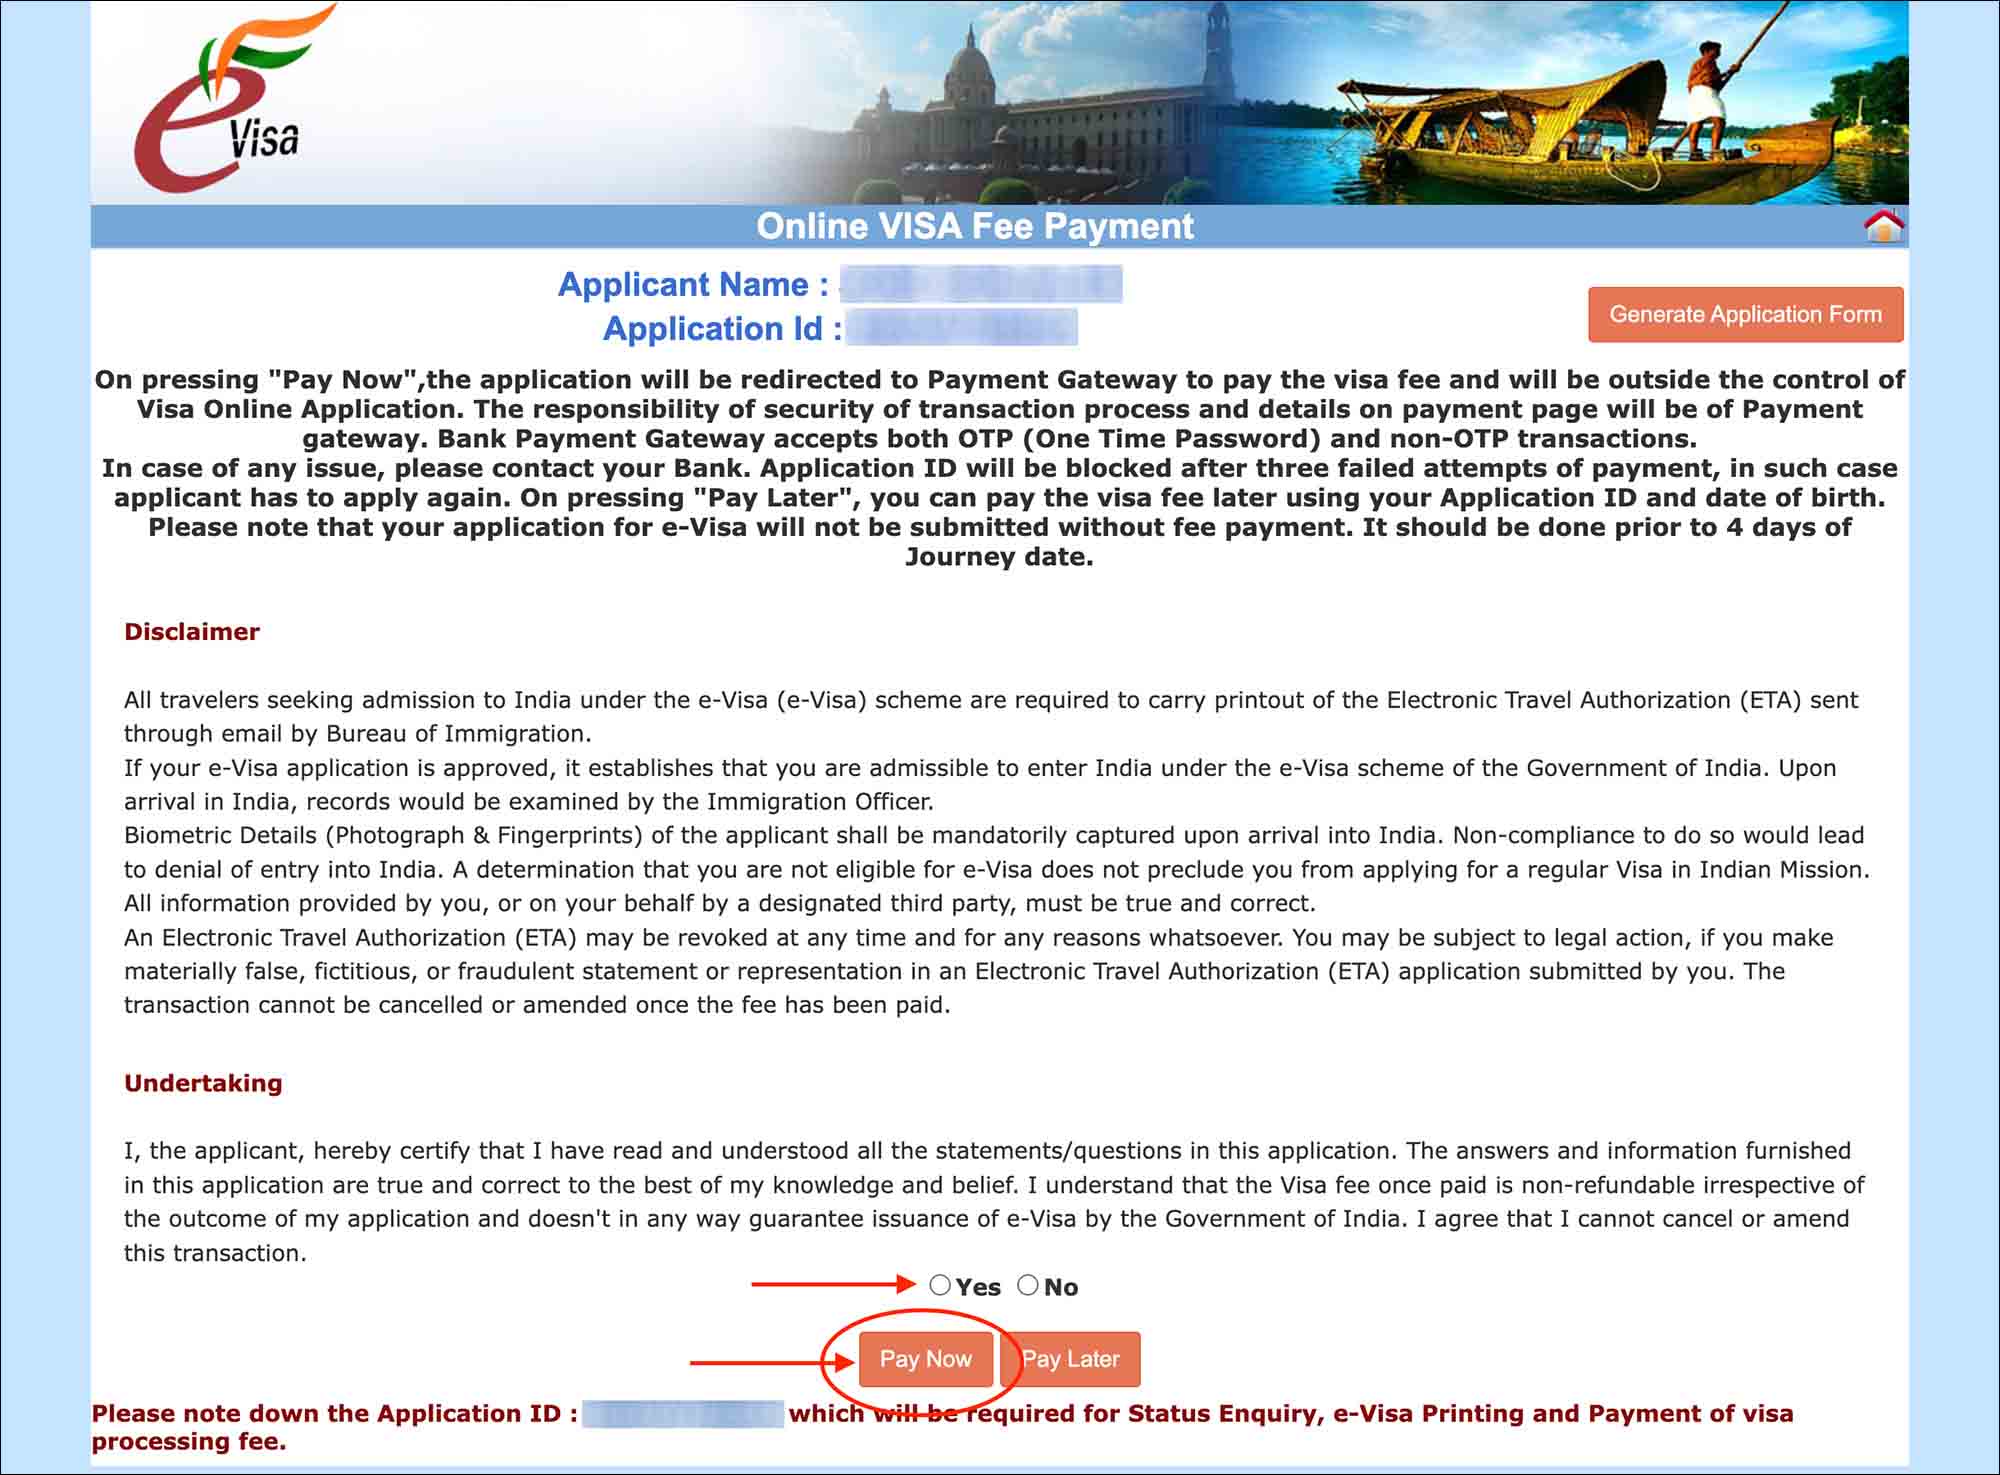
On this page, your name and application ID are displayed along with the disclaimer and undertaking.
Select “Yes” for the undertaking and click on the Pay Now button.
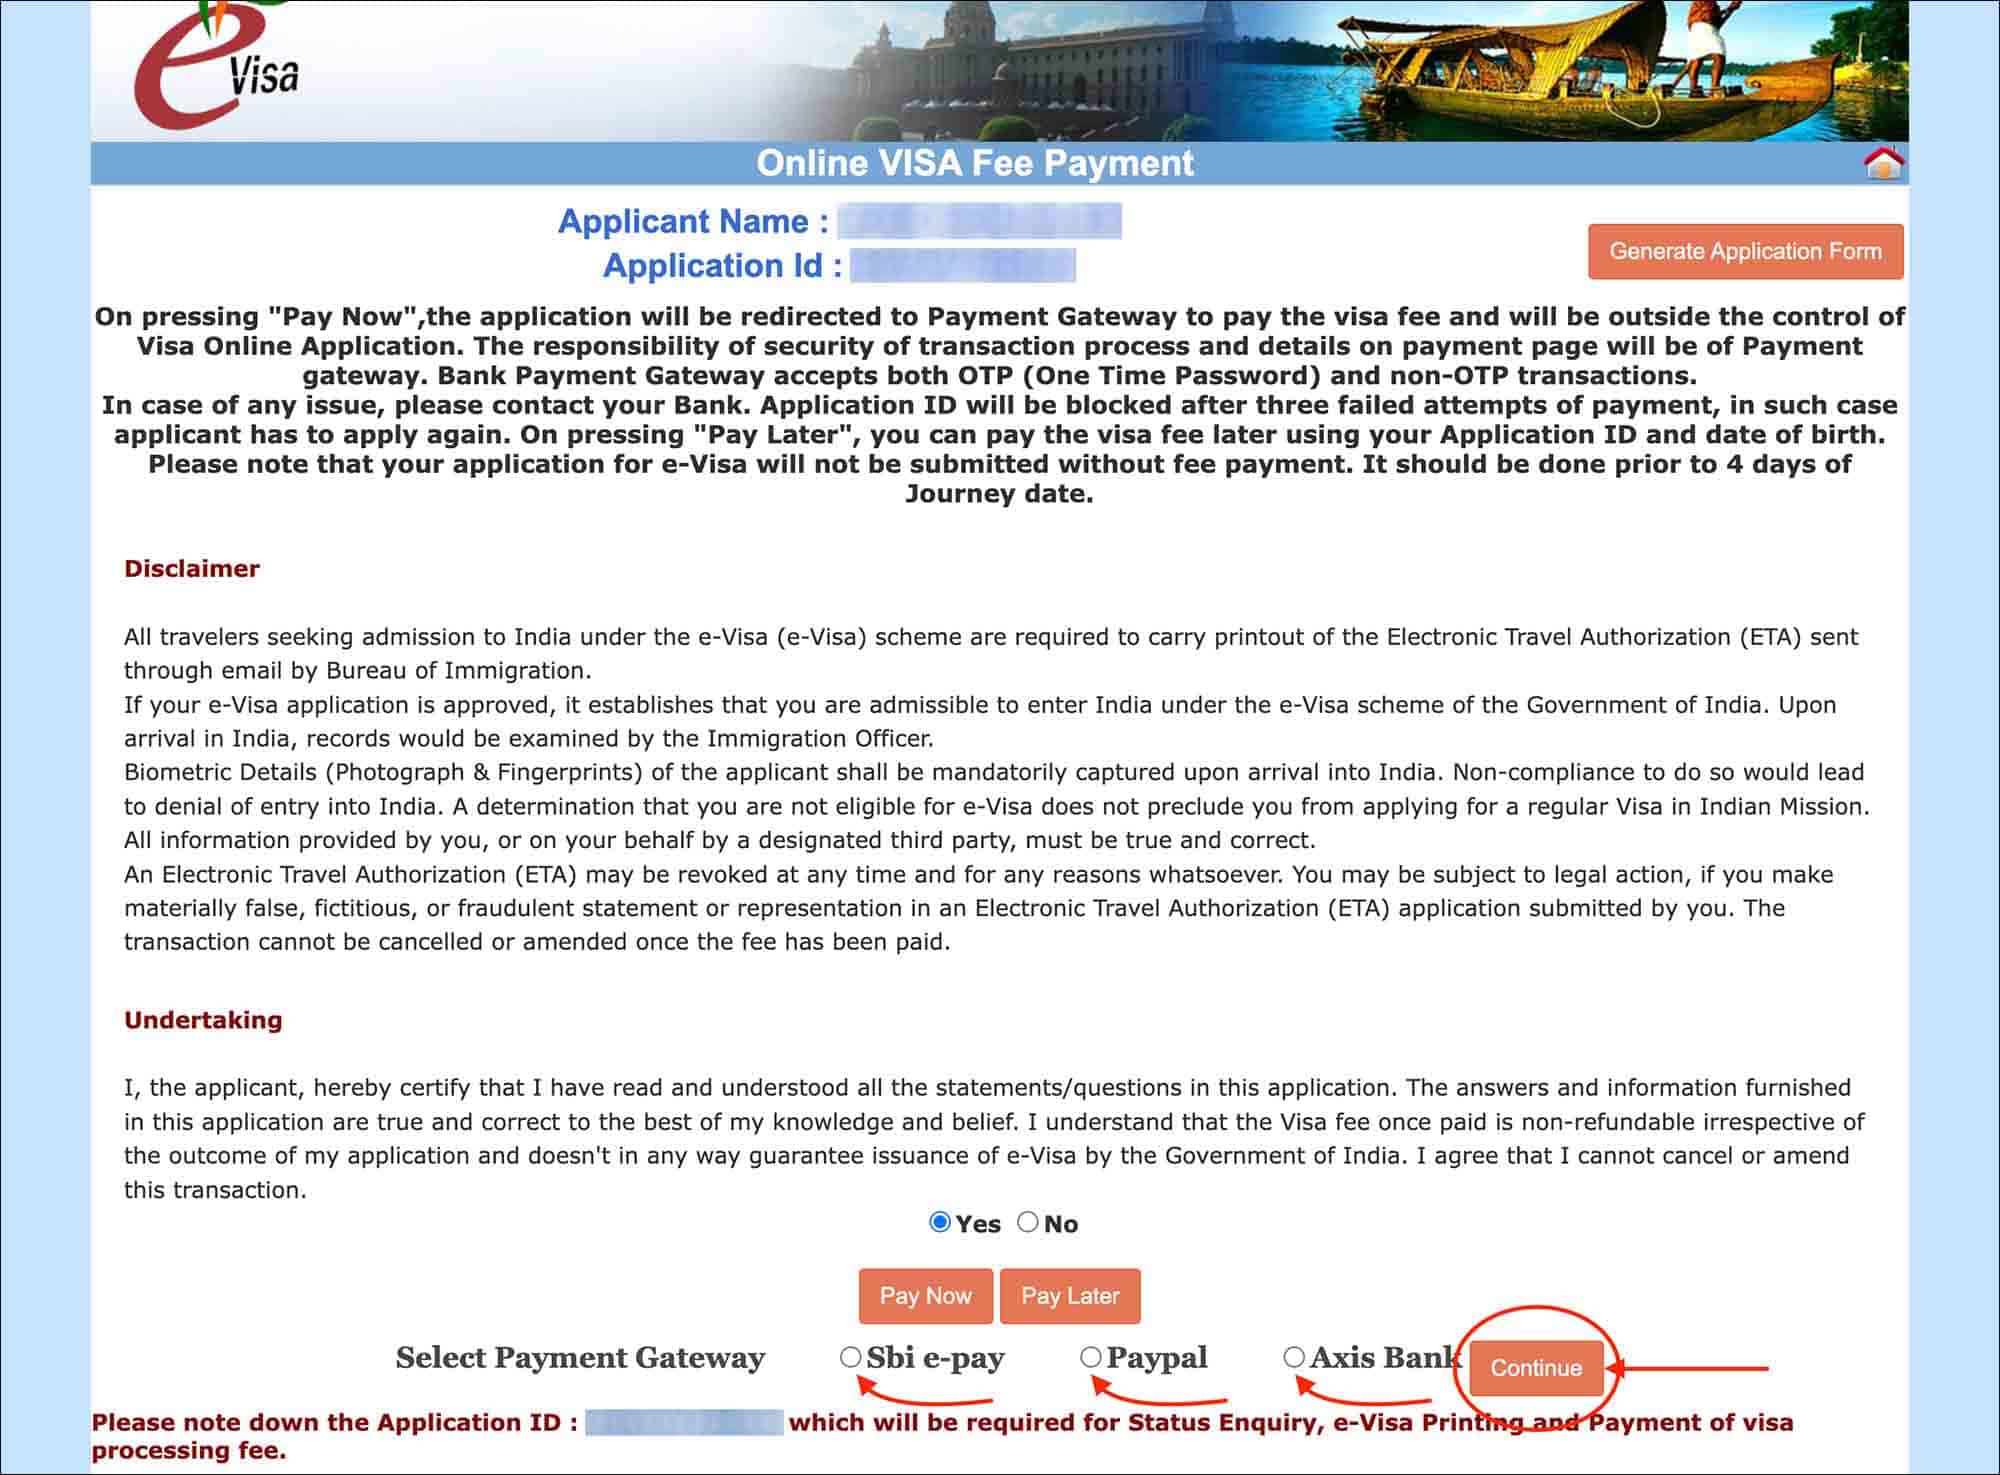
You will then be shown the below three available payment gateway options.
- Sbi e-pay
- Paypal
- Axis bank
Select the payment gateway that you would like to use and click on the Continue button.
NOTE
The Axis bank gateway is not reliable. Use Sbi e-pay when paying with a credit or debit card.
You will be shown a popup notifying you that there may be some payment delays. Click on the Ok button on the popup to continue.
You will be taken to the payment gateway page to enter your credit or debit card details.
Sbi e-pay
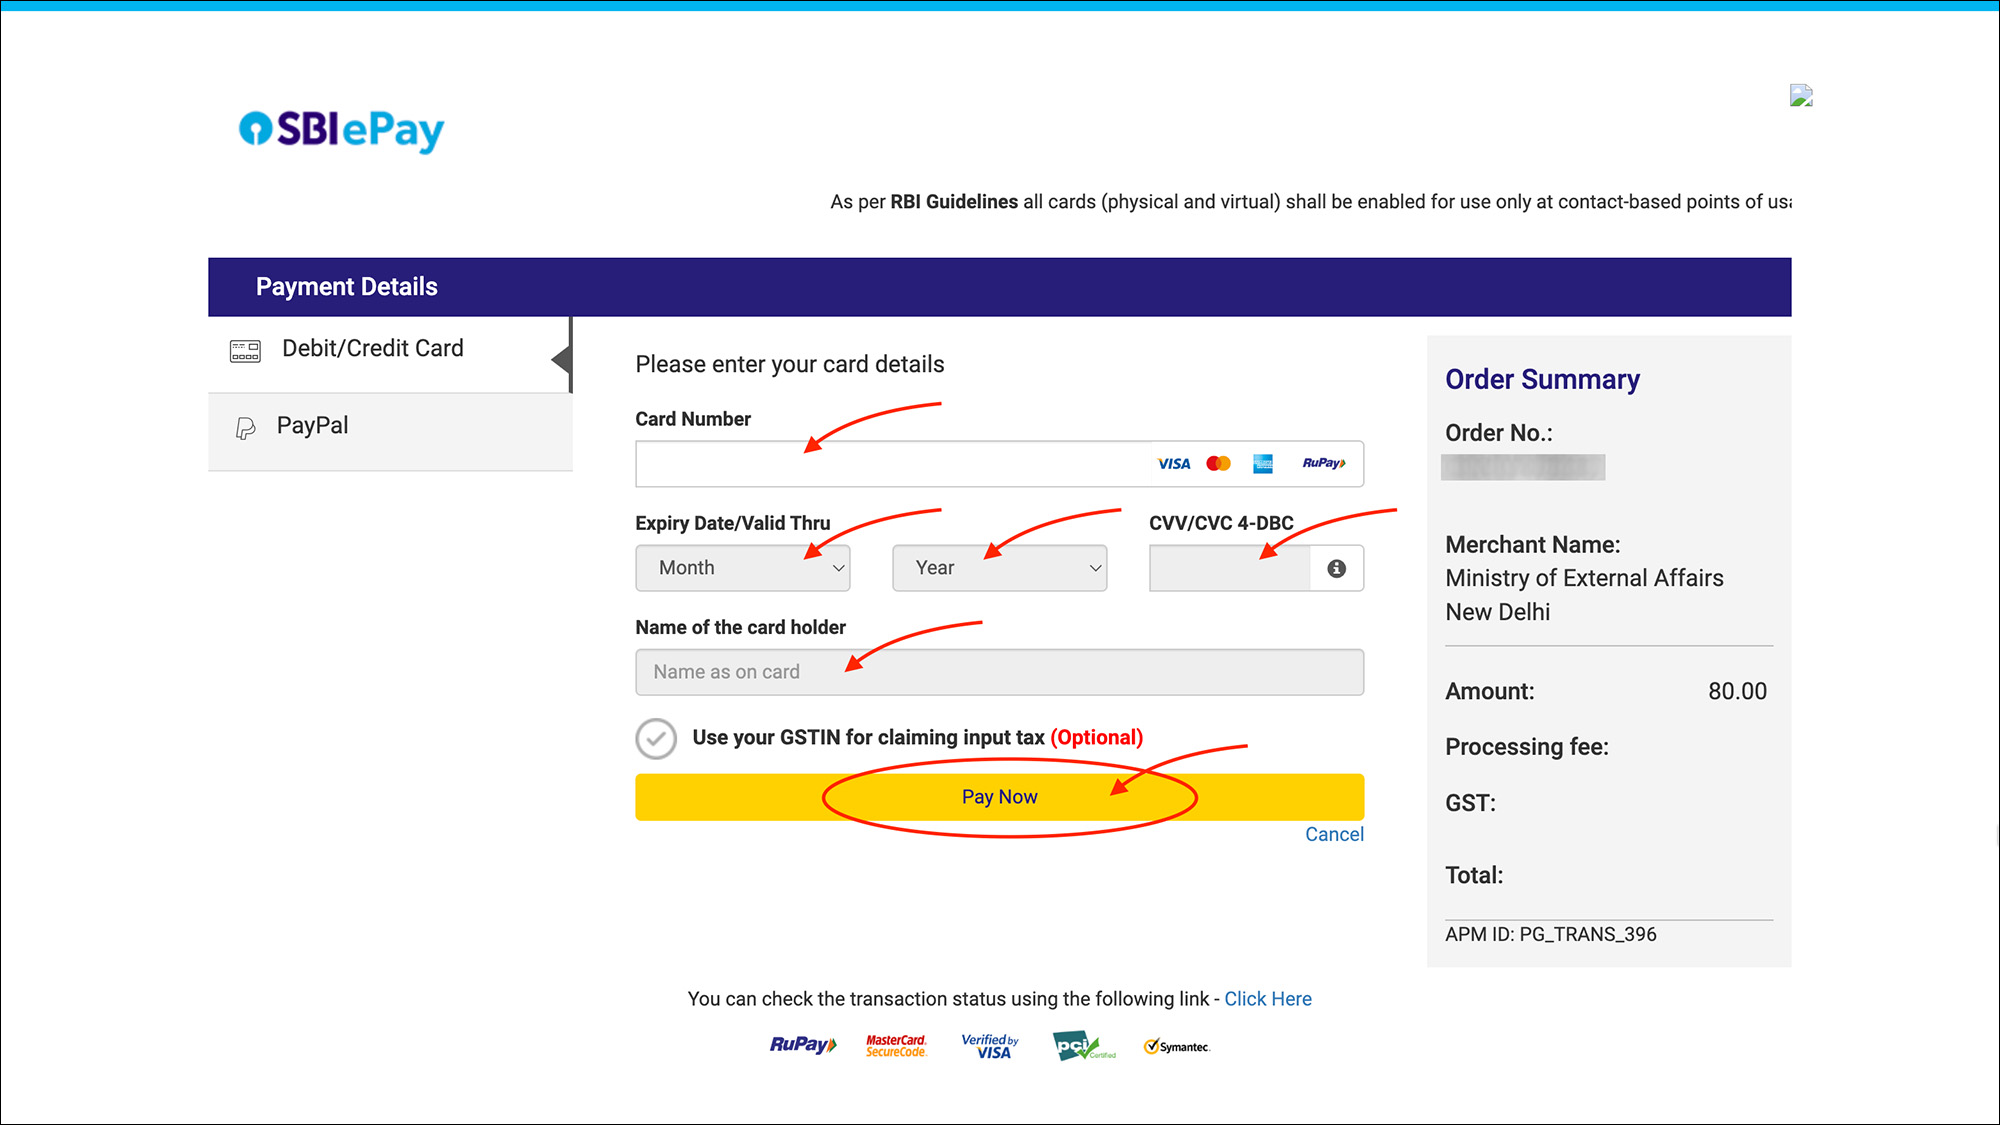
On the Sbi e-pay gateway page, the Debit/Credit Card option will be selected by default.
Enter the following information in the Debit/Credit Card form.
- Card number [Comment: Enter your credit/debit card number]
- Expiry date/valid thru [Comment: Enter your credit/debit card expiry date]
- CVV/CVC [Comment: Enter your credit/debit card CVV number]
- Name of the cardholder [Comment: Enter your name as it appears on your credit/debit card]
- Use your GSTIN for claiming input tax [Comment: Leave this check box as is]
Click on the Pay Now button.
Axis bank
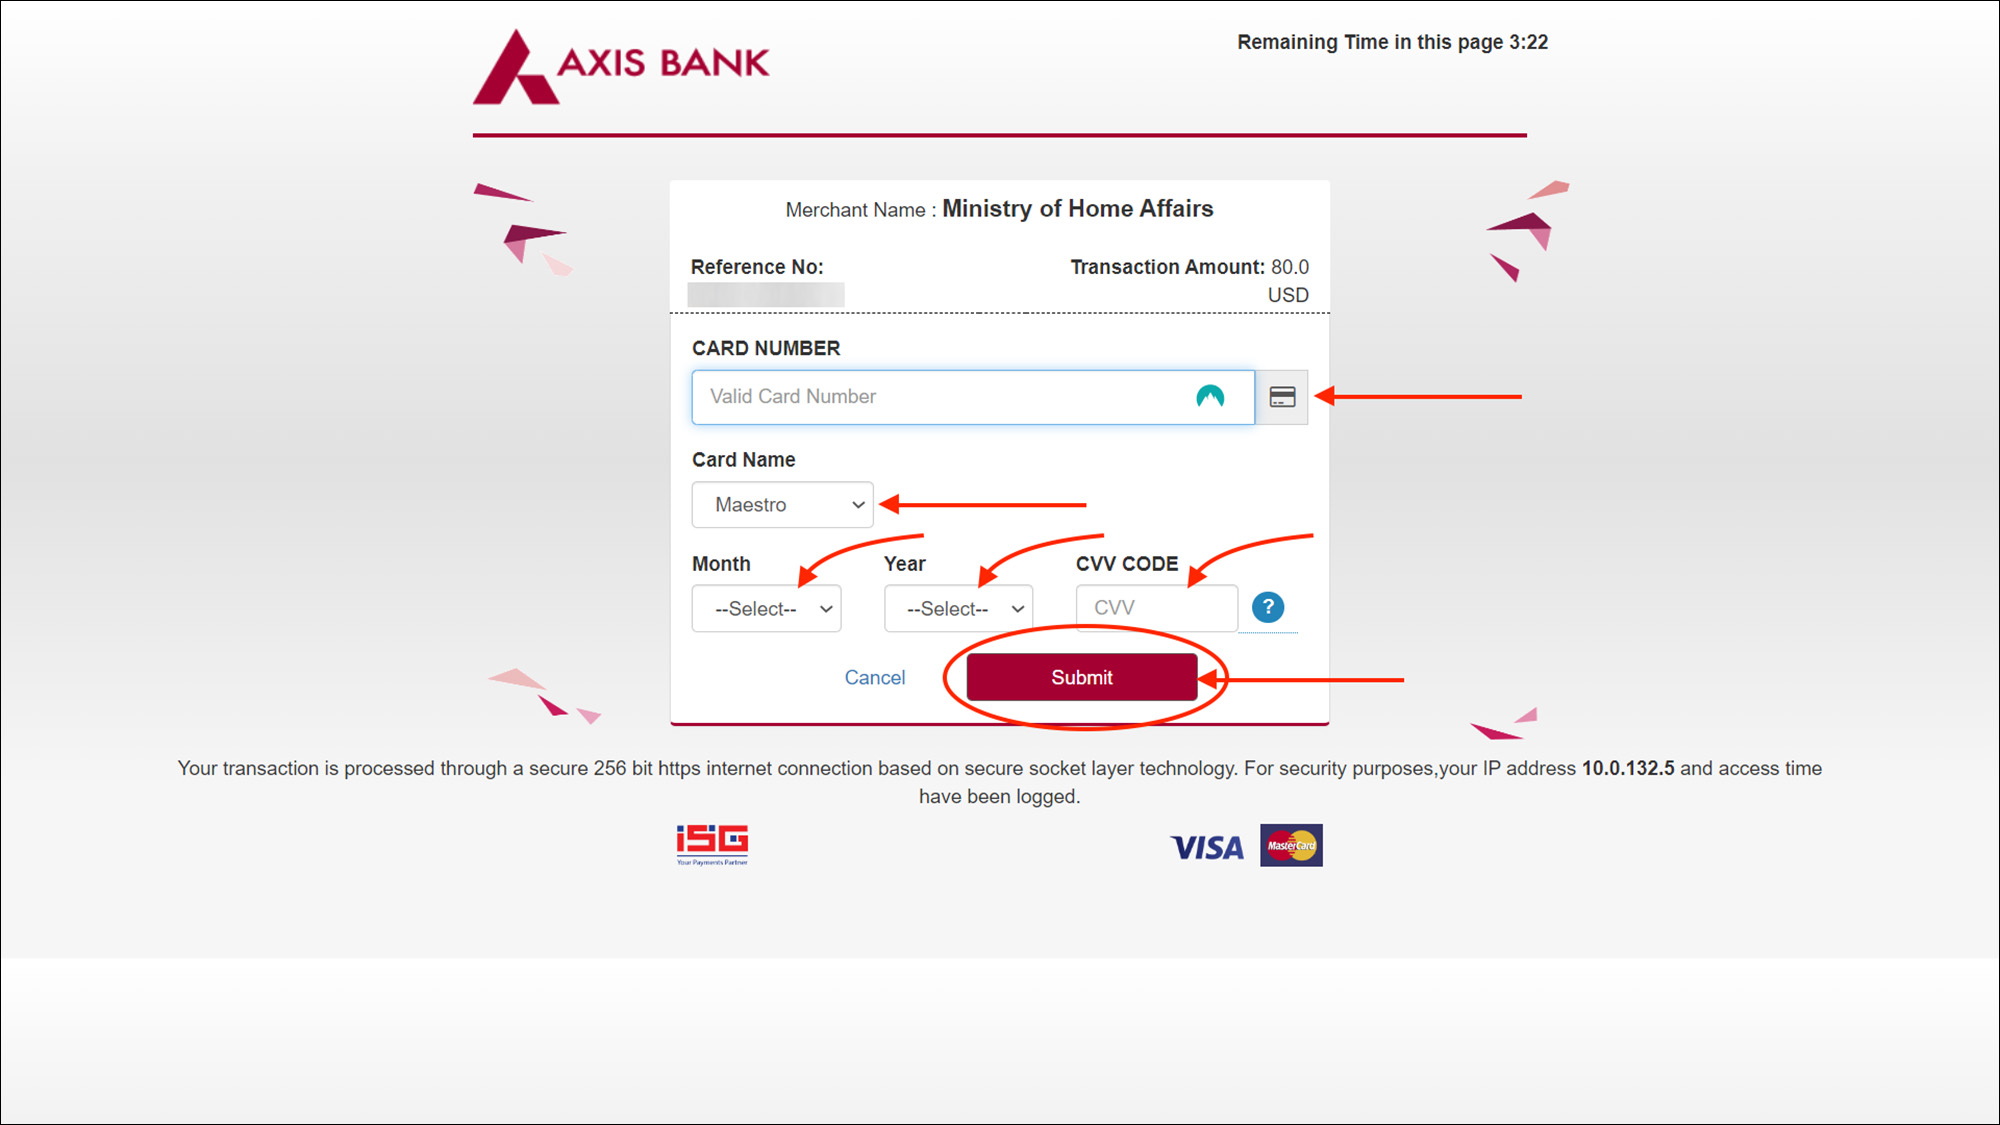
On the Axis bank gateway page, enter the following information.
- CARD NUMBER [Comment: Enter your credit/debit card number]
- CARD NAME [Comment: Enter your card issuer such as Visa, Master, etc.]
- MONTH [Comment: Enter the month of your credit/debit card expiry]
- YEAR [Comment: Enter the year of your credit/debit card expiry]
- CVV CODE [Comment: Enter your credit/debit card CVV number]
Click on the Submit button.
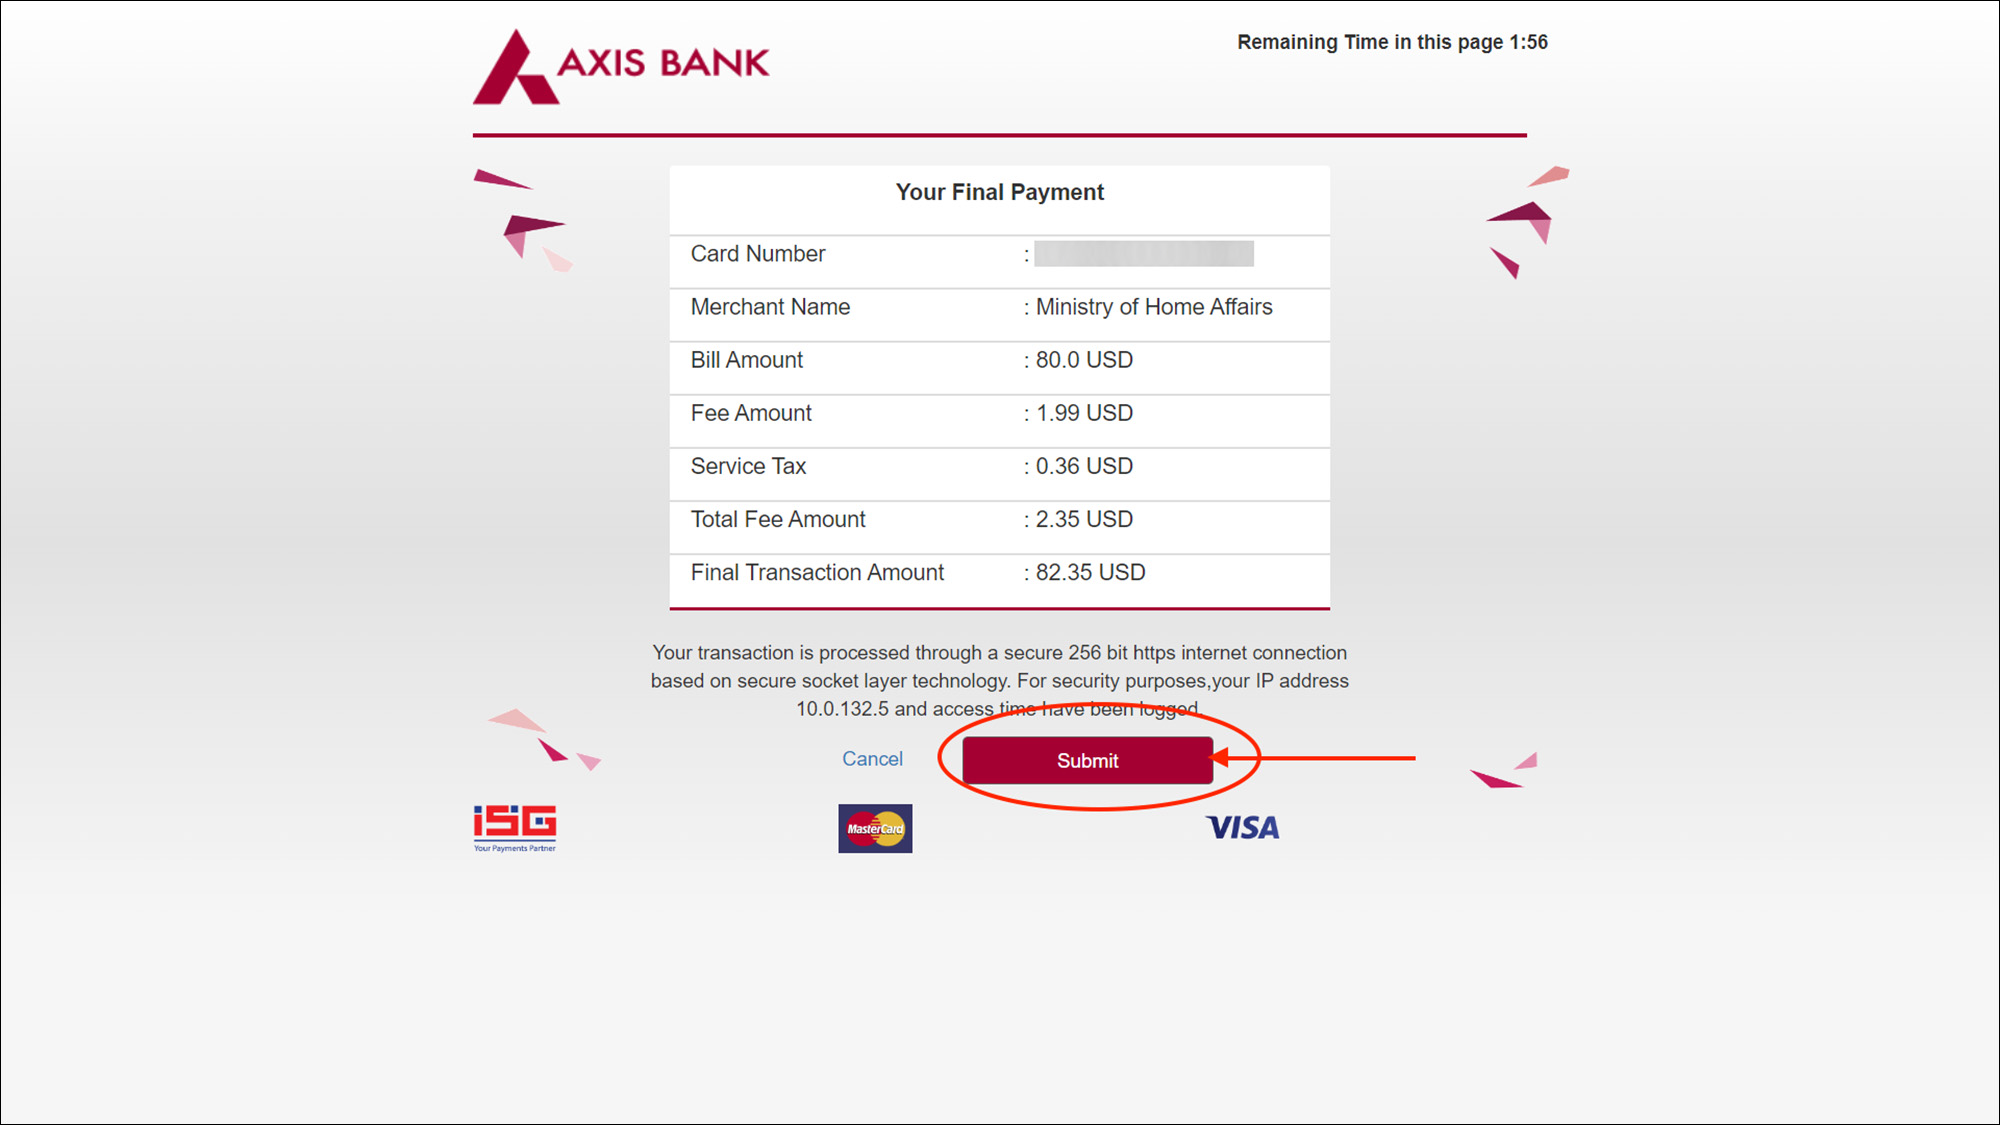
You will be taken to the Your Final Payment page of Axis bank.
Click on the Submit button.
India e-Visa payment success
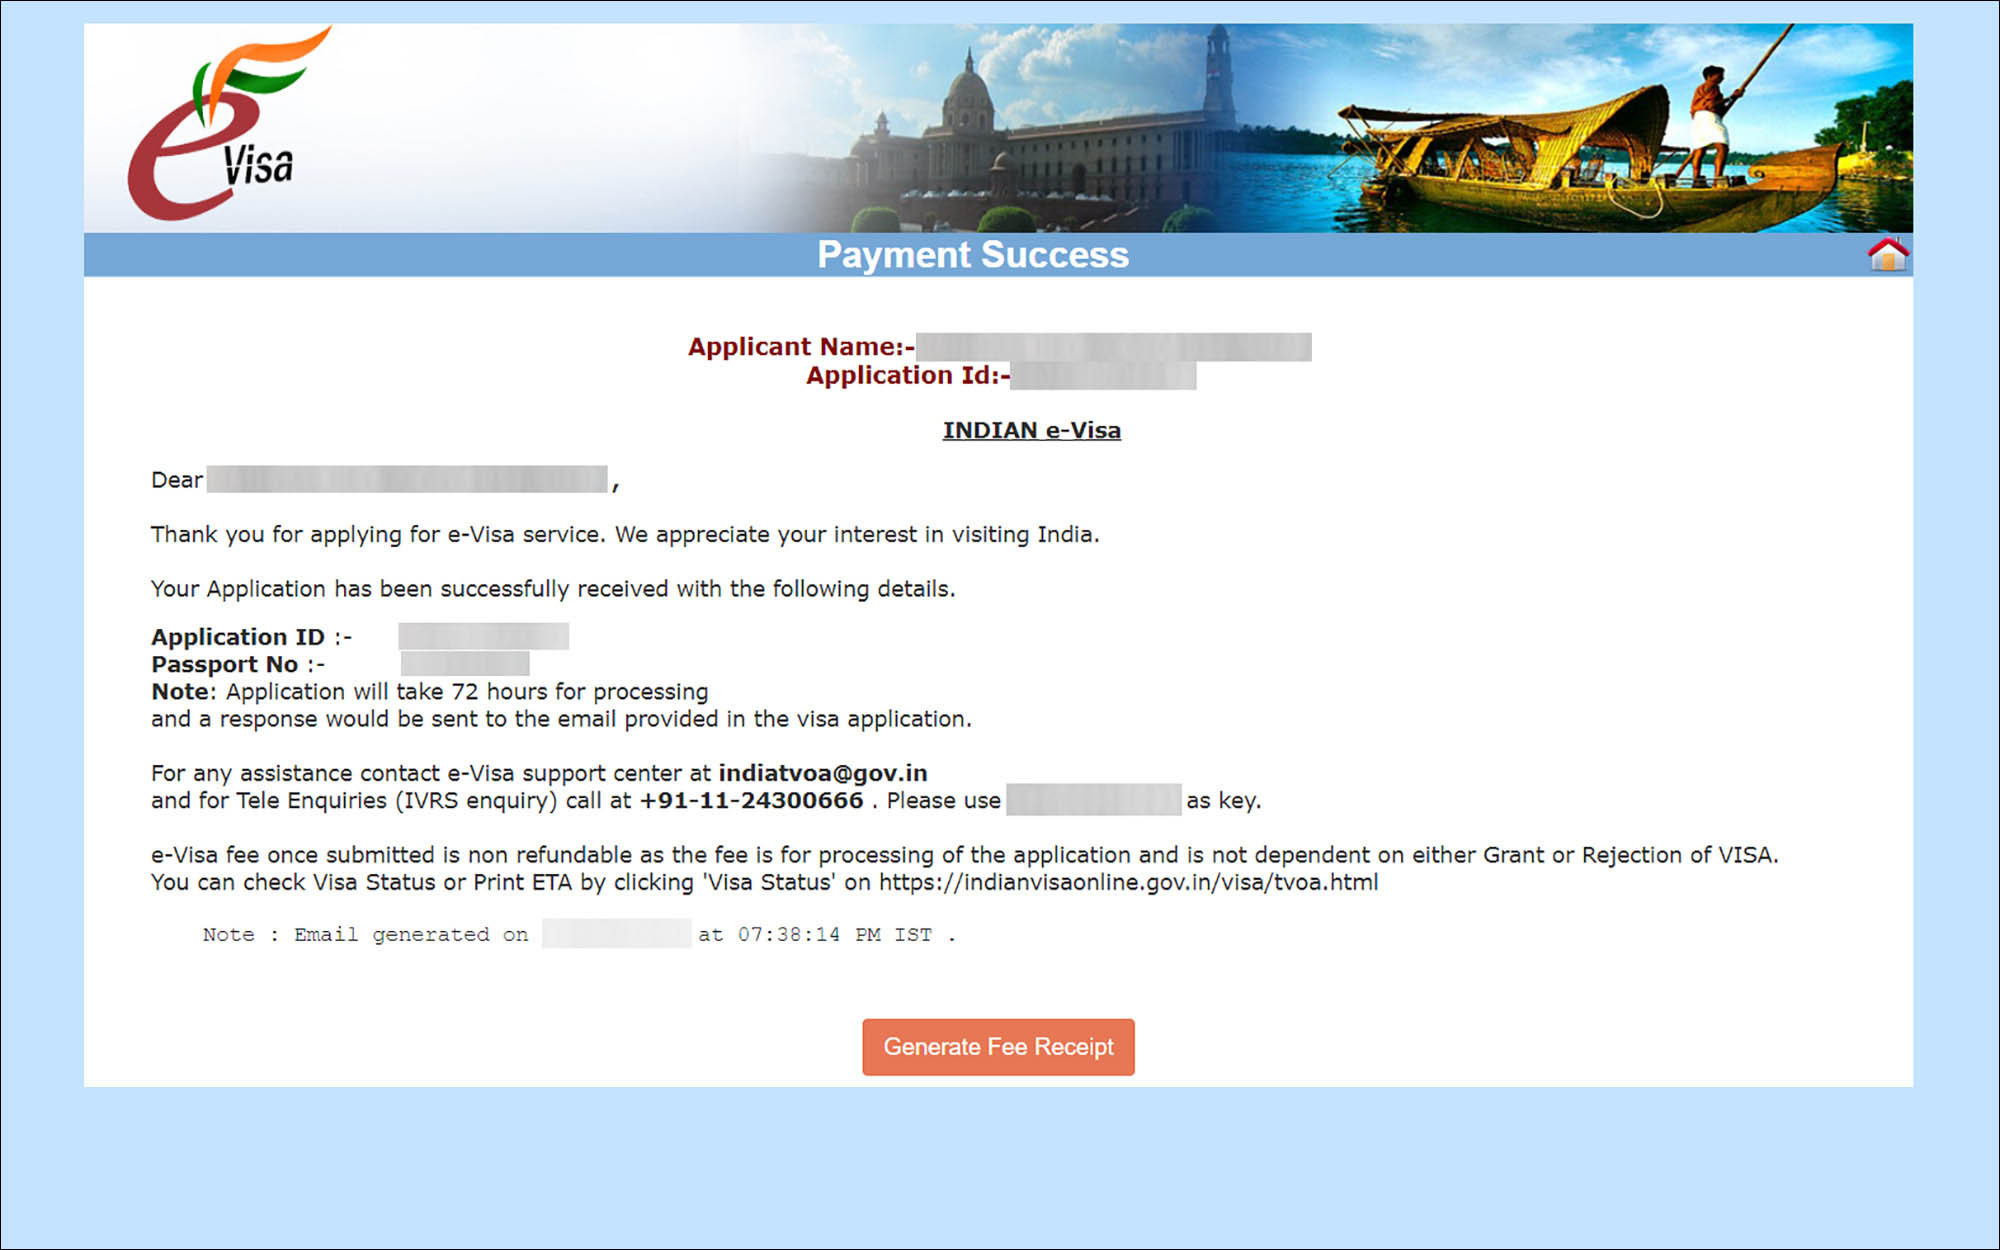
If the payment is successful, you will be taken to the Payment Success page.
On this page, your name, application ID and passport number are deployed along with contacts of the e-Visa department for any assistance.
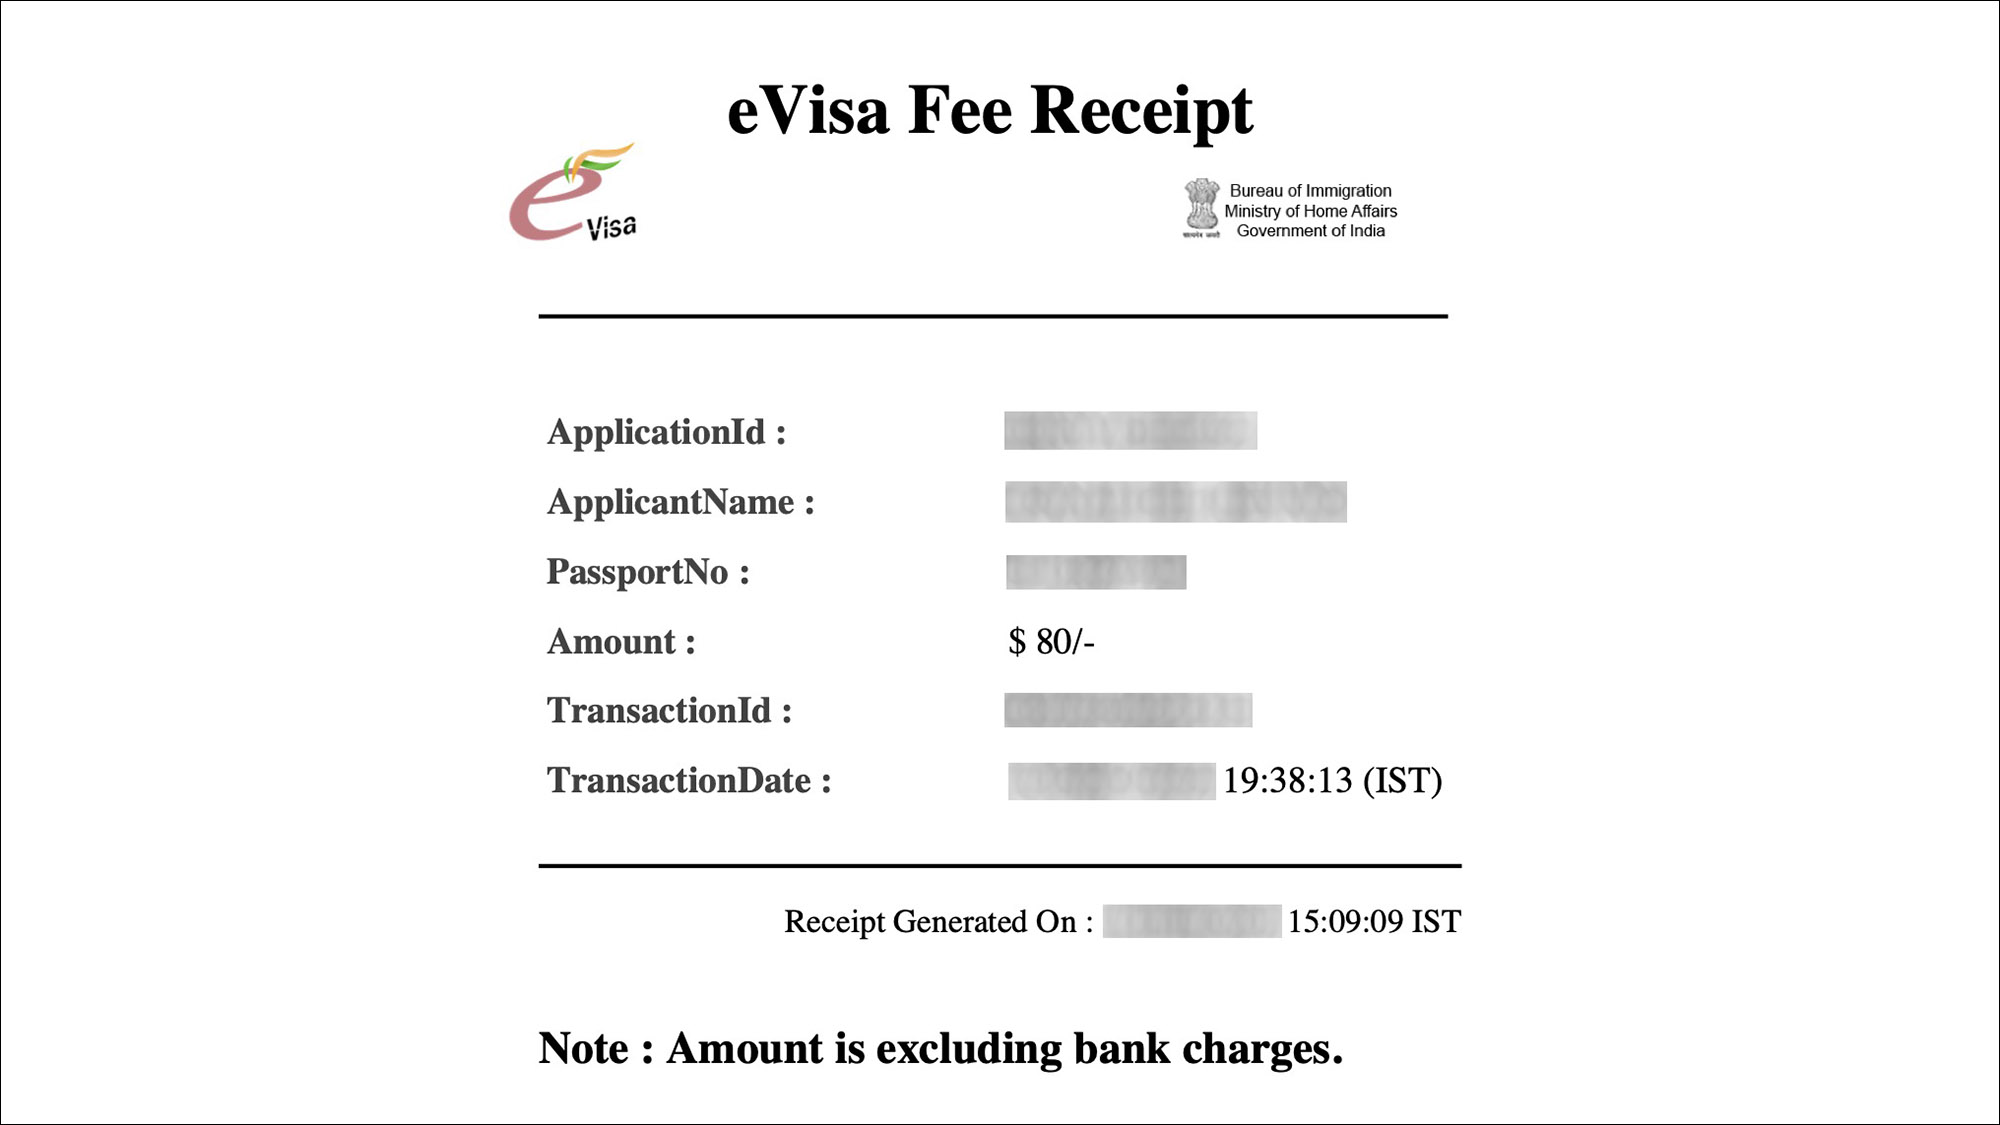
Click on the orange Generate Fee Receipt button to download a copy of the fee receipt.
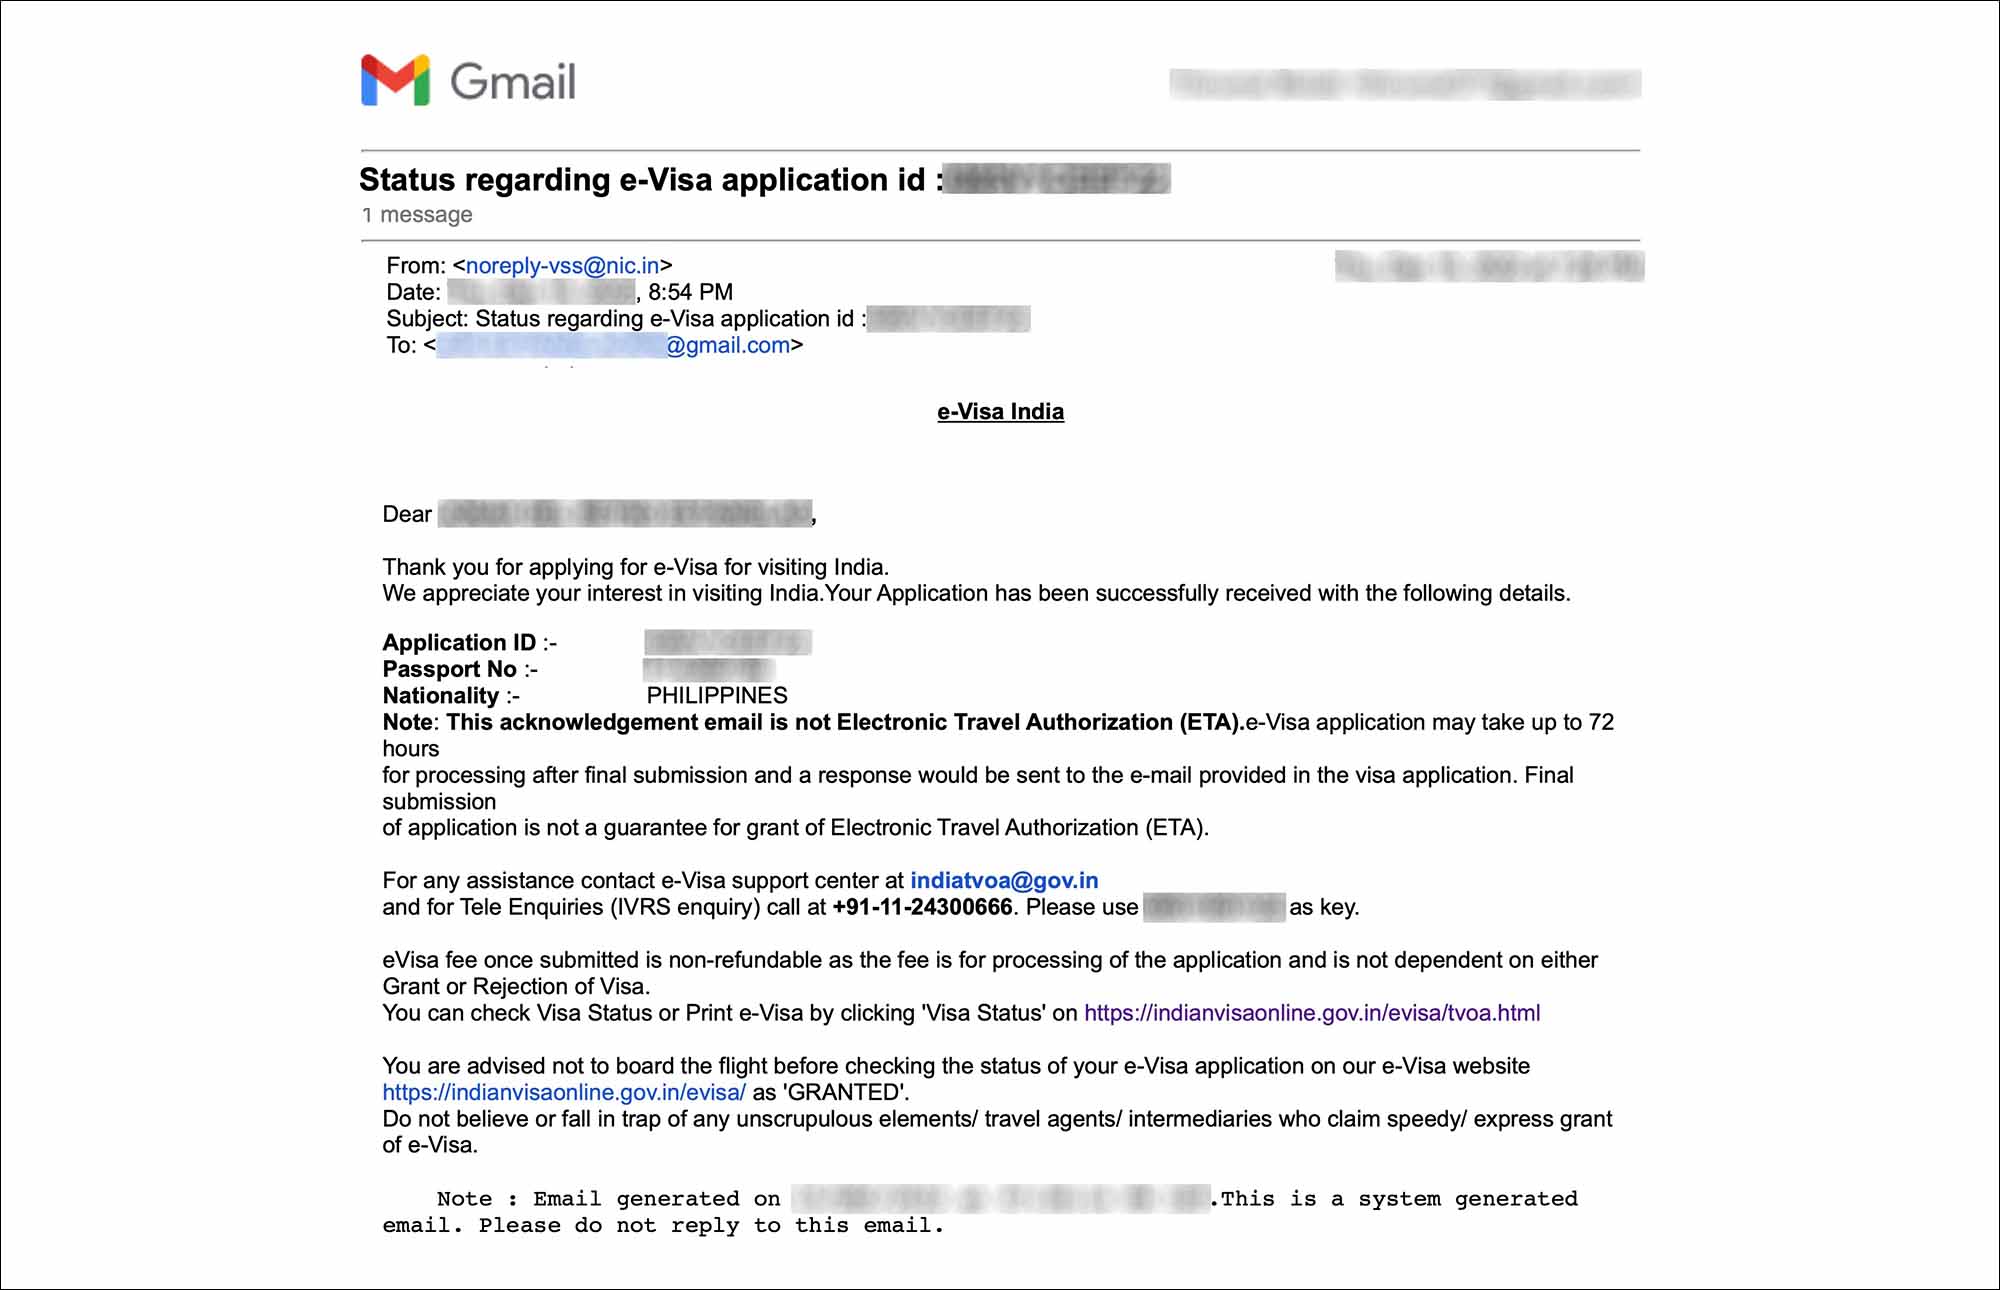
You will also receive an email that your application has been successfully submitted.
India e-Visa payment failed
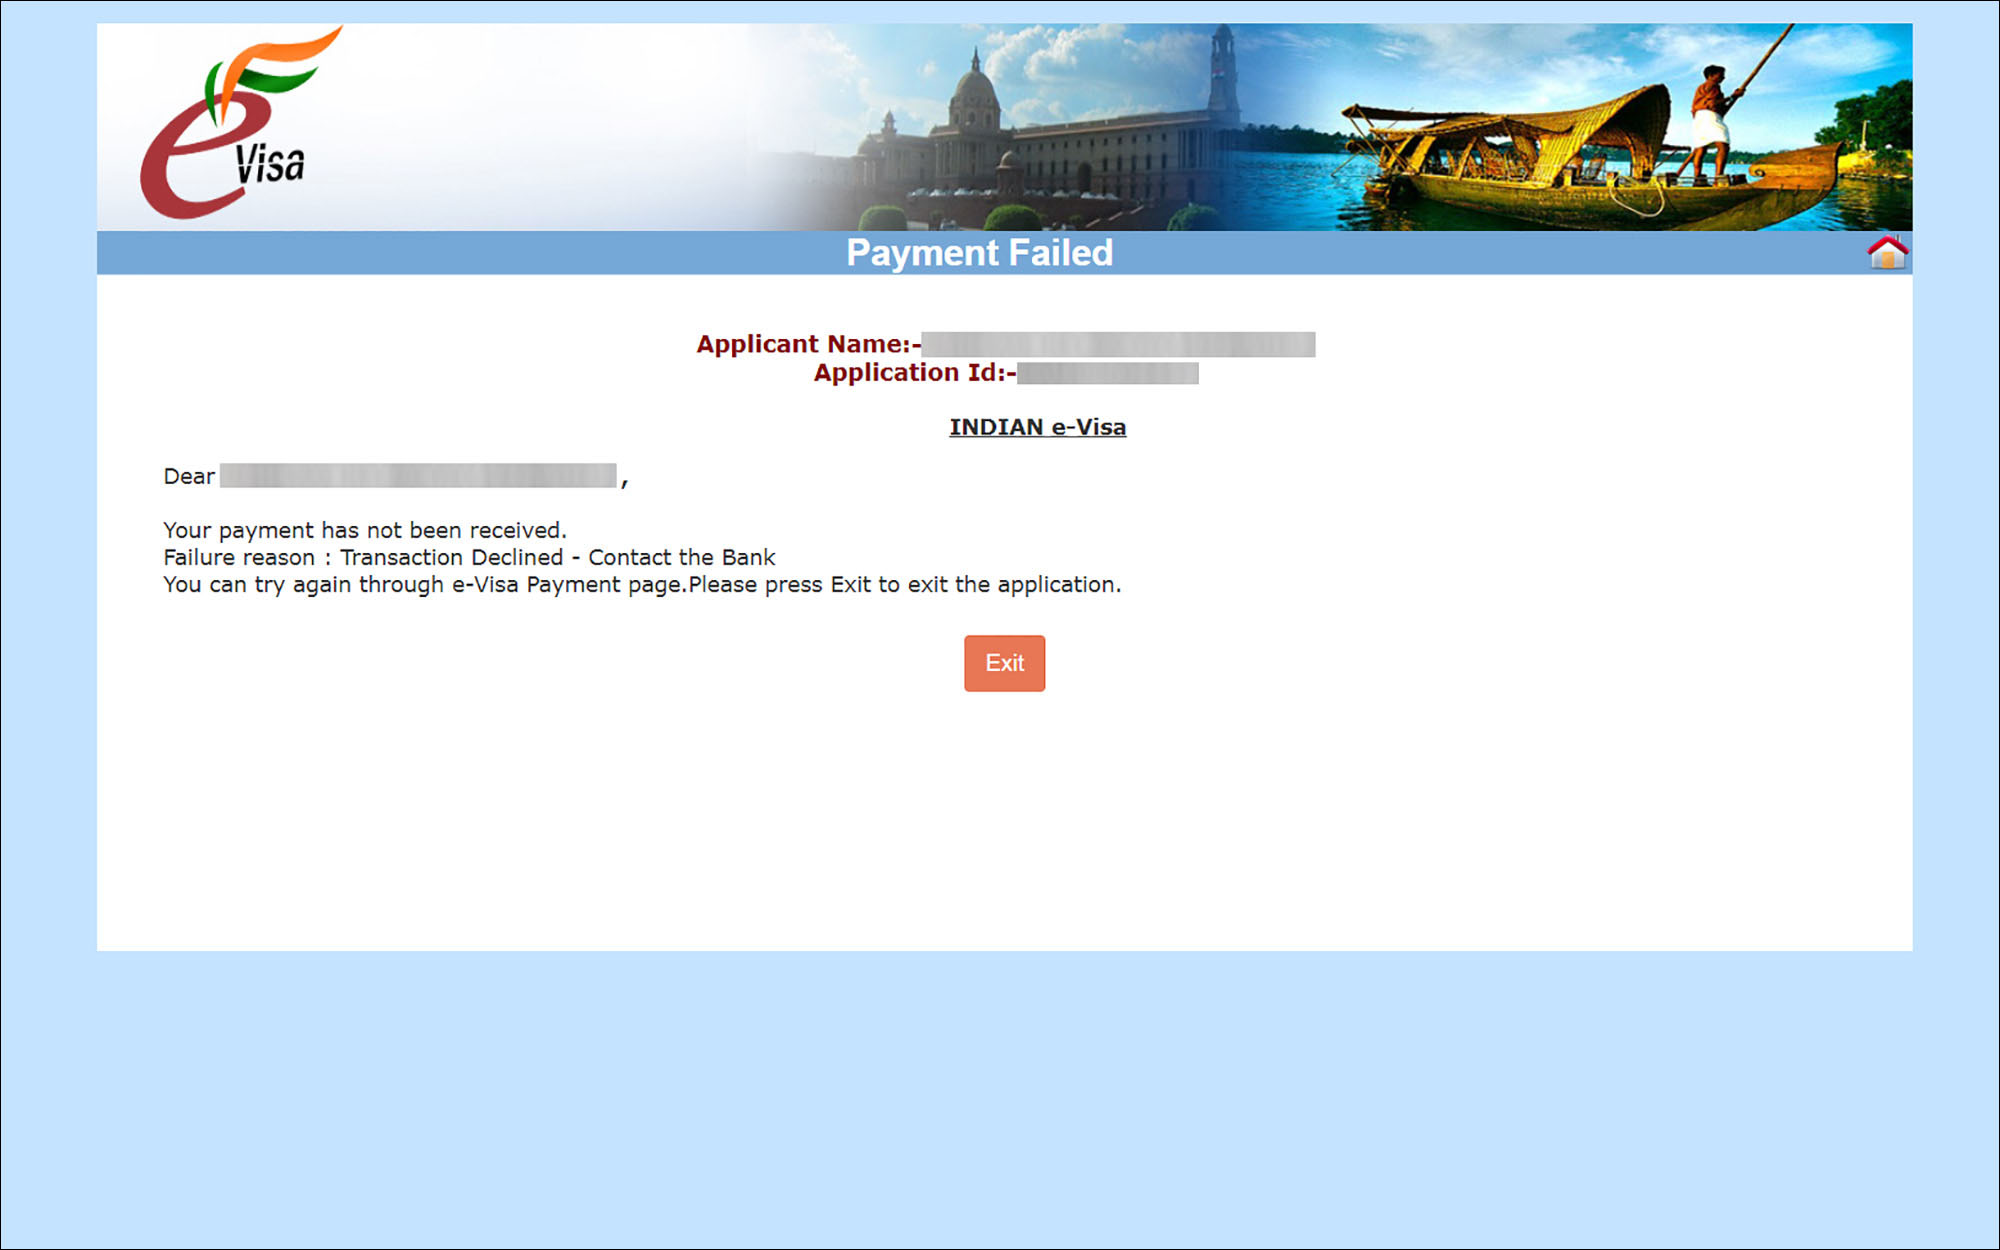
If your payment is failed, you will be taken to the Payment Failed page.
On this page, the reason for the payment failure, such as the card declined, etc. is displayed. You cannot retry the payment from this page. To retry the payment, follow the below steps.
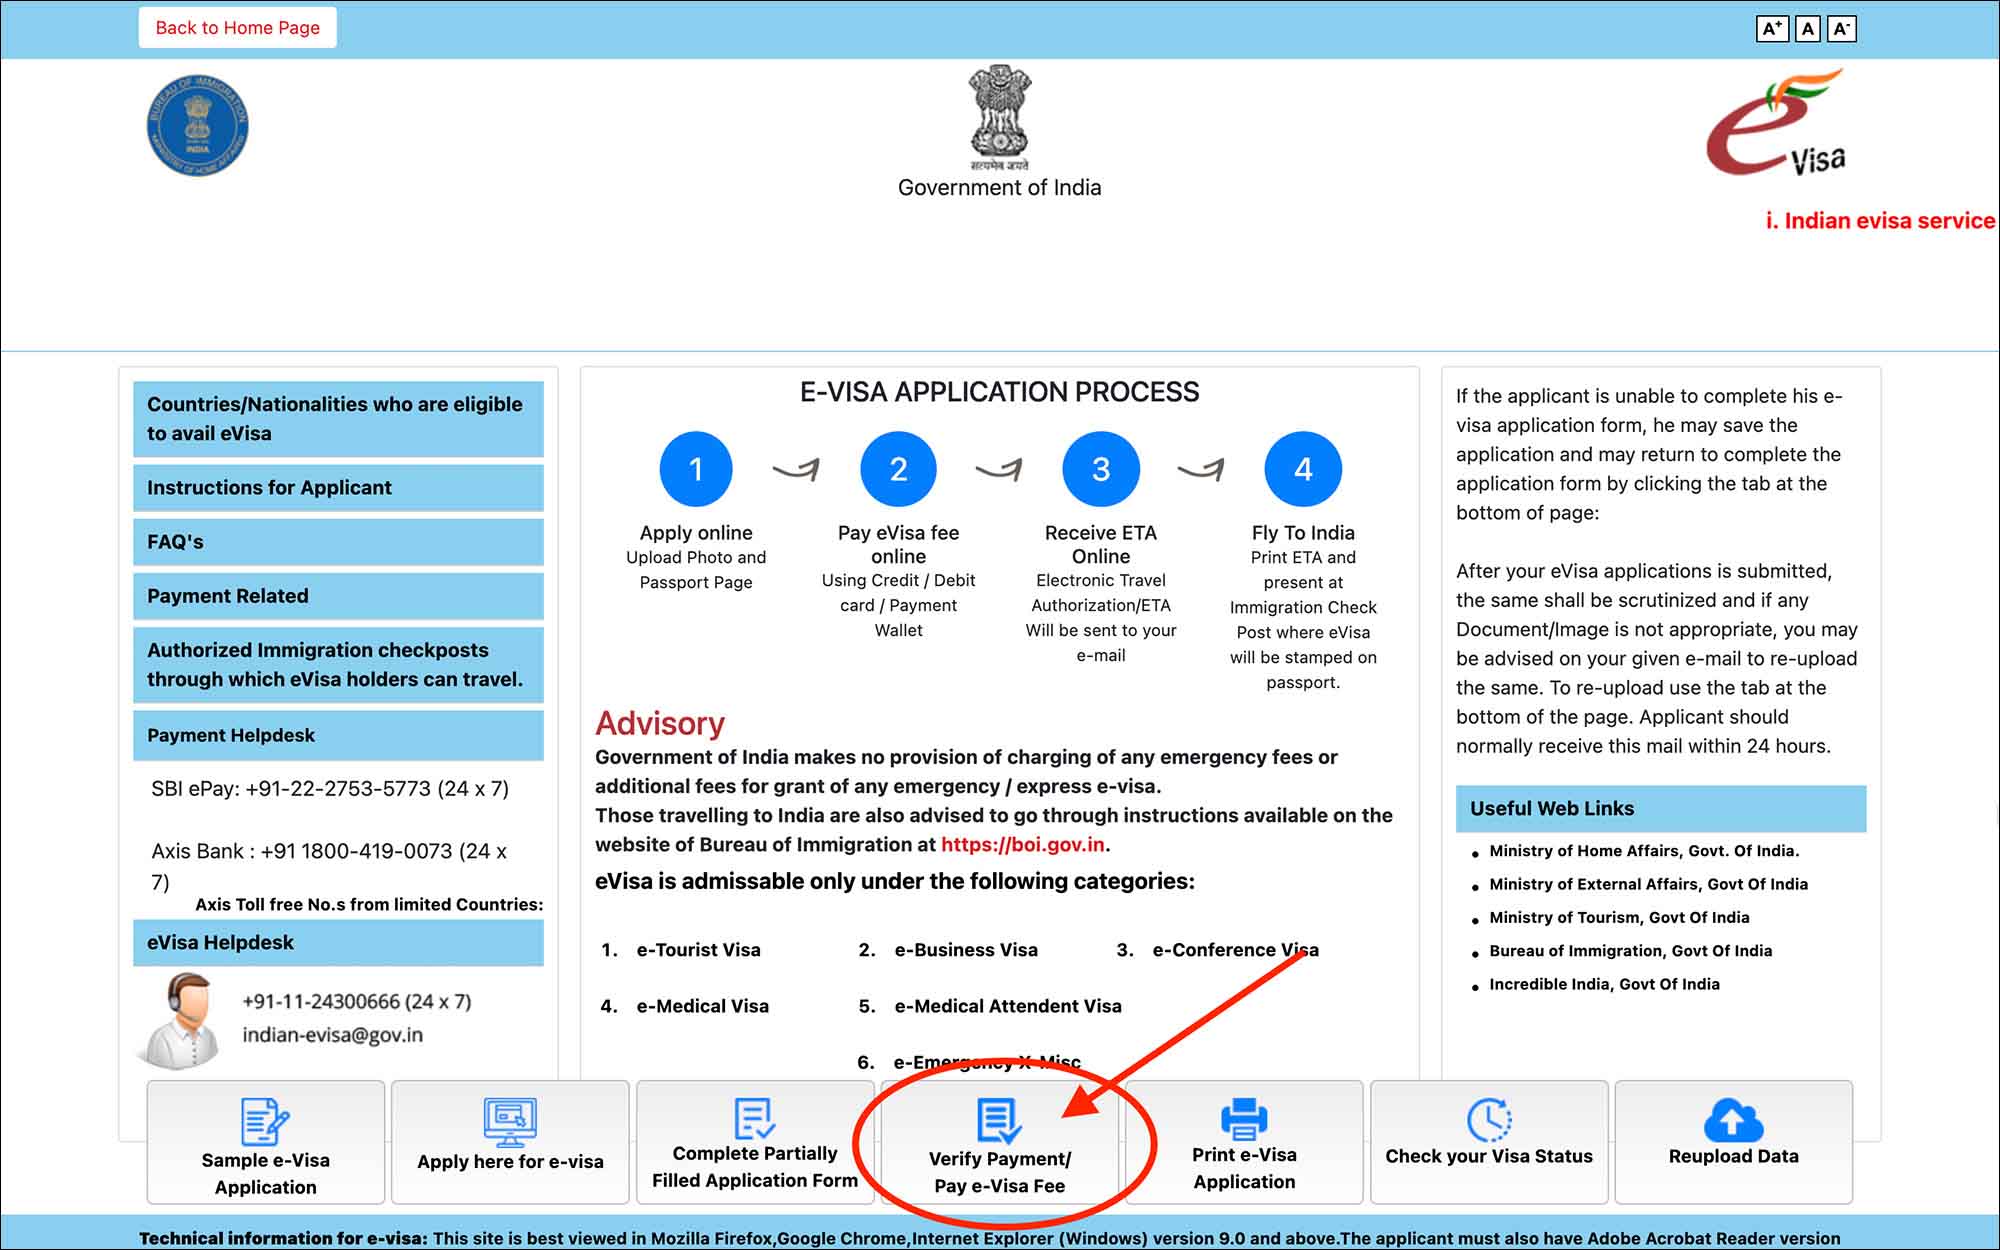
- Go to India e-Visa Portal
- Click on the Verify Payment/Pay e-Visa Fee button
You will be taken to the Pay Visa Processing Fee page.
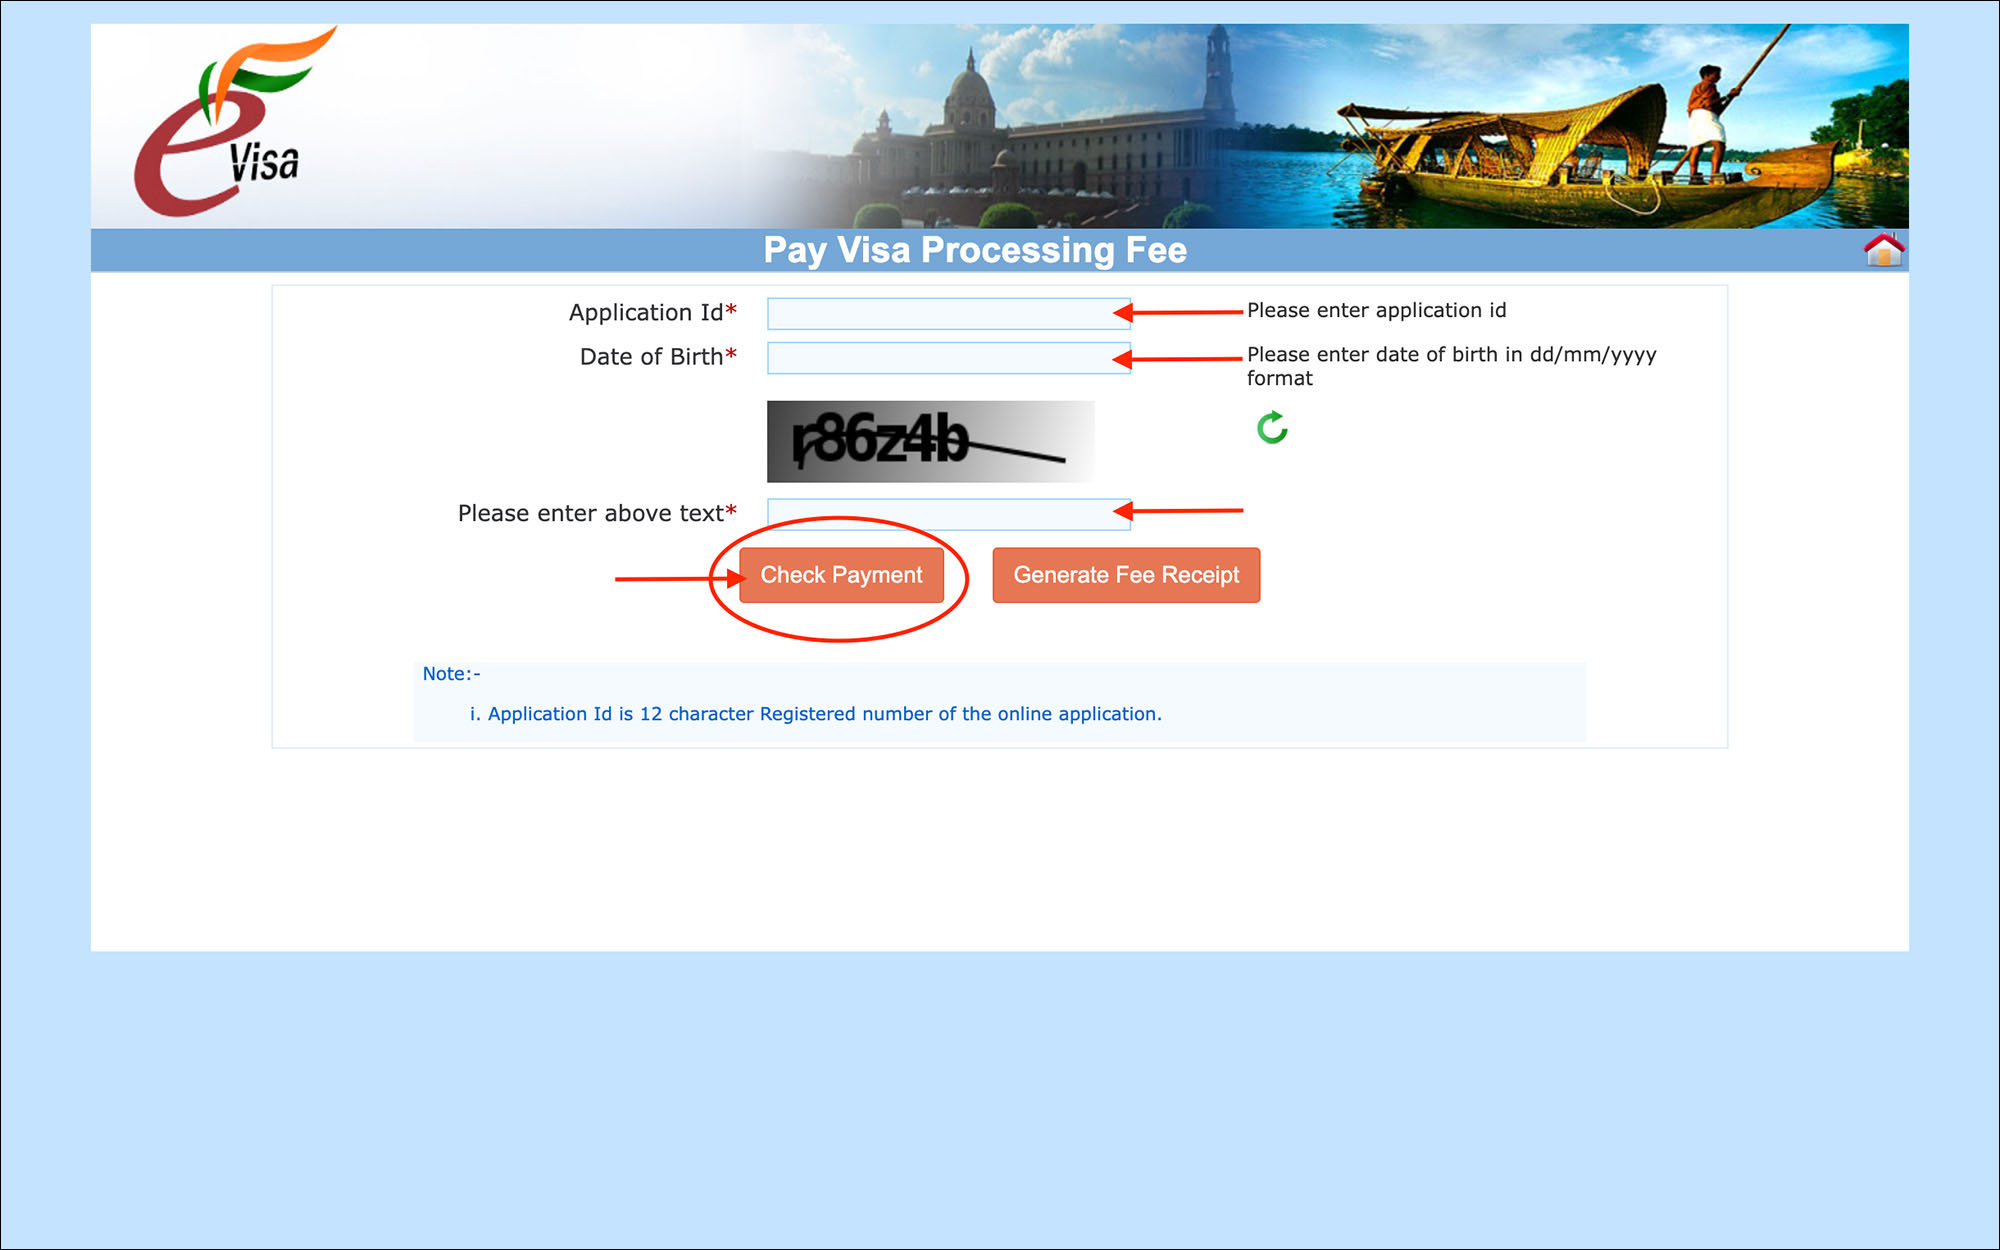
On the Pay Visa Processing Fee page, enter the following details.
- Application Id [Comment: Enter your saved 12-digit application Id. If you don’t remember, check your email]
- Date of Birth [Comment: Enter your date of birth as it appears in your passport]
- Please enter above text [Comment: Enter the captcha]
Click on the orange Check Payment button.
You will be taken to the Payment Report page.
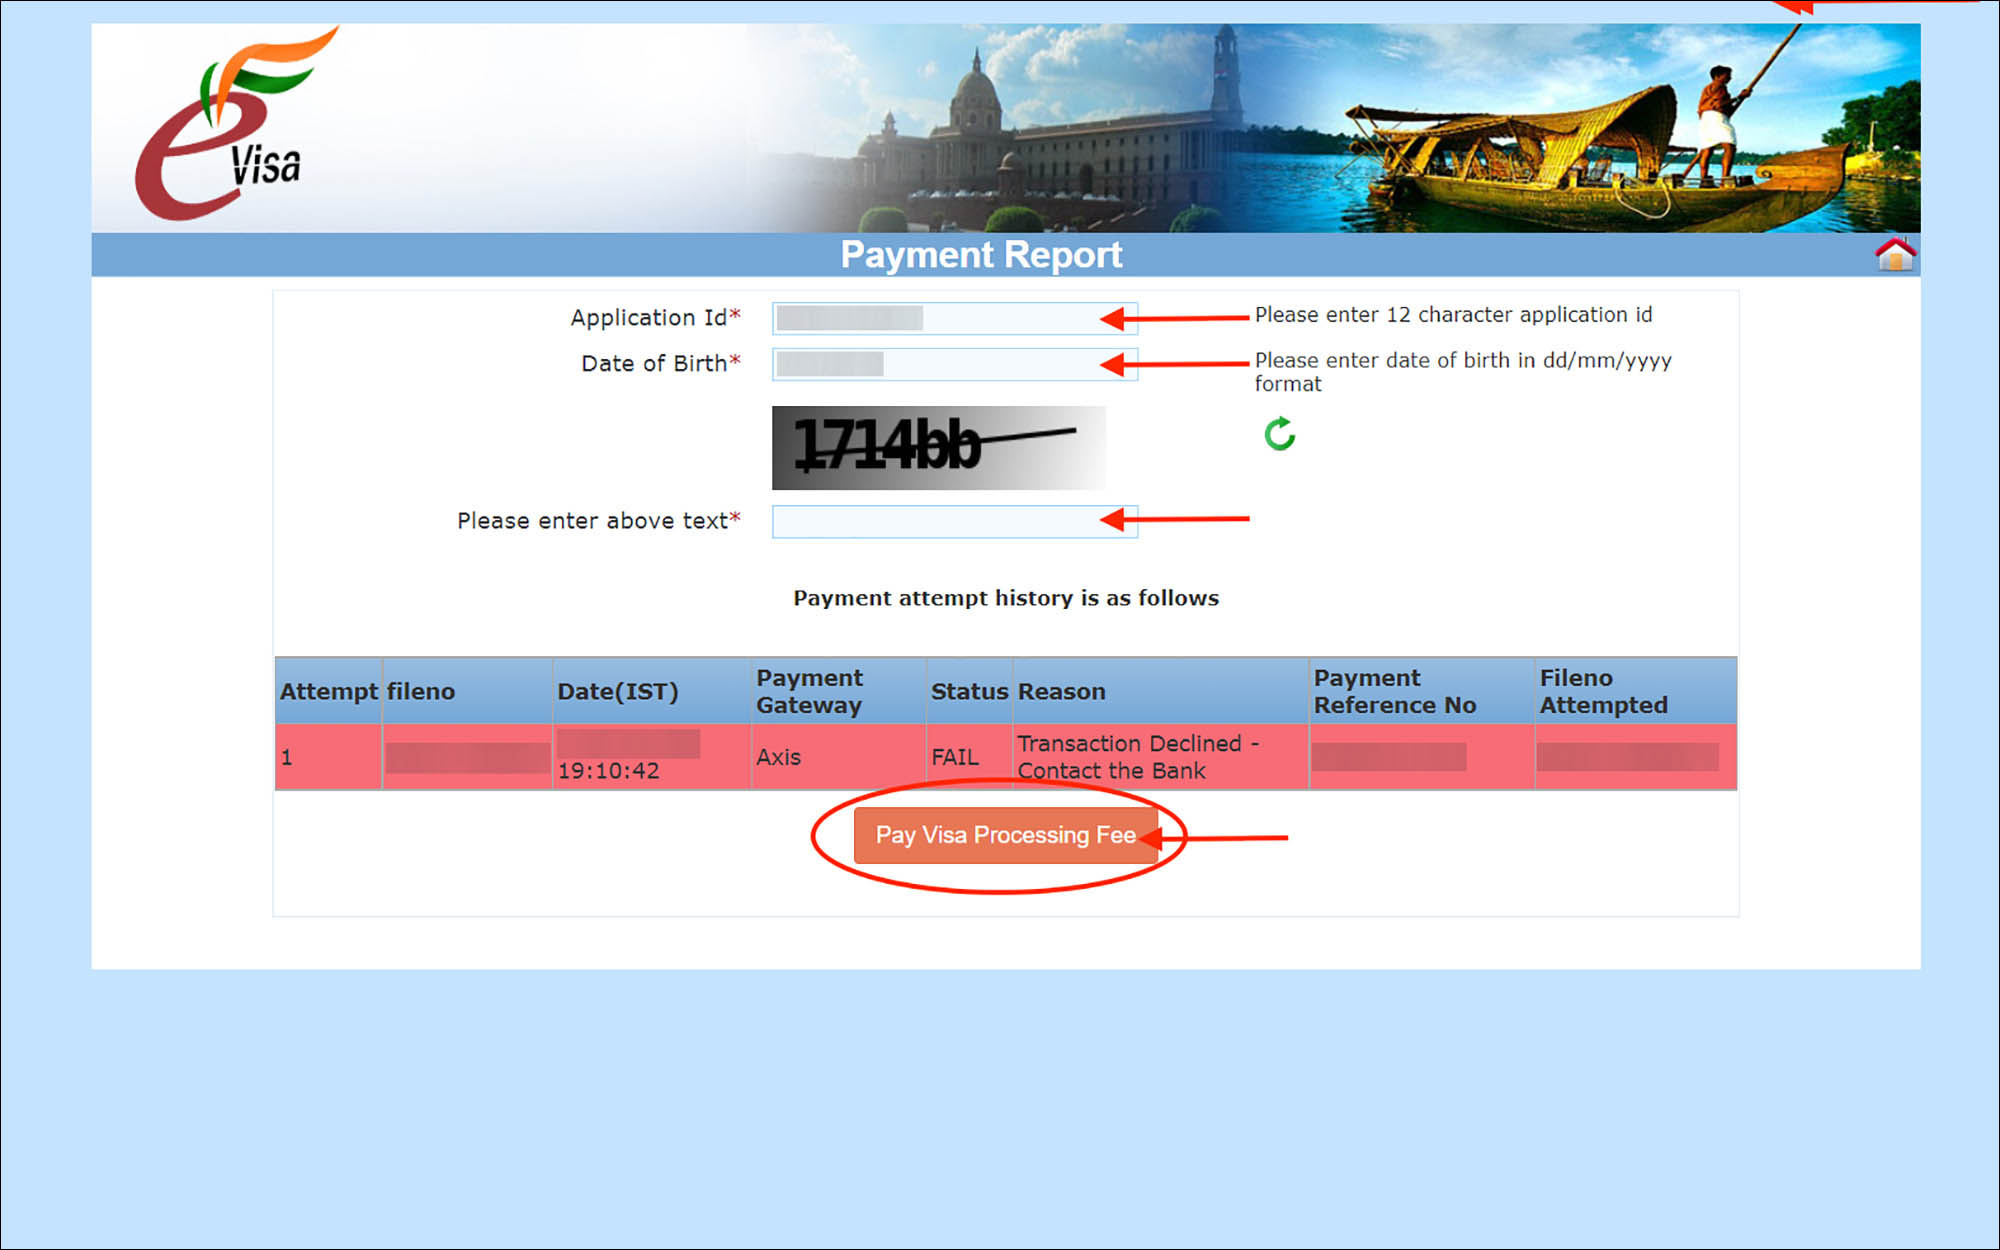
On the Payment Report page, you will see your last failed payment attempt and the reason for the failure.
Click on the orange Pay Visa Processing Fee button.
You will be taken back to the Online VISA Fee Payment page. From here simply follow the steps outlined in “10. Online VISA Fee Payment” above to try the payment again.
***
Check your India e-Visa application status
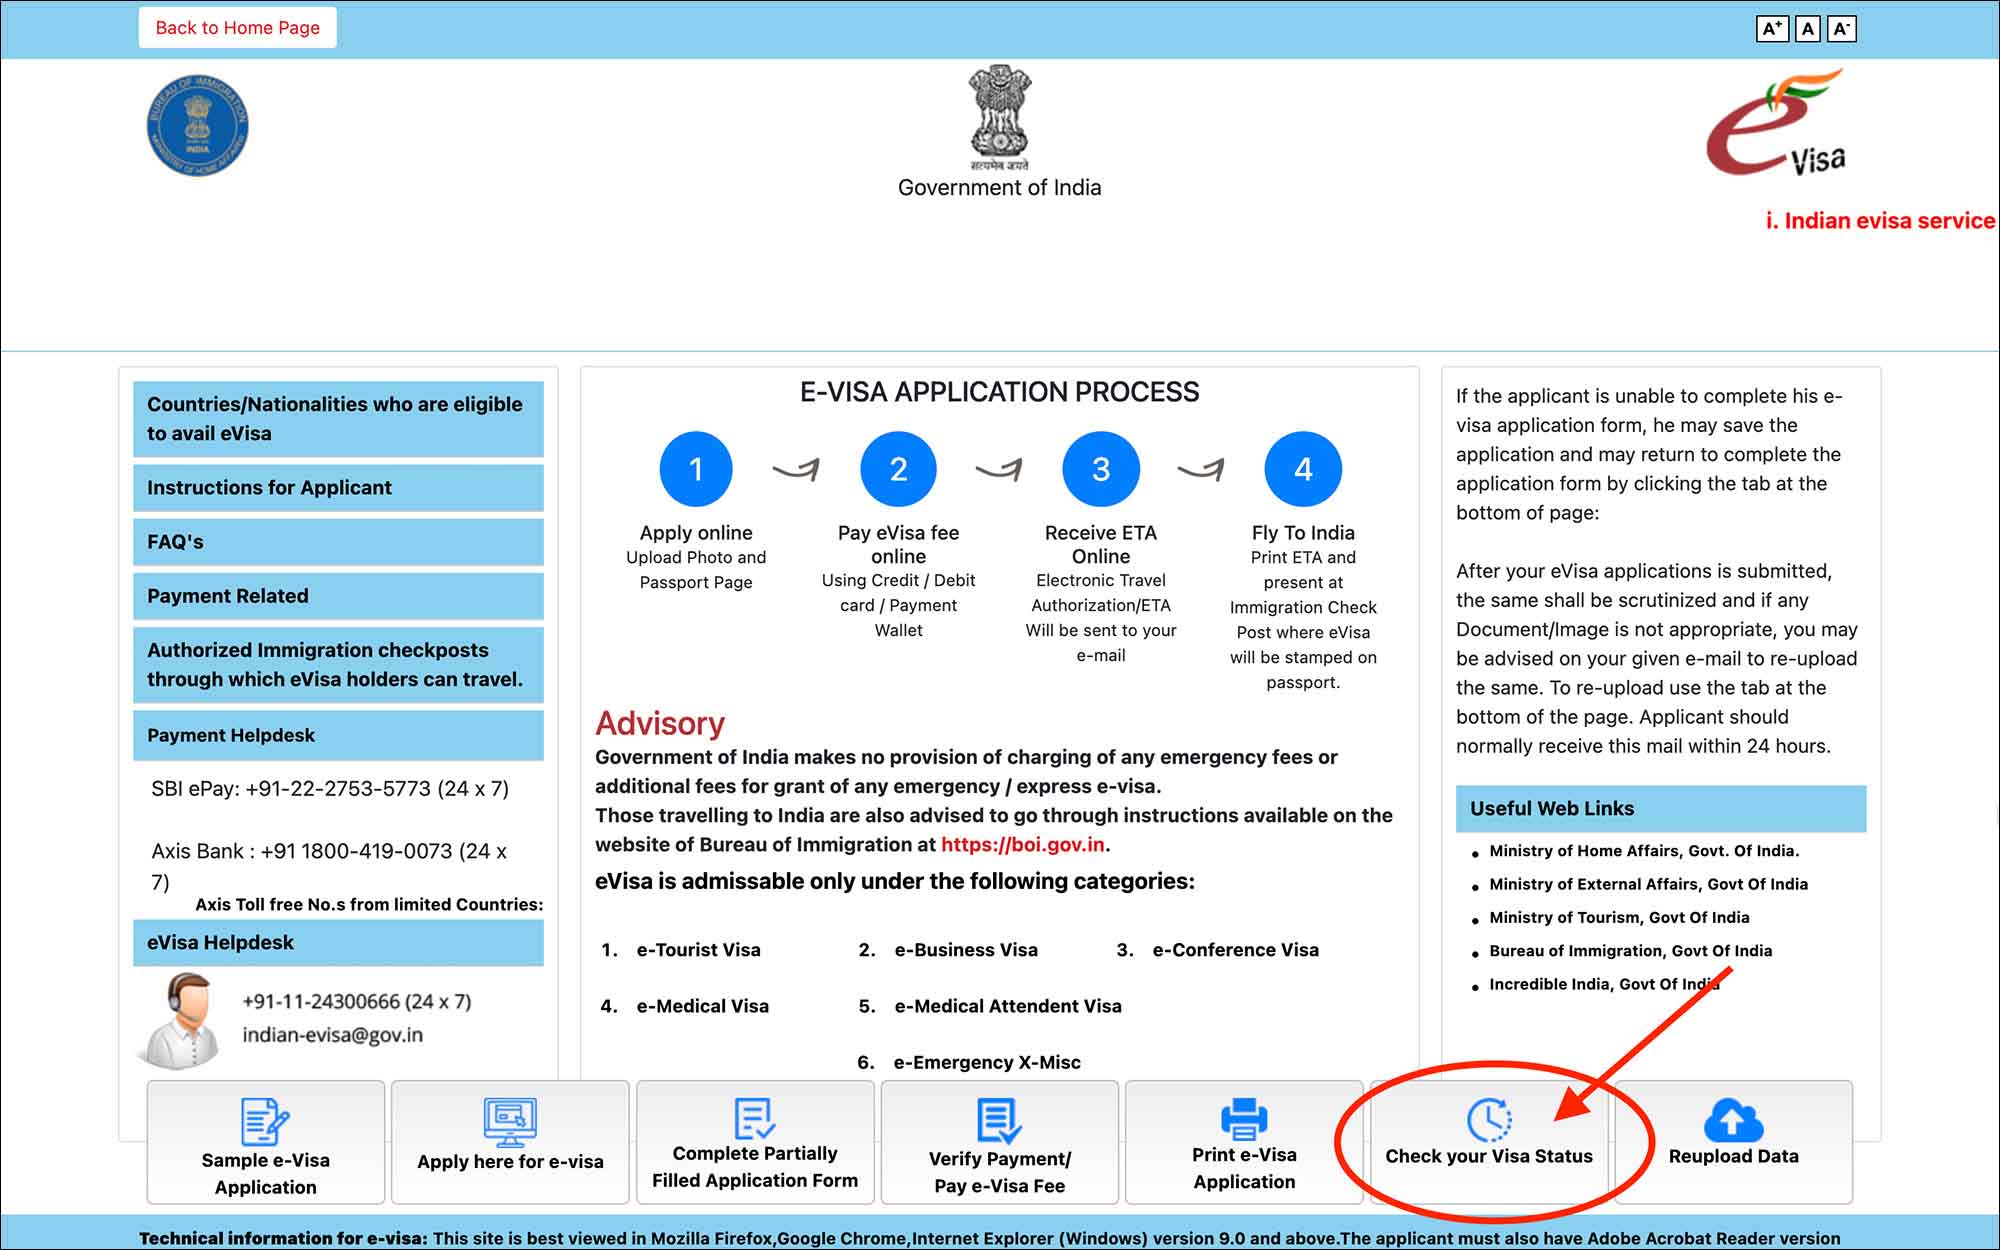
To check the status of your India e-Visa process, follow the below steps.
- Go to India e-Visa Portal
- Click on the Check your Visa Status button
You will be taken to the Visa Status Enquiry page.
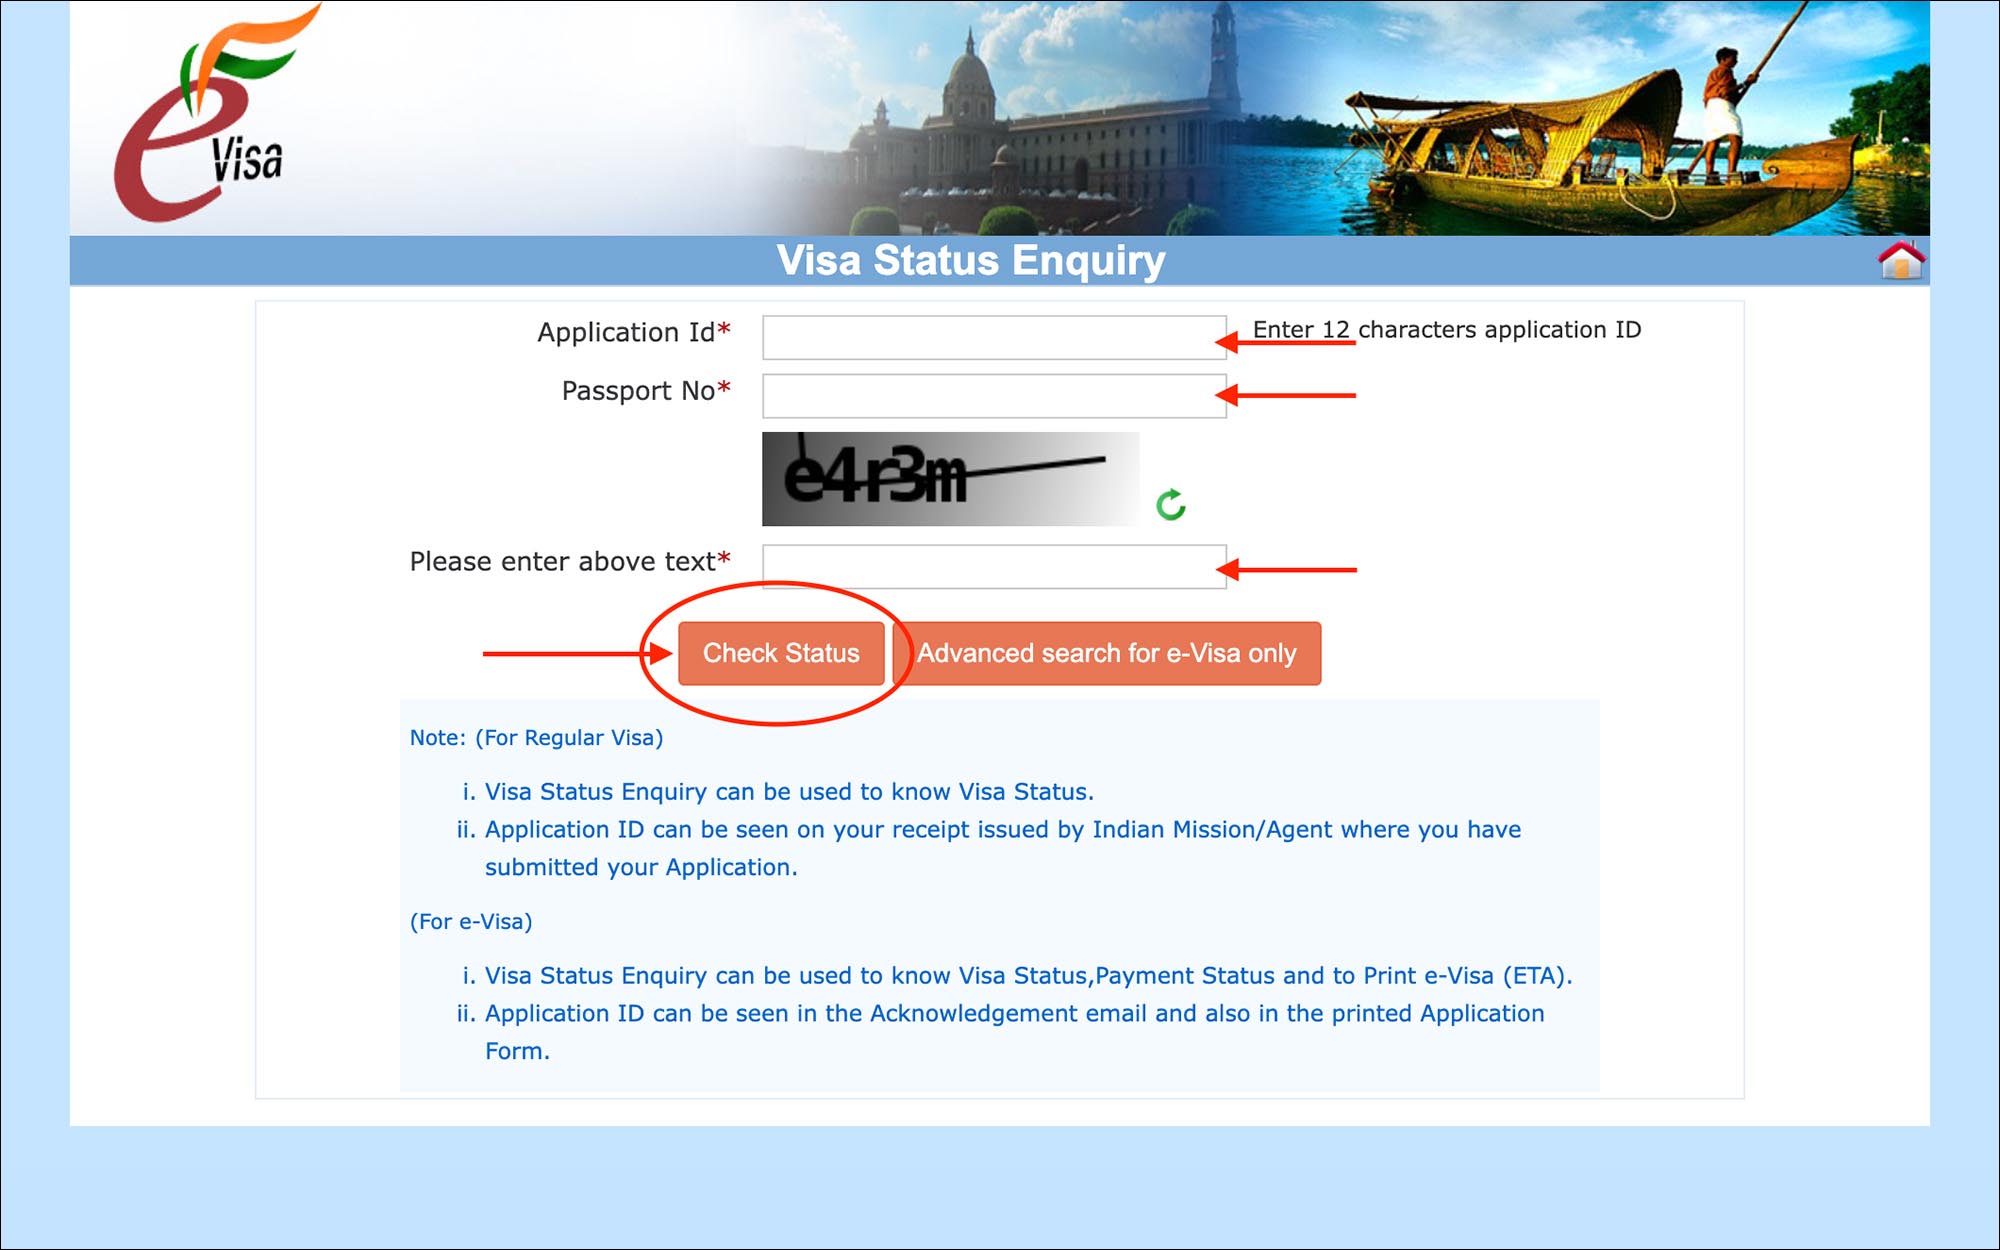
Enter the following on the Visa Status Enquiry page.
- Application Id [Comment: Enter your saved 12-digit application Id. If you don’t remember, check your email]
- Passport No. [Comment: Enter your passport number]
- Please enter above text [Comment: Enter the captcha]
Click on the orange Check Status button.
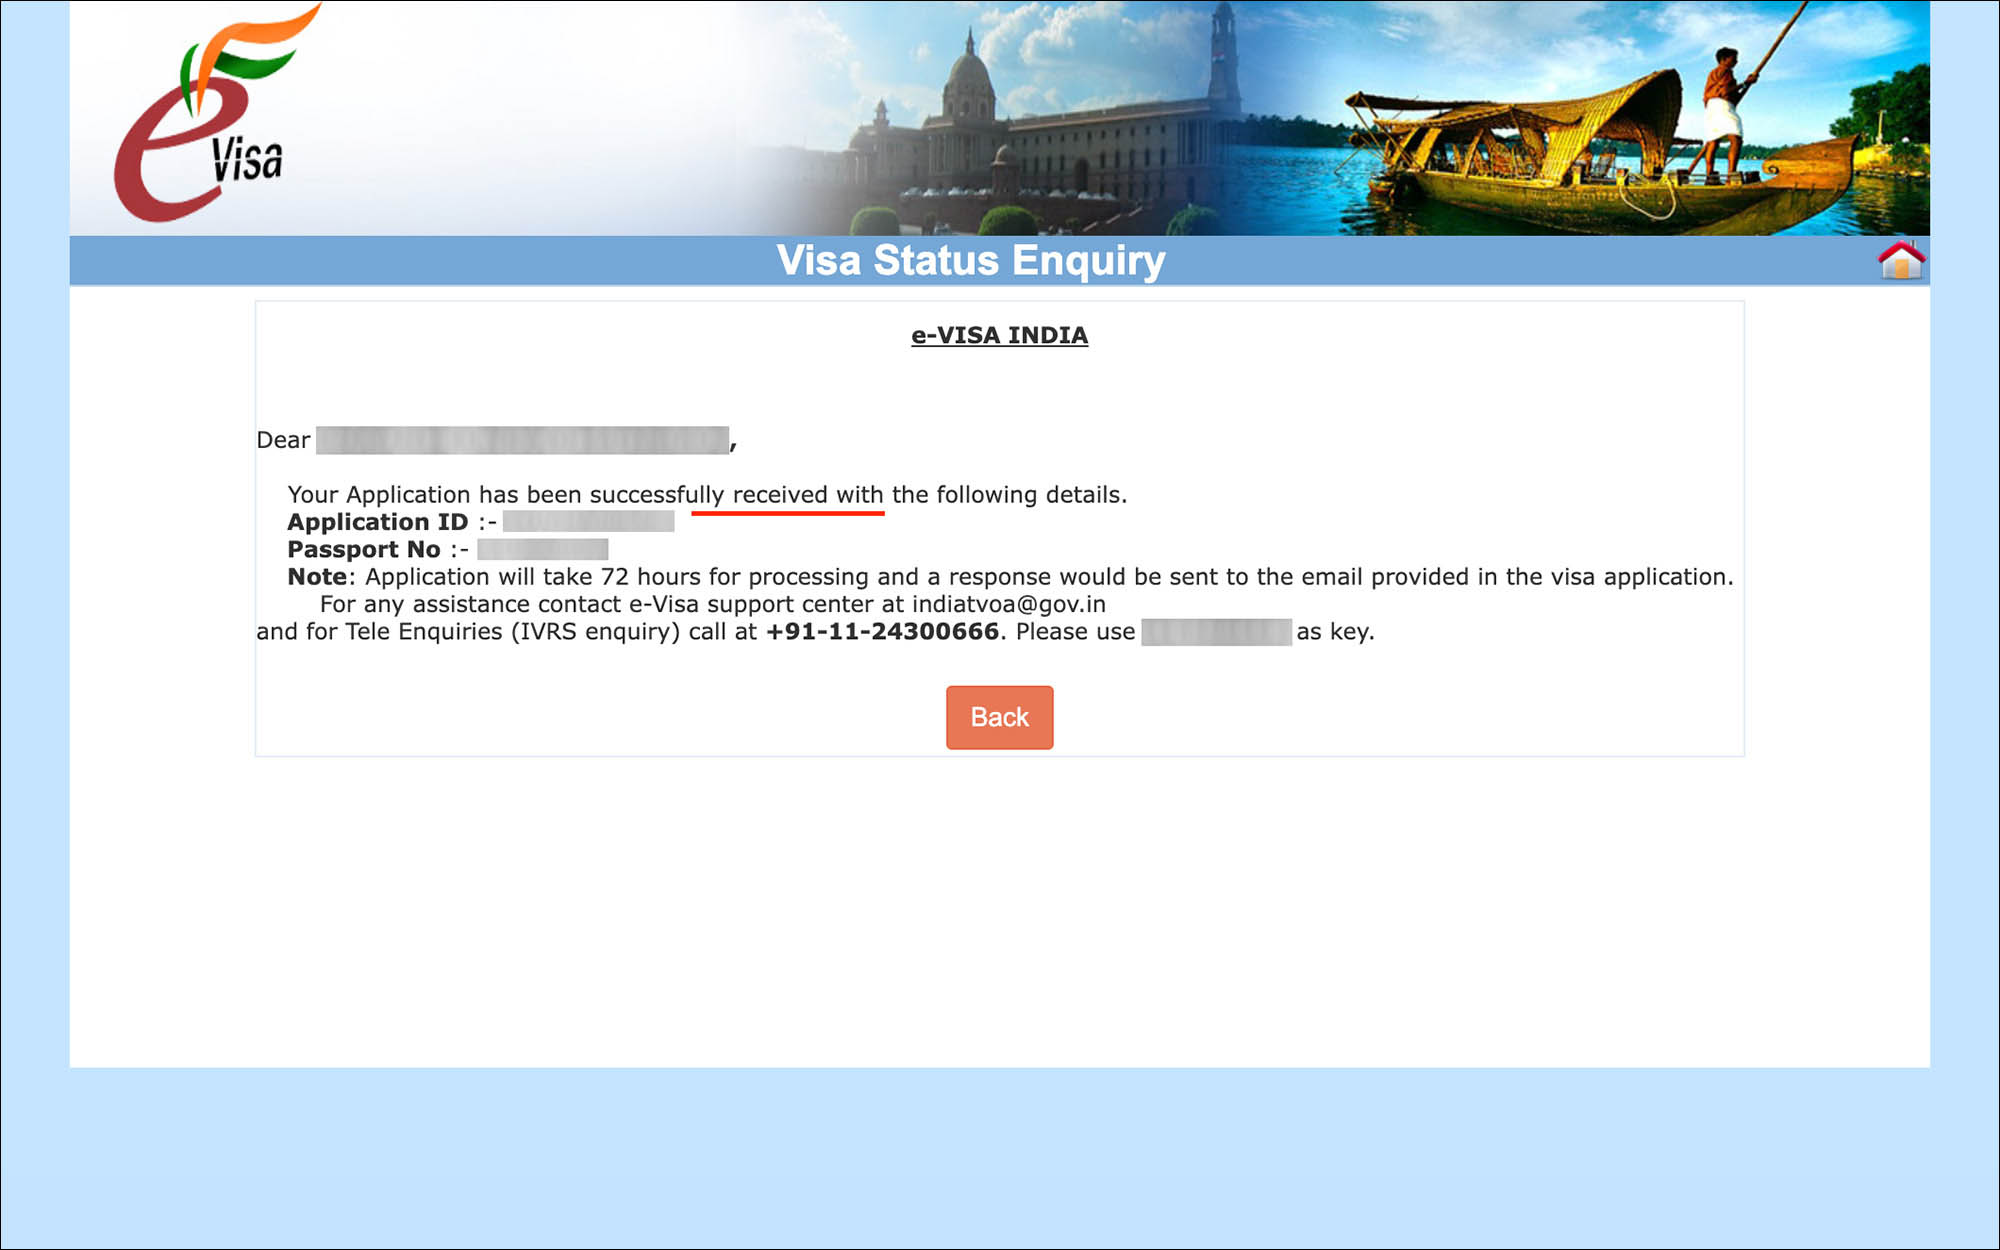
On the next page, your visa status will be displayed.
If the application status says “successfully received”, then your application is still in process. If the application status says granted, then your e-Visa is approved.
***
Receive your approved India e-Visa

When your Indian e-Visa is approved, you will receive an email notifying you that your e-Visa has been granted.
You can use this email as proof of your e-Visa approval or you can download your approved e-Visa from the India e-Visa Portal.
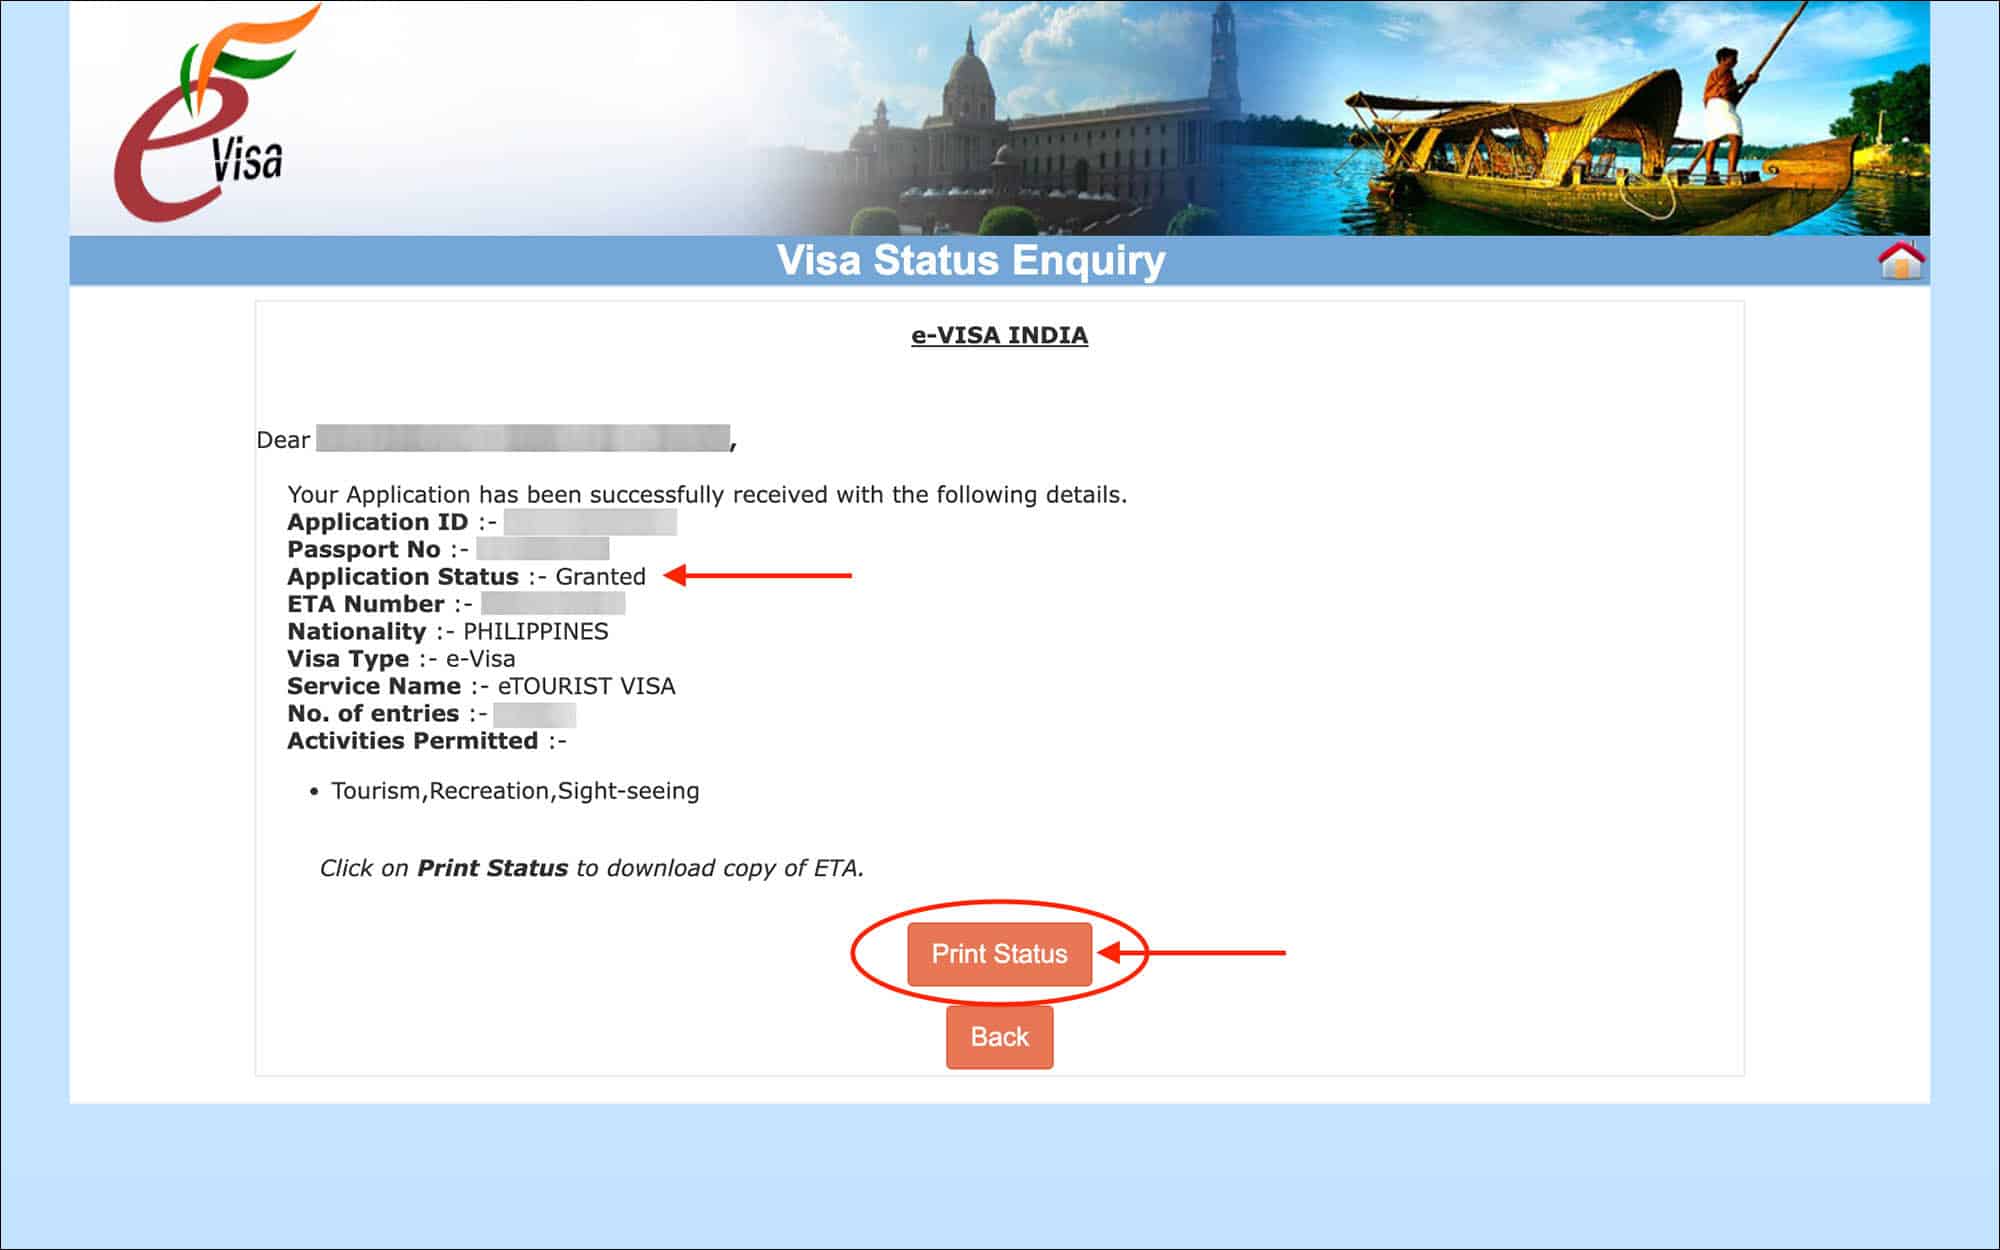
To download your approved e-Visa, first follow the steps to check the visa status as outlined above in “Check your India e-Visa application status“.
On the Visa Status Enquiry page, you will see that your application status is now “Granted”.
Click on the orange Print Status button to download your approved e-Visa.
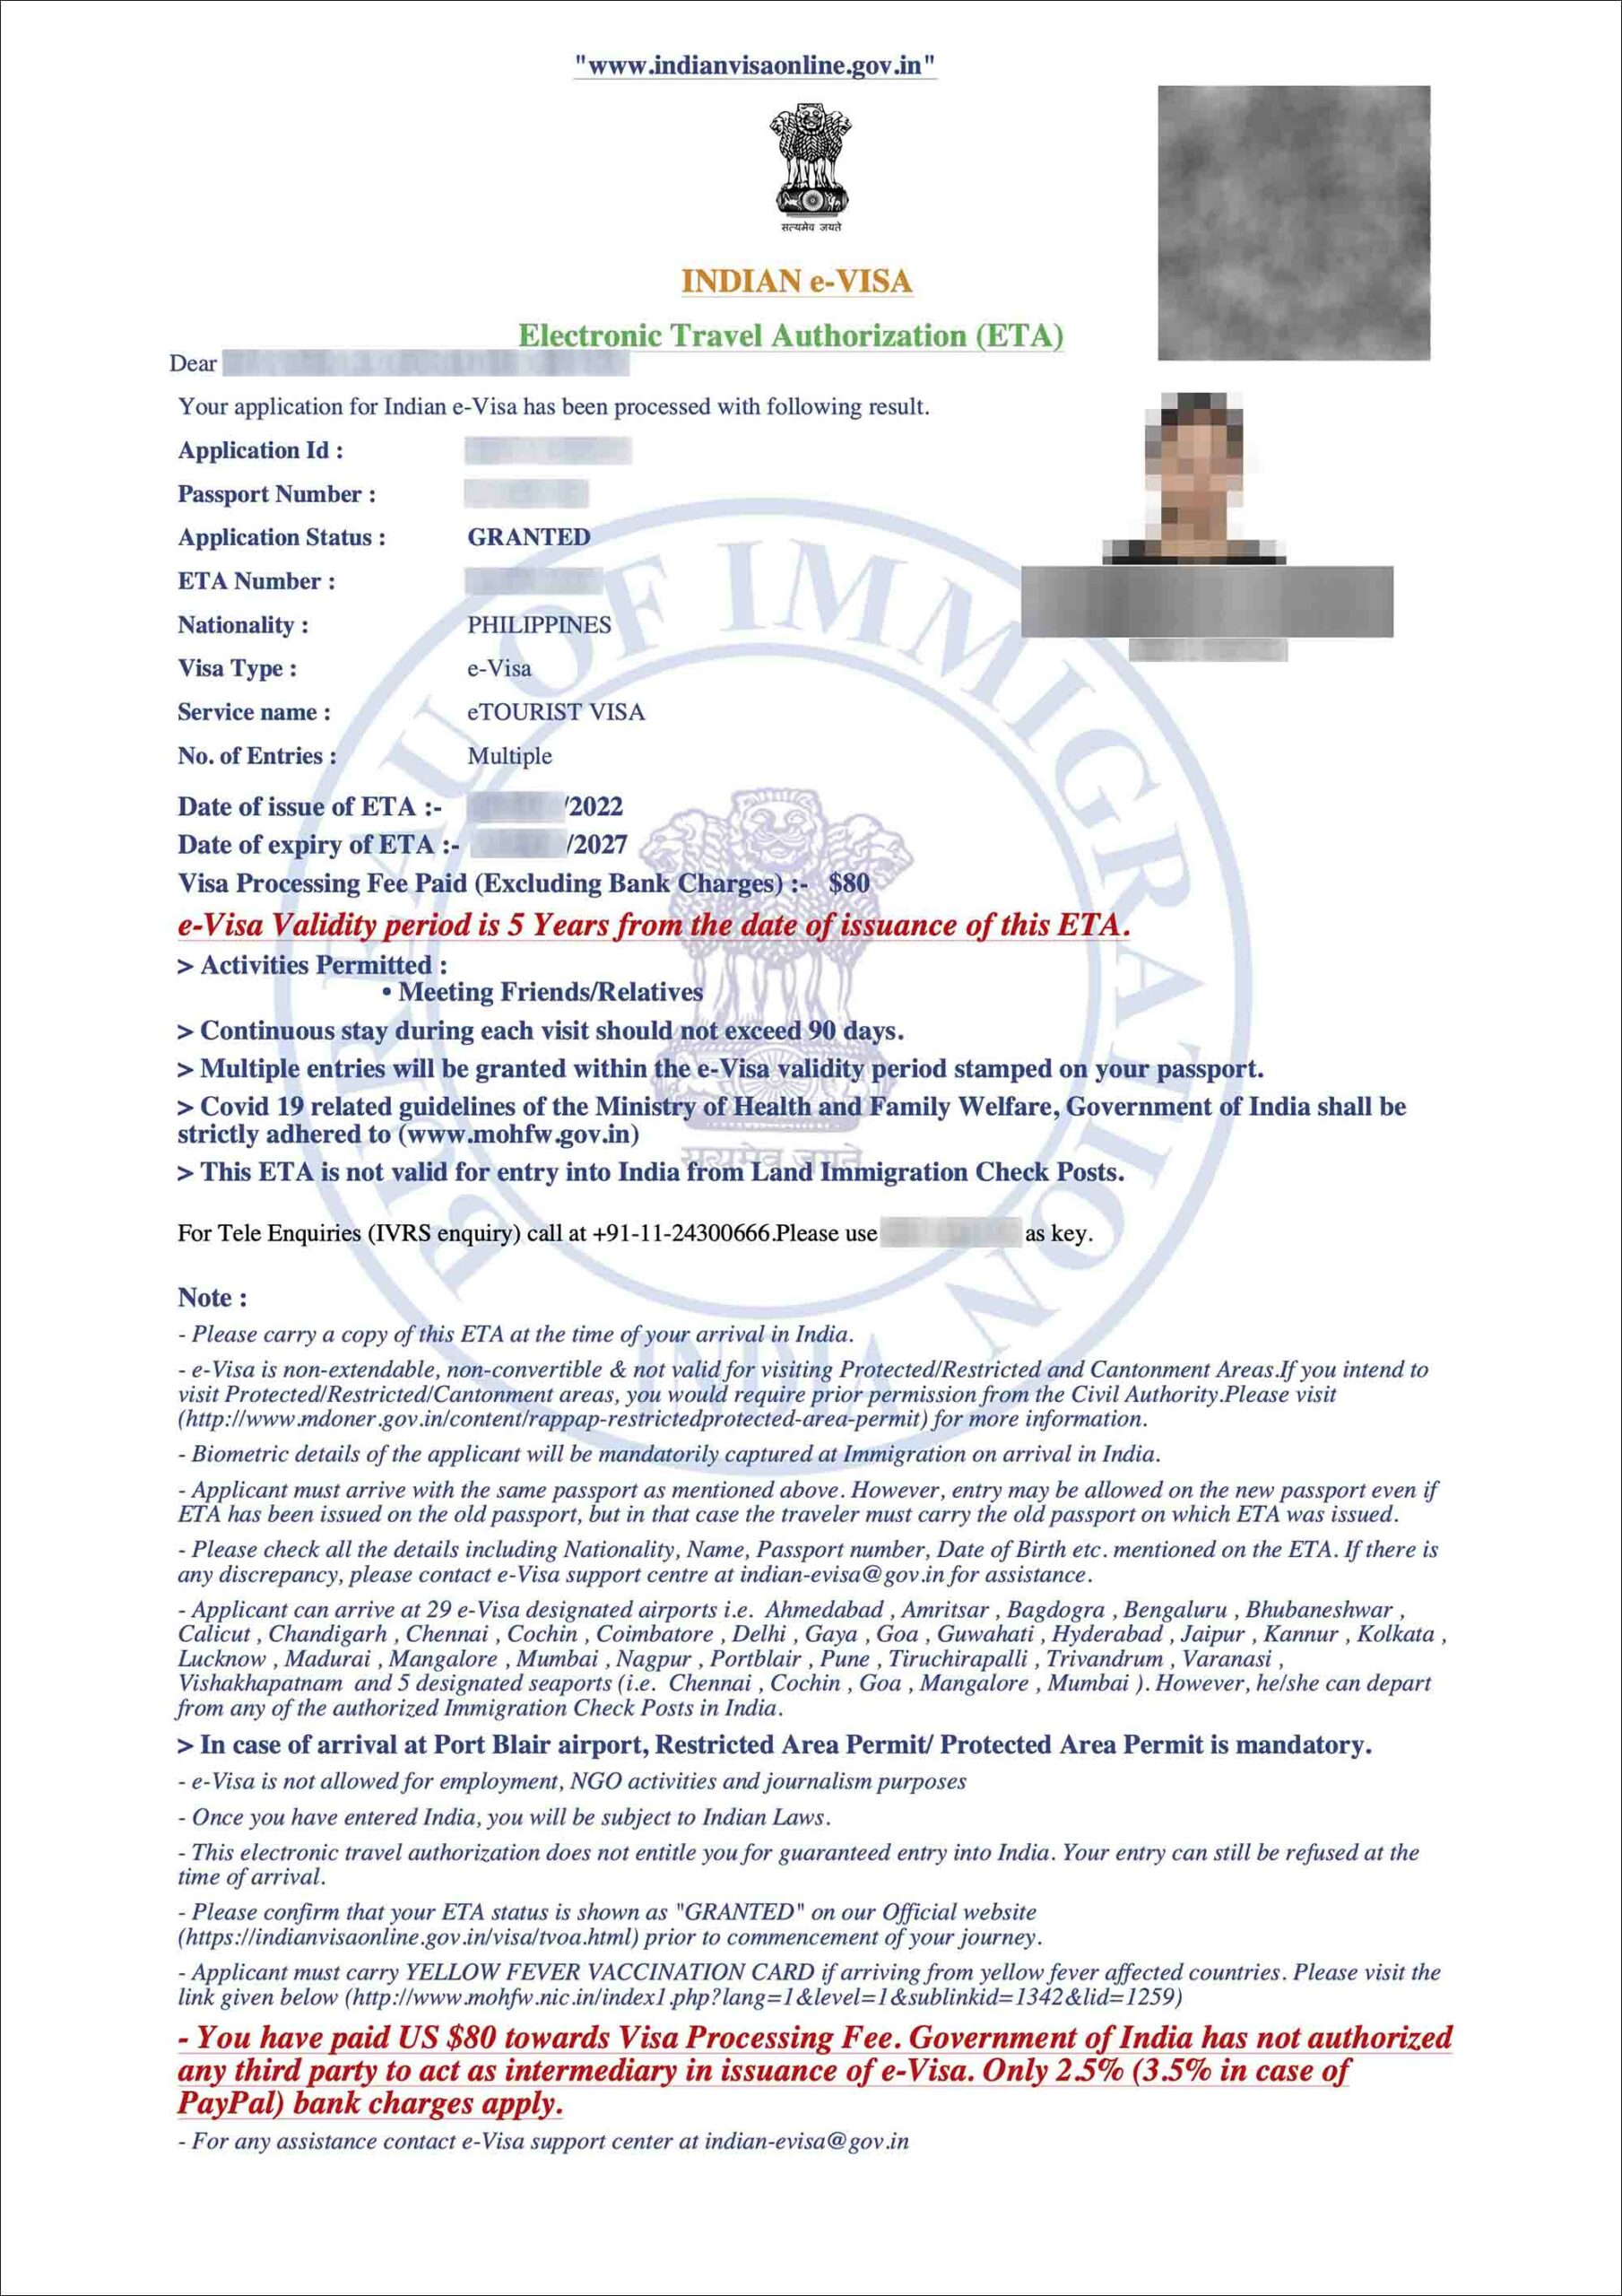
Print and carry your approved India e-Visa PDF when you travel. Or download it as a PDF on your phone and present it to the airline staff or India immigration officer on your arrival.

 India tourist visa from the embassy in 2023: A complete guide
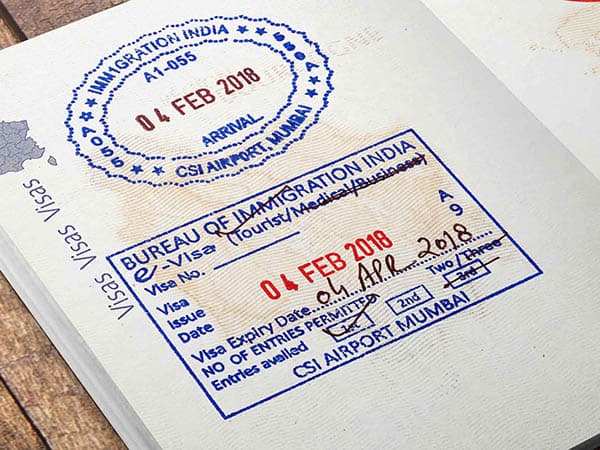 India Visa on Arrival for Tourists in 2023: A complete guide
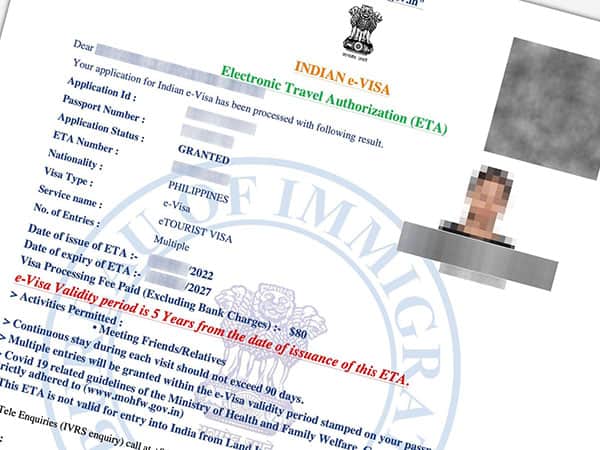 India e-Visa for tourists in 2023: Requirements, eligibility and more